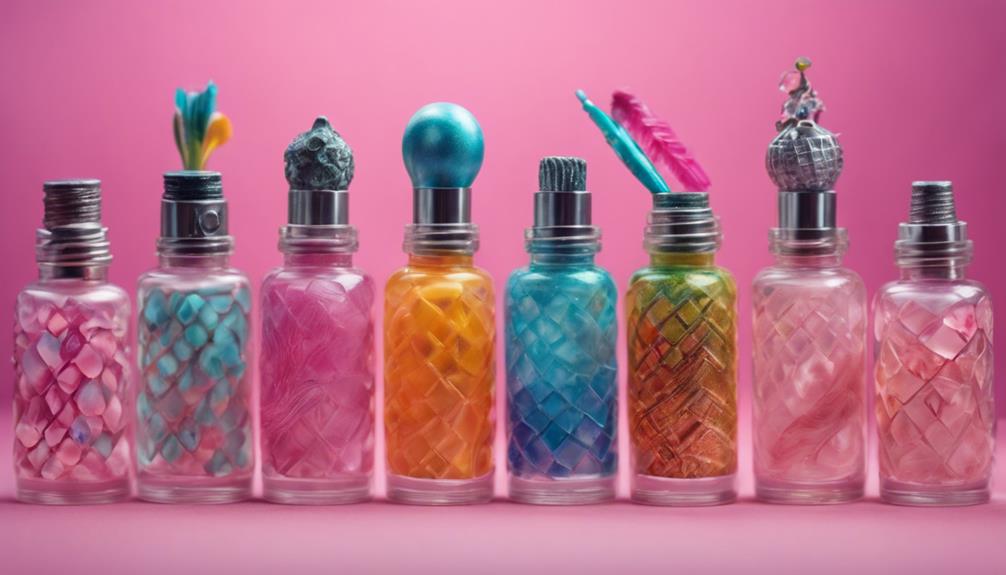

Immerse yourself in the allure of mermaid nail designs with ten mesmerizing styles. Immerse yourself in the Pastel Gradient Mermaid Nails blending soft shades for a dreamy finish. Immerse yourself in the Shimmering Ocean Glitter Nails, featuring a dazzling glitter gradient and seashell accents for whimsical charm. Explore Delicate Wave and Bubble Designs capturing the essence of the ocean with glitter accents for a serene look. Discover 3D Shell Line and Pearl Accents for a textured finish with intricate details. Immerse yourself in Enchanting Bling Mermaid Nails with sparkling sea shell accents and delicate pearl accents for elegance. Each design offers a unique underwater paradise waiting to be explored further.
Key Takeaways
- Blend pastel pink, purple, and blue for dreamy gradients.
- Incorporate shimmering glitter and seashell accents.
- Create wave and bubble designs with glitter for a serene look.
- Enhance nails with 3D shell lines and pearl accents.
- Add sparkling sea shell and gemstone details for enchanting nails.
Pastel Gradient Mermaid Nails
Create a mesmerizing look with Pastel Gradient Mermaid Nails by blending soft shades of pink, purple, and blue for a dreamy base. This nail art technique involves seamlessly blending pastel hues to mimic the enchanting colors of a mermaid's tail.
To achieve this look, start by applying a light pink polish as the base color. Then, using a sponge or brush, gently dab on purple and blue shades, blending them together for a seamless gradient effect. This method creates a smooth shift between colors, giving your nails a magical underwater vibe.
To elevate the design, consider adding iridescent or holographic polish to mimic the shimmering scales of a mermaid. Additionally, incorporating glitter accents or rhinestones can enhance the overall look, adding a touch of sparkle and elegance.
Finish off your Pastel Gradient Mermaid Nails with a glossy top coat to seal in the colors and ensure a long-lasting, polished manicure that will leave you feeling like a mystical sea creature.
Shimmering Ocean Glitter Nails
To achieve shimmering ocean glitter nails, incorporate the glitter gradient technique for a dazzling effect that captures the essence of the sea.
Enhance the design with seashell nail accents to add a touch of whimsical charm and evoke the underwater world of mermaids.
Experiment with different textures and shades to create a mesmerizing nail art look that sparkles like the ocean waves.
Glitter Gradient Technique
For a stunning shimmering ocean-inspired nail look, begin by applying a light blue polish as the base coat for the glitter gradient.
To achieve this enchanting effect, use a sponge to dab a chunky glitter polish from the tips of the nails towards the middle, creating a sparkling transformation.
Adding a layer of finer glitter polish over the chunky glitter will enhance depth and dimension in the gradient. It's essential to blend the two glitter polishes seamlessly to achieve a mesmerizing ocean-inspired look that mimics the glistening waves.
Once the gradient is perfected, finish off with a glossy top coat to seal the glitter design and intensify the shimmering effect. This technique not only captures the essence of the ocean but also adds a touch of glamour and sophistication to your nails, making them stand out with a dazzling allure.
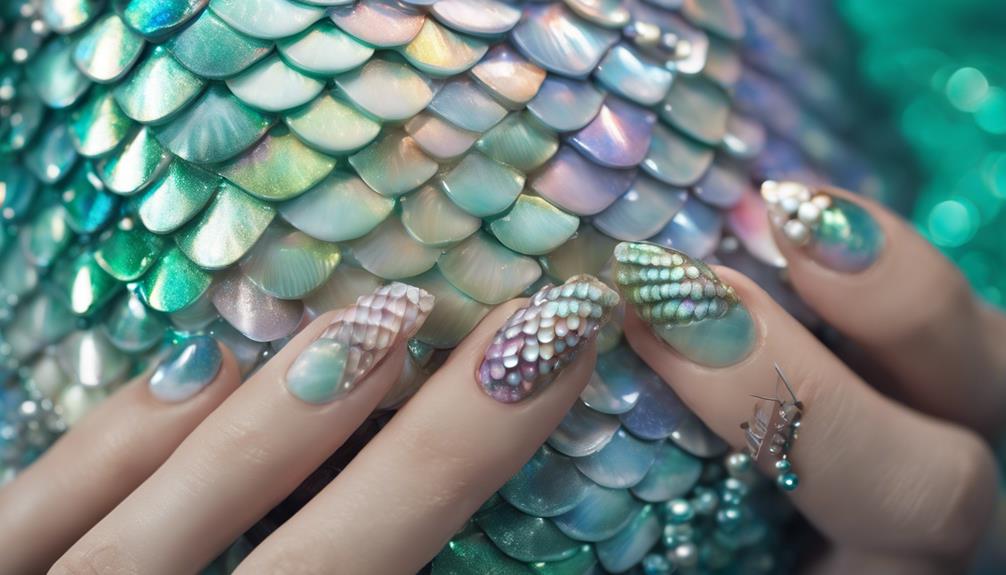
Seashell Nail Accents
Enhance your mesmerizing ocean-inspired glitter nails by incorporating elegant seashell accents that add a touch of sophistication to your overall nail design. To achieve a stunning look, consider using pastel colors such as pink, coral, and mint when creating realistic seashell designs on your nails. Utilizing a fine nail art pen allows for intricate detailing, enhancing the overall aesthetic of the seashell patterns. For a polished finish, apply a matte top coat to bring out the subtle beauty of the seashell nail accents. Combining these seashell designs with pearl accents can create a cohesive and sophisticated nail art style.
—
| Seashell Nail Accents | Tips |
|---|---|
| Pastel Colors | Use pink, coral, and mint for realistic designs. |
| Nail Art Pen | Incorporate intricate details with a fine pen. |
| Matte Top Coat | Enhances the subtle beauty of seashell accents. |
| Pearl Accents | Combine with seashell designs for sophistication. |
Delicate Wave and Bubble Designs

Create stunning wave-inspired nail art with shades of blue and white, capturing the essence of the ocean on your nails.
Embrace a whimsical and bubbly look by incorporating delicate bubble designs using white liner gel.
Achieve the perfect water movement effect with a striper brush, adding glitter accents for a touch of magic.
Wave-Inspired Nail Art
To achieve a mesmerizing oceanic look on your nails, delicately craft wave patterns and incorporate playful bubbles using a striper brush. These wave-inspired designs can be created on natural nails or as a French tip for a different design.
Experiment with shades of blue and white to mimic the ebb and flow of ocean waves, blending different blues to create a gradient effect that captures the serene underwater scene. Adding small pearls or beads to your nail art can give it a 3D dimension, enhancing the oceanic theme.
Bubble-Themed Nail Designs
Immerse yourself in the world of bubble-themed nail designs to showcase an enchanting and mesmerizing style on your fingertips.
Craft an enchanting underwater look by infusing delicate wave patterns with whimsical bubble accents in your nail art designs. To achieve this, make sure to use light blue and white nail polishes to create the free Edge-inspired wave designs on your nails.
Then, add a little bit of magic by incorporating small bubble accents using a dotting tool and white polish. For an extra touch of enchantment, consider sprinkling iridescent glitter to mimic the sparkling effect of water around the bubbles.
Seal your masterpiece with a glossy top coat to enhance the shine of both the bubbles and waves. Experiment with different bubble sizes and placements to create a dynamic and playful nail art look that captures the essence of an underwater wonderland.
Let your creativity flow and explore the world of bubble-themed nail designs to showcase a whimsical and enchanting style on your fingertips.
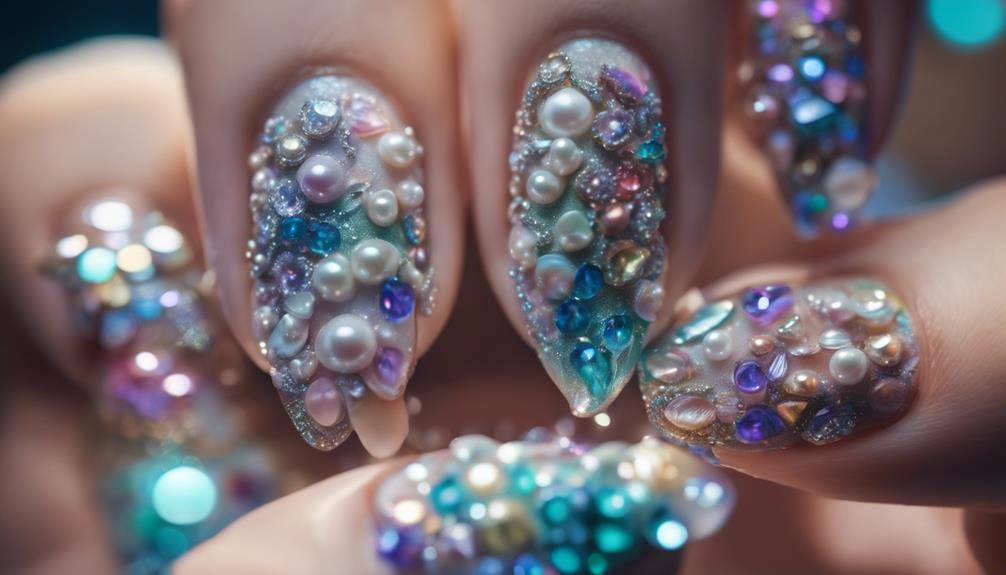
3D Shell Line and Pearl Accents

Enhance your mermaid nail design with mesmerizing 3D shell lines and pearl accents. Creating intricate 3D shell lines on your nails using thick gel adds a textured and unique dimension to your look. To maintain the shape of these detailed lines, consider using flash curing techniques for a lasting finish. Additionally, incorporating delicate pearl accents into your design can elevate the overall mermaid-inspired aesthetic, adding a touch of elegance and charm. To bring these elements together, seal the design with a top coat to guarantee the 3D shell lines and pearls stay securely in place.
| Shell Lines | Pearl Accents | Top Coat |
|---|---|---|
| Textured look | Delicate touch | Secure finish |
| Created with thick gel | Adds elegance | Guarantees longevity |
| Flash curing technique | Enhances overall design | Preserves shape |
Enchanting Bling Mermaid Nails
Enhance your mermaid nail design with an enchanting touch by incorporating sparkling sea shell accents and a shimmery scale gradient.
These bling elements add a luxurious feel to your nails, elevating them to a mesmerizing level of glamour and sophistication.
Experiment with different sizes and shapes of rhinestones, pearls, and gemstones to create a dazzling and eye-catching mermaid nail look.
Sparkling Sea Shell Accent
To create mesmerizing mermaid nails with a touch of enchanting bling, incorporate delicate seashell designs in pastel colors like pink, coral, and mint for an underwater-inspired look. Enhance the sea shell accents with intricate details using a fine nail art pen to create a whimsical touch on nails. Apply a matte top coat to give the sea shell designs a subtle and elegant finish, perfect for a mermaid-inspired nail art.
Elevate the design by combining the sea shell accents with pearl embellishments for a touch of sophistication and glamour.
- Delicate seashell designs in pastel colors like pink, coral, and mint offer an enchanting sea-inspired look.
- Intricate details using a fine nail art pen add a whimsical touch to the sea shell accents.
- A matte top coat provides a subtle and elegant finish, ideal for a mermaid-inspired nail art design.
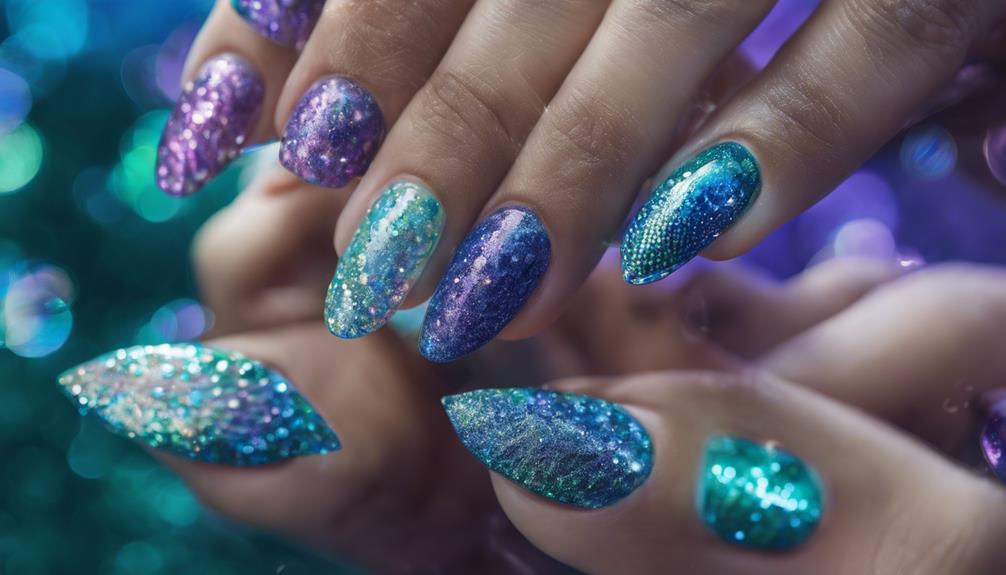
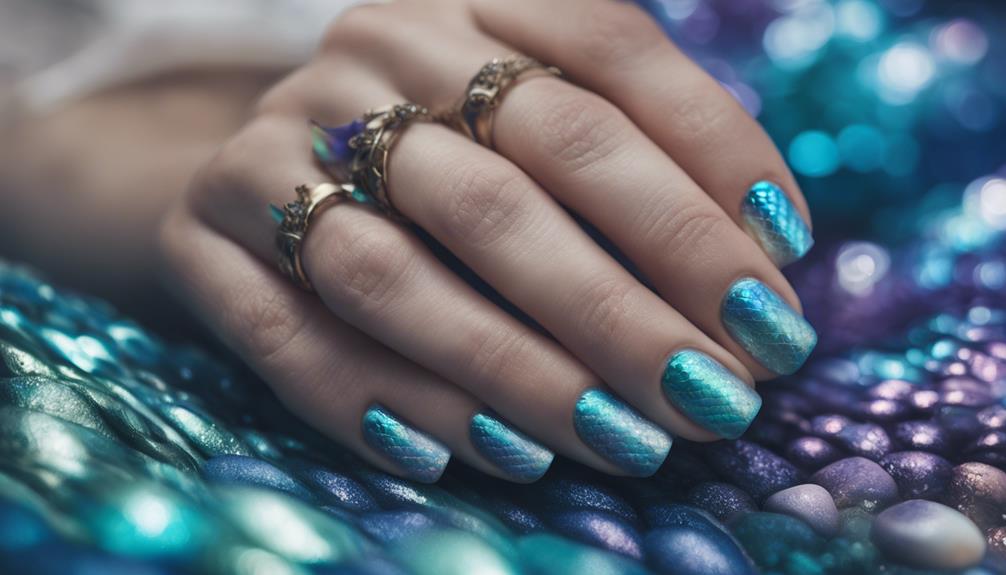
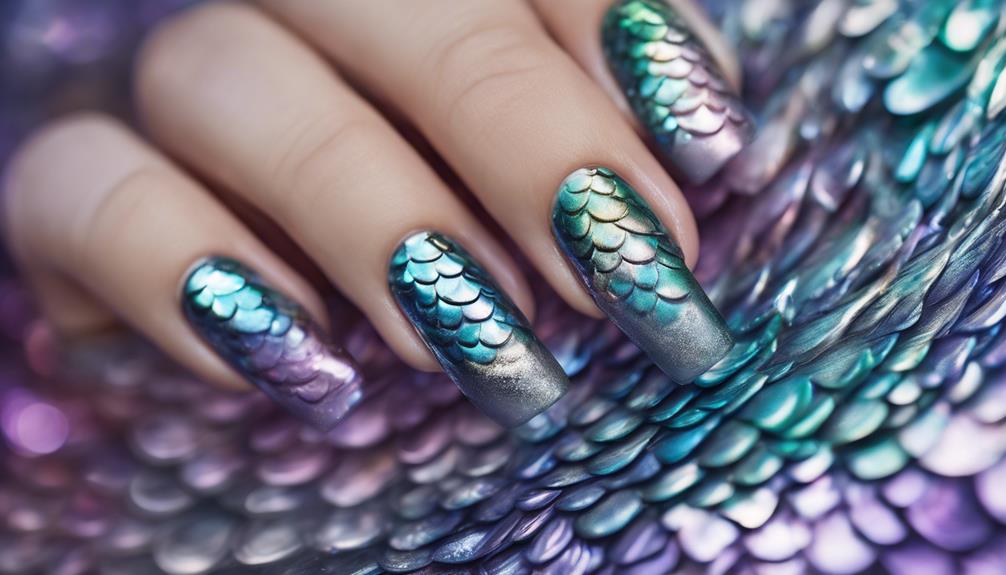
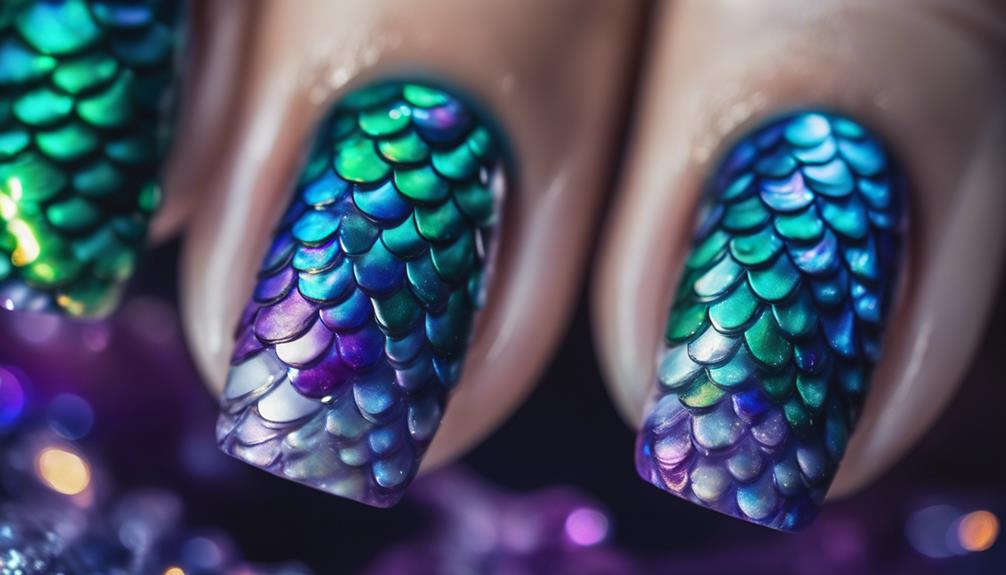
Shimmery Scale Gradient
Create a mesmerizing mermaid nail design with an enchanting bling factor by incorporating a shimmery scale gradient using iridescent nail polish. To achieve this mystical allure, blend shades of blue, green, and purple in a gradient effect on your nails. Using a thin nail art brush, paint intricate scale patterns that mimic a mermaid's tail. For an added touch of elegance, enhance the design with rhinestones strategically placed on the scales. Seal the enchanting look with a glossy top coat to guarantee a dazzling and long-lasting finish.
| Mermaid Nail Design Steps | |
|---|---|
| 1. Apply base coat | 3. Paint scale patterns |
| 2. Blend gradient colors | 4. Add rhinestones |
Matte Top Coat Magic
Give your mermaid nail design a velvety touch with a matte top coat for a sophisticated finish. This type of top coat adds a non-shiny texture to your nails, creating a modern and elegant look by eliminating any gloss or shine.
Here's why you should consider incorporating a matte top coat into your mermaid-inspired manicure:
- Enhanced Details: Matte top coats can elevate the intricate details and textures of your nail art, making them stand out in a subtle yet striking manner.
- Subtle Elegance: Achieve a subtle and refined mermaid-inspired manicure with a matte finish, adding a touch of sophistication to your overall look.
- Unique Twist: By opting for a matte top coat instead of the traditional glossy finish, you can give your mermaid nails a unique and contemporary edge that sets them apart.
Adding a matte top coat to your mermaid nail design can transform your manicure into a mesmerizing work of art with a velvety, sophisticated allure.
Chrome Powder Border Elegance
Enhance your mermaid nail design with an elegant chrome powder border for a luxurious and reflective finish. By using Art Deco gel to outline the border, you can elevate the overall look with a raised effect that adds dimension and sophistication.
Flash curing the 3D border lines is vital to preserve their intricate details and guarantee a long-lasting design. To further enhance the elegance, consider incorporating pearls and bling within the chrome powder border for an extra touch of sparkle and glamour.
Sealing the design with a top coat not only secures all the elements in place but also provides a glossy finish that enhances the reflective properties of the chrome powder border. This final step is essential in achieving a visually appealing set of mesmerizing mermaid nails that catch the light and draw attention to the intricate details of the design.
Starfish and Seashell Details
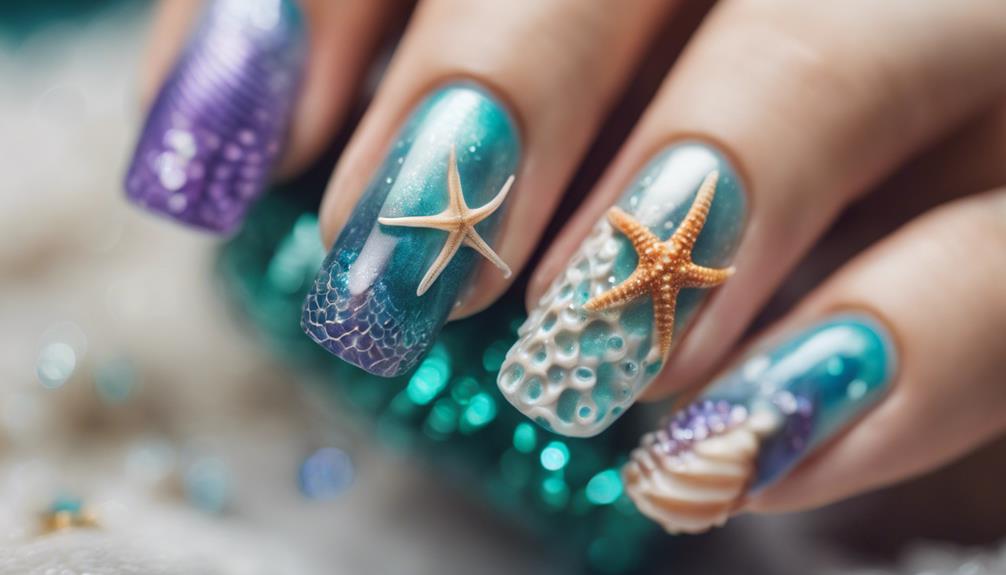
Adding starfish and seashell details to your mermaid nail design brings a touch of beachy whimsy and charm. To achieve this look, consider using pastel colors like pink, coral, and mint to paint intricate seashell designs on your nails.
Then, enhance the realism of the starfish and seashells by adding fine details with a nail art pen. For a subtle and elegant appearance, finish off the design with a matte top coat.
Incorporate Pastel Colors: Use colors like pink, coral, and mint to bring the seashell designs to life on your nails.
Add Fine Details: Utilize a nail art pen to add intricate details to the starfish and seashells, enhancing the overall look.
Matte Finish: Complete the design with a matte top coat to give the starfish and seashell details a sophisticated and polished appearance.
Underwater Sparkle Nail Art
Create a shimmering underwater sparkle effect on your nails using iridescent nail polish. By choosing shades of blue, green, and purple, you can capture the essence of the ocean on your fingertips. To enhance the sparkle and add dimension to your design, consider incorporating rhinestones or glitter strategically into your nail art. Once you have achieved the desired look, seal it with a glossy top coat to intensify the underwater shimmer effect.
For a more intricate and mesmerizing mermaid-inspired appearance, you can use a thin nail art brush to create scale patterns on your nails. This detailed technique will elevate your nail art to a whole new level, resembling the scales of a mystical sea creature.
Experiment with different designs and patterns to find the one that best suits your style and captures the enchanting beauty of underwater sparkle.
Mermaid Scales and Tail Designs
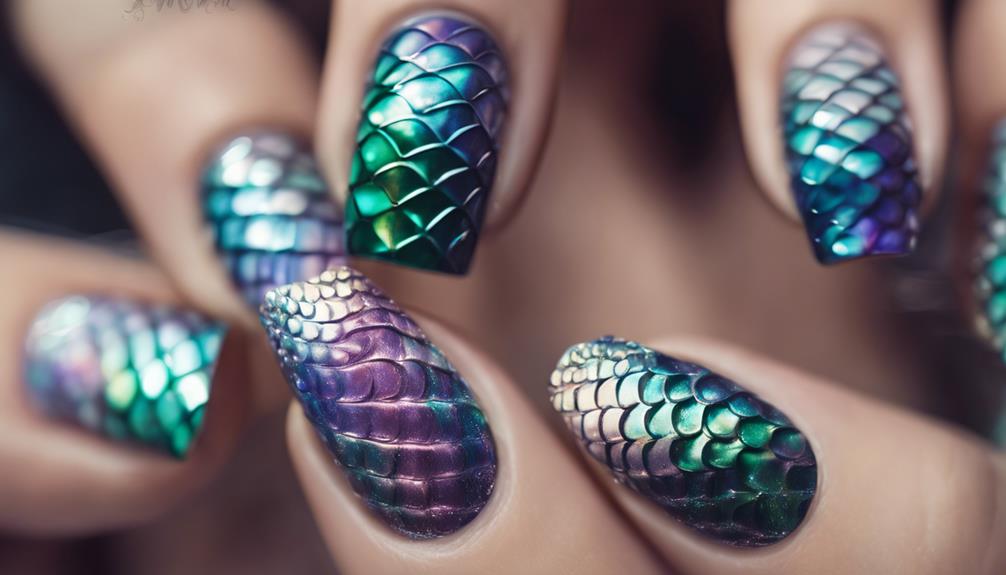
To achieve enchanting mermaid scales and tail designs on your nails, experiment with iridescent nail polish and vibrant colors like blue, green, and purple.
Here are some tips to help you create stunning mermaid-inspired nail art:
- Start by painting your nails with a base color, preferably in one of the mermaid shades like ocean blue or emerald green.
- Using a thin nail art brush, delicately draw scales on your nails using iridescent nail polish to achieve a shimmering effect that mimics a mermaid's tail.
- For an extra touch of glamour, consider adding rhinestones to your scale designs. These tiny gems can enhance the sparkle and overall allure of your mermaid-inspired nails.
Frequently Asked Questions
What Is the Hottest Nail Trend?
The hottest nail trend embraces whimsical and magical elements, stirring a mystical allure. Artists infuse designs with scales, shells, and ocean motifs, crafting an enchanting underwater theme. These stunning spring nail designs are perfect for adding a touch of fantasy and charm to any look. Whether it’s iridescent mermaid scales or delicate seashell accents, these whimsical nail designs are sure to make a splash. Embracing the beauty of the ocean, these enchanting nail art creations are a must-try for anyone looking to add a touch of magic to their manicure.
Nautical symbols and fantasy landscapes further elevate this trend, incorporating iridescent polish and intricate details. Vibrant hues like teal and aqua, along with 3D effects and mermaid silhouettes, define this mesmerizing style.
Embrace the mesmerizing world of mermaid nail art for a truly enchanting manicure experience.
What Are Mermaid Fingernails?
Mermaid fingernails are nail art designs inspired by the mystical and enchanting world of mermaids. These designs often incorporate elements like scales, shells, mermaid tails, and oceanic motifs.
Colors such as blues, greens, purples, and iridescent shades are commonly used to create a magical underwater look. Additionally, 3D elements like pearls, rhinestones, and beads can be added for extra dimension, allowing for a creative and unique nail art experience.
How Do You Use Mermaid Dust on Your Nails?
To use mermaid dust on your nails, follow these steps:
Start by applying a clear base coat.
While the polish is still wet, sprinkle the mermaid dust over it.
Gently press the dust into the polish for a smooth finish.
Seal the design with a top coat to secure the mermaid dust and enhance its longevity.
This method guarantees a dazzling shimmer effect that can be customized to your preference, either as a subtle glow or part of a more elaborate nail art design.
How Do Acrylic Nails Work?
Acrylic nails work by combining a liquid monomer with a powder polymer to create a strong overlay on natural nails. This mixture hardens through a chemical reaction, providing durability and customization.
Regular fills maintain the seamless look by filling the gap between the natural nail and the acrylic overlay.
Removal typically involves soaking in acetone to dissolve the acrylic material, making it easier to gently push off.
Acrylic nails offer a long-lasting solution for nail extensions.
Conclusion
To sum up, these enchanting mermaid nail designs offer a touch of whimsy and elegance for those looking to make a splash with their manicure.
With a wide range of options from pastel gradients to shimmering ocean glitter, there's sure to be a style that suits every mermaid enthusiast.
So why not immerse yourself in the world of underwater nail art and let your inner mermaid shine through with these stunning designs?
Happy nail painting!