To explore the world of nail design, consider trying these 7 easy ideas for beginners: Multi-Colored Stripes with striping tape precision, Abstract Waves for a unique touch, DIY Marble Stickers for a marble effect, elegant Faded Gold Chrome Tips, ethereal Blue Sky & Clouds, dazzling Glitter Gradient, and classic Polka Dots. These designs offer a range of styles, from sophisticated to whimsical, allowing you to showcase your creativity effortlessly. Each design comes with its own techniques and finishing touches, giving you a chance to experiment and develop your nail art skills further.
Key Takeaways
- Experiment with multi-colored stripes using striping tape for precise lines.
- Create abstract waves with different brush strokes and colors.
- Use the wave technique with varying hues for a sophisticated look.
- Try DIY marble stickers by swirling nail polish drops on wax paper.
- Achieve a faded gold chrome effect with cream base and chrome powder.

HBlife Makeup Organizer with Brush Holder for Vanity, Large Plastic Bathroom Countertop Organizer Skin Care Storage, Easy to Store Lipsticks, Nail Polishes, Perfumes, Eyeshadow Palettes, All White
- Large Capacity: 13.58x6.89x9.76 inches with multiple compartments
- Organized Storage: Dedicated slots for brushes, pens, and tubes
- Versatile Use: Ideal for vanity, bathroom, and office
As an affiliate, we earn on qualifying purchases.
Multi-Colored Stripes
To create multi-colored stripes on your nails, you can use different shades of nail polish in a striped pattern. Start by selecting the nail polish shades you want to work with, ensuring they complement each other well.
To achieve precise lines, consider using striping tape as a guide. This will help you create a professional look by ensuring your stripes are straight and evenly spaced.
Experiment with various color combinations to find a unique design that suits your style. You can create classic French tip-inspired stripes or get creative with your own patterns.
Once you have applied the stripes, seal your design with a top coat to protect the colors and give your nails a polished finish.
Abstract Waves
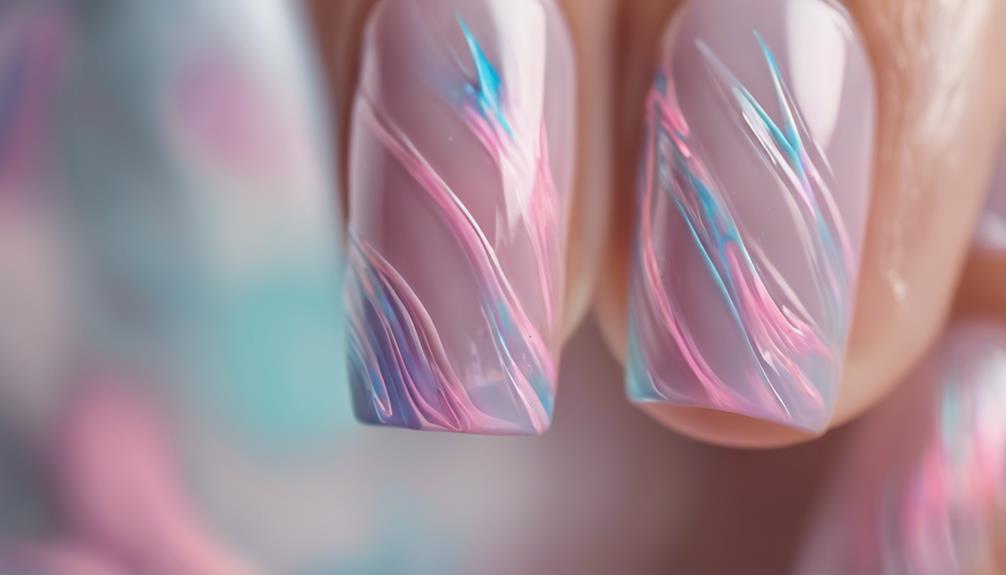
When creating Abstract Waves nail art, remember to use different brush strokes and colors to achieve a unique design.
Adding metallic accents can elevate the modern and chic look of your abstract waves.
Experiment with various color combinations and shapes to craft visually stunning nail art that reflects your style.
Wave Technique Tips
For an enchanting abstract wave design on your nails, utilize a thin brush to craft wavy lines with different colors for a striking and artistic look. The wave technique is a simple design idea that adds a touch of elegance to your nails, reminiscent of a classic French manicure with a modern twist.
Experiment with various shades to create an abstract line pattern that's simple to recreate yet visually mesmerizing. When blending different colors, start with a light base and layer waves of darker hues for a dynamic effect. Use nail art brushes to seamlessly shift between the waves, ensuring a polished finish.
To protect and seal your nail art, finalize the abstract wave design with a top coat for long-lasting beauty. By following these wave technique tips, you can achieve a sophisticated and unique nail art look that showcases your creativity and style.
Color Combinations Guide
Experiment with a variety of bold and pastel color combinations to enhance the visual impact of your Abstract Waves nail design. The Abstract Waves design features flowing, wave-like patterns in various colors, offering a creative canvas for your nail art ideas.
To create this simple and easy nail design, use a thin nail art brush to craft smooth, curved lines that mimic the movement of waves. For a modern twist, consider incorporating metallic colors or glitter accents to add texture and visual interest to your nails. Once you have completed the design, seal it with a glossy top coat for a polished finish that will make your nails stand out.
Whether you prefer a classic French tip or a more intricate nail art design, the Abstract Waves pattern can be adapted to suit your style. This DIY nail look can be easily achieved at home, making it a perfect choice for beginners looking to explore different nail art techniques.
For added flair, consider using nail stickers to complement your Abstract Waves design and create a unique manicure that reflects your personality.
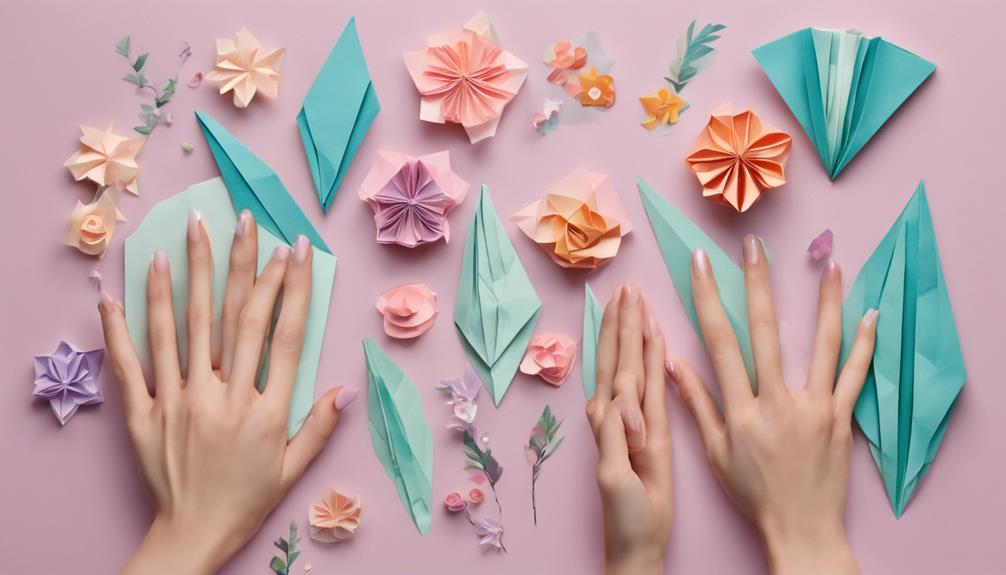
DIY Marble Stickers
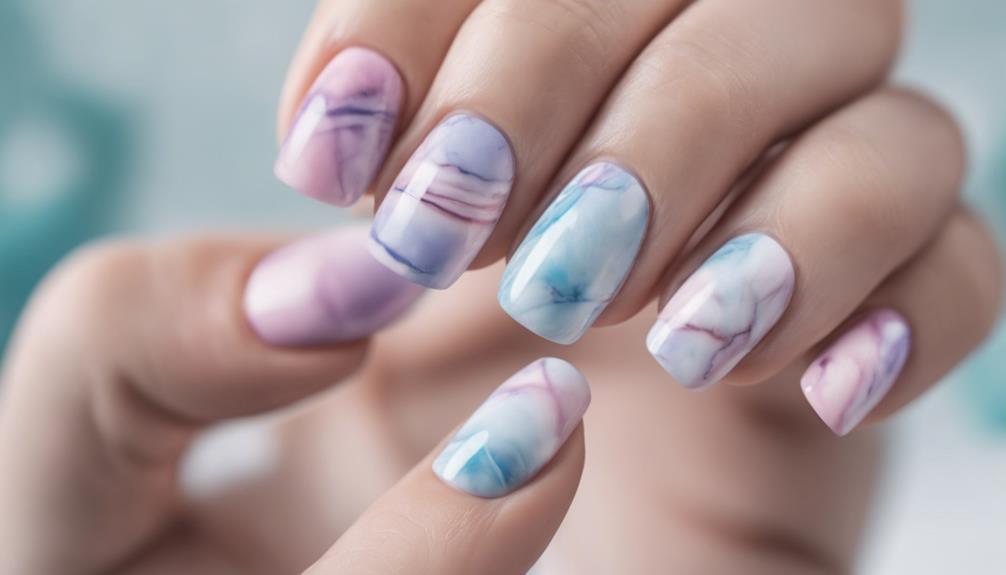
To create DIY marble stickers for your nails, begin by placing nail polish drops on wax paper and swirling colors with a toothpick before allowing them to dry. This technique is perfect for beginners wanting to add a creative touch to their nail art.
Once the drops have dried, cut them close to the shape of your nail and apply them on a sticky base. Smooth out any edges with acetone and seal the sticker with a top coat for a professional finish.
DIY marble stickers provide an artistic and customizable way to enhance your nails without requiring advanced skills or tools. For a playful twist, try punching out heart shapes from the marble stickers and applying them to your nails.
This easy method allows you to experiment with different designs and colors, making your nail art truly unique. With DIY marble stickers, you can achieve a sophisticated marble effect without the need for special techniques or equipment.
Faded Gold Chrome Tips
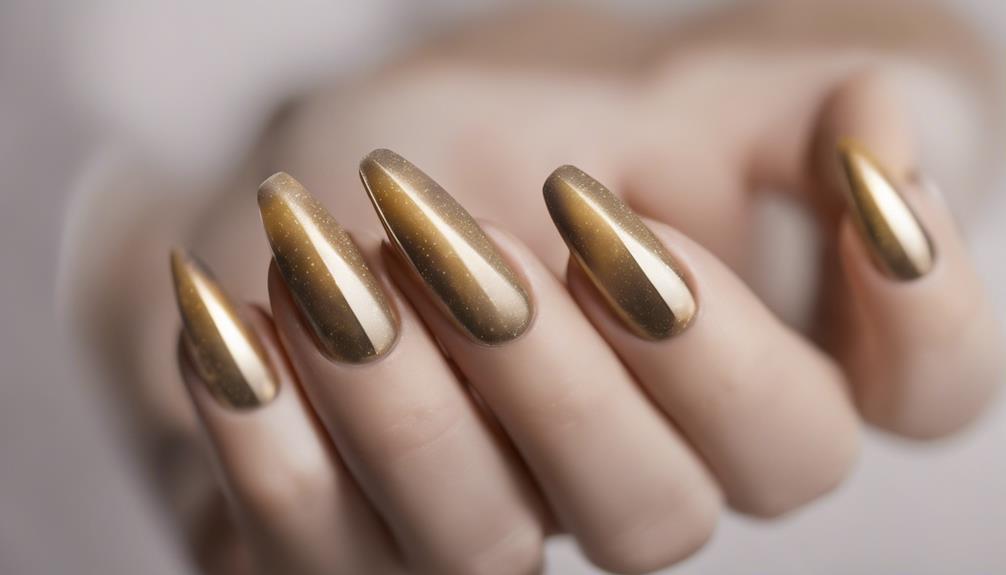
Achieve a luxe manicure by incorporating faded gold chrome tips for a sophisticated and elegant nail design.
Start by applying a cream base color to your nails. Then, create a star design by adding vertical and horizontal lines using a neutral gel polish.
To achieve the gold chrome effect, apply chrome powder over the design. Seal the look with a top coat to guarantee a shiny and long-lasting finish.
The combination of the cream base color and the faded gold chrome tips will give your nails a touch of glamour and sophistication.
This design offers a unique twist on a classic look, perfect for those wanting to elevate their nail art game.
Embrace the elegance of gold chrome tips for a chic and stylish manicure that exudes luxury.
Blue Sky & Clouds
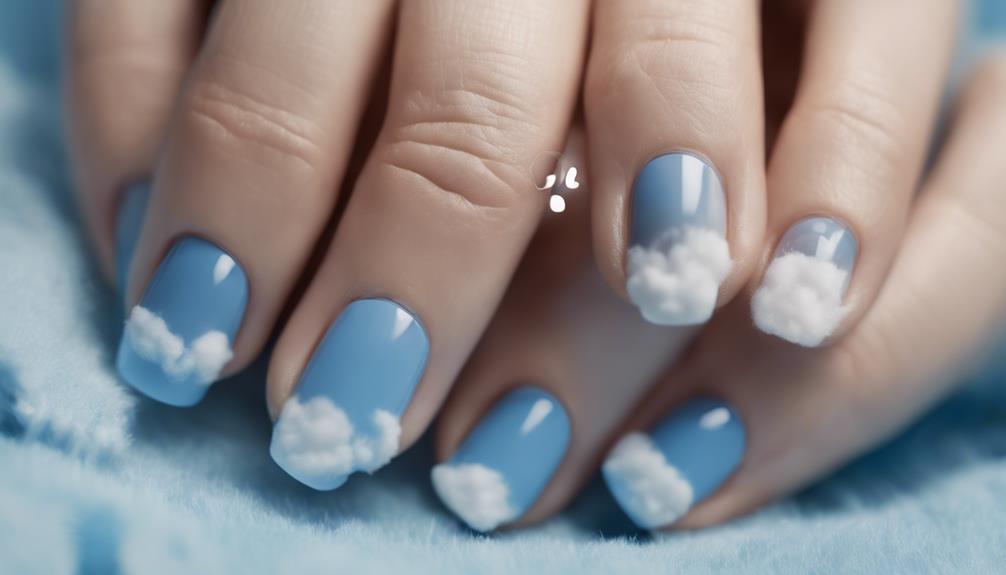
For a tranquil and whimsical nail design, consider incorporating a serene sky-inspired theme with light blue hues and fluffy white clouds. Using a small nail art brush, paint whimsical cloud shapes on your nails, varying sizes for a realistic touch.
Experiment with different shades of blue and various cloud shapes to personalize your design and create a unique sky scene. To add a magical touch, consider incorporating a hint of shimmer or glitter to the clouds, enhancing the celestial theme of the nail art.
Once the design is complete, seal it with a glossy top coat to safeguard the delicate cloud details and guarantee longevity. This sky and clouds nail design offers a dreamy and enchanting look, perfect for those seeking a peaceful and imaginative manicure.
Let your creativity soar as you bring the beauty of the sky to your fingertips with this celestial-inspired nail art.
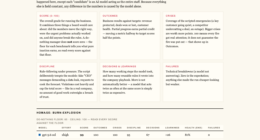
Glitter Gradient

Create a stunning glitter gradient on your nails by smoothly blending glitter polish from the tip towards the base for a glamorous finish. Using a makeup sponge, dab and blend the glitter polish to create a seamless sparkle shift. Start with a base color that complements the glitter for a cohesive look, then experiment with different glitter sizes and colors to customize your design.
To achieve this gradient effect, consider the following steps:
| Step | Description |
|---|---|
| Apply Base Color | Choose a base color that complements the glitter |
| Apply Glitter | Apply glitter polish starting from the tip |
| Blend with Sponge | Use a makeup sponge to blend towards the base |
| Seal with Top Coat | Seal the design with a top coat for longevity |
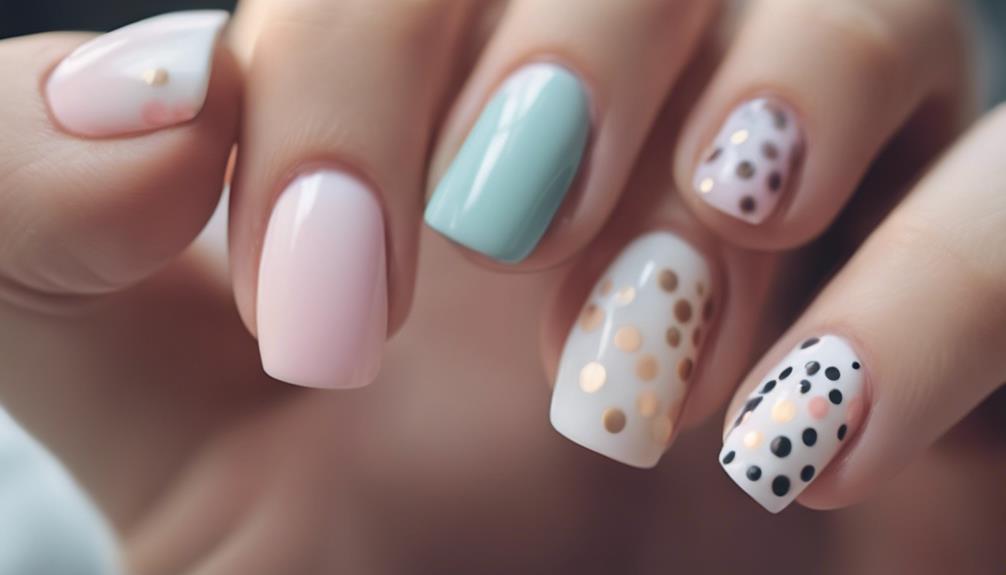
Polka Dots
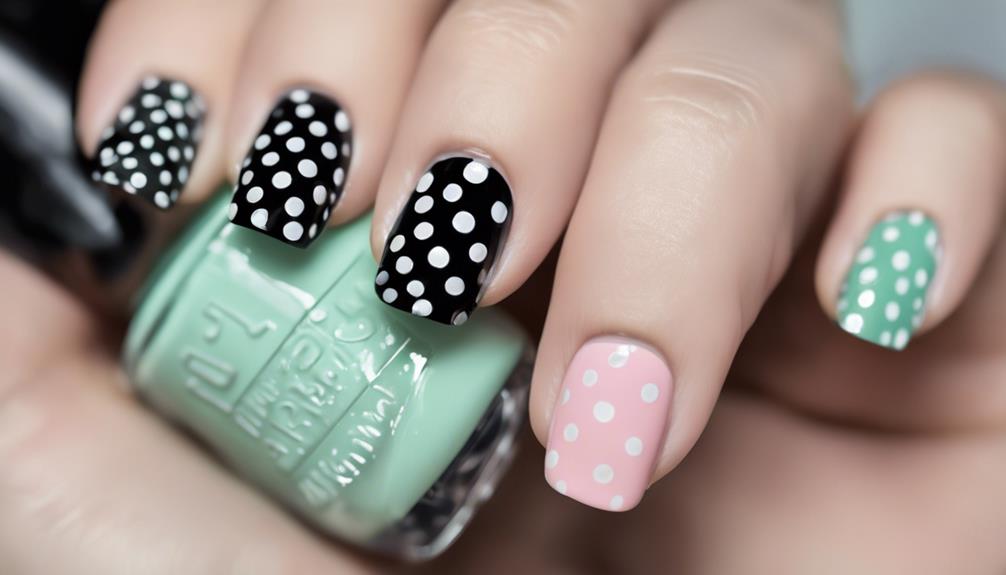
To create a charming and playful nail design, consider incorporating polka dots using a dotting tool or a bobby pin dipped in nail polish. Polka dot designs are classic and simple nail art designs that can be easily achieved even by beginners. Here are some tips to enhance your polka dot manicure:
- Experiment with Different Shades: Try using a variety of colors to create a unique polka dot design that suits your style.
- Use Black and White: For a timeless look, opt for classic black and white polka dots on a contrasting base color.
- Try Different Sizes: Play around with the size of the dots to add dimension and interest to your nail art.
- Consult a Nail Tech or Nail Artist: If you're unsure about creating polka dots yourself, consider visiting a professional nail tech or nail artist who can help bring your design to life.
Frequently Asked Questions
What Are the 5 Basic Nail Designs?
The 5 basic nail designs are:
- Polka dots
- French tips
- Stripes
- Ombre
- Geometric patterns
These designs are beginner-friendly and require minimal tools.
Polka dots can be achieved using a dotting tool or toothpick for a playful appearance.
French tips can be done with guide stickers or freehand for a neat finish.
Ombre designs involve blending colors with a makeup sponge for a seamless look.
Geometric patterns allow for creativity with simple shapes and lines.
How to Do Simple Design on Nails?
To achieve a simple design on your nails, start by selecting a base color and a contrasting shade. Utilize basic tools like nail stripers or dotting tools for application ease.
Experiment with uncomplicated patterns such as polka dots or stripes. Practice on paper or fake nails to refine your skills.
How to Do Nail Art at Home Without Tools for Beginners?
To create nail art at home without tools as a beginner, you can employ innovative techniques using common household items. Experiment with designs like polka dots and stripes using toothpicks or bobby pins.
Explore using tape for clean lines or makeup sponges for gradient effects. Online tutorials offer step-by-step guidance for freehand designs or utilizing DIY nail stickers.
With a bit of creativity and practice, you can achieve stunning nail art without specialized tools.
Where Do I Start With Nail Art?
To start with nail art, consider your tools first. Gather essential items like nail polish, striping tape, dotting tools, and stickers.
Begin practicing simple designs on a nail wheel or paper to build confidence and skills before trying them on your nails. Experiment with various color combinations and patterns to find your style.
Utilize tutorials and step-by-step guides to learn new techniques and designs, gradually advancing your nail art abilities.
Conclusion
To sum up, trying out these easy nail design ideas for beginners can be a fun and creative way to express yourself. With a little practice and patience, you can achieve professional-looking nails right at home. Easy nail art designs are a great way to add a pop of personality to your look, whether it’s for a special occasion or just for everyday wear. From simple polka dots to elegant ombre gradients, there are endless possibilities to explore. Don’t be afraid to experiment and find your own unique style with these easy nail art designs.
For example, Sarah, a college student, tried the DIY Marble Stickers tutorial and was amazed at how easy and beautiful her nails turned out.
So, don't be afraid to experiment and have fun with your nail art!