To build sturdy floating shelves, start by choosing strong materials like oak or plywood, and measure carefully to cut supports that match the shelf length. Find wall studs with a stud finder, then install cleats or brackets into these secure points for stability. Use level tools to guarantee everything is perfectly aligned before fastening. If you continue, you’ll discover detailed tips to help you install your shelves safely and professionally for a sleek, functional look.
Key Takeaways
- Measure and mark wall studs with a stud finder for secure support placement.
- Choose durable materials like hardwood or moisture-resistant options for strength and longevity.
- Install sturdy cleats or heavy-duty brackets into wall studs, ensuring they are level.
- Drill pilot holes in the shelf to prevent splitting and facilitate secure mounting.
- Confirm the shelf is level and securely fastened for safety and a professional appearance.
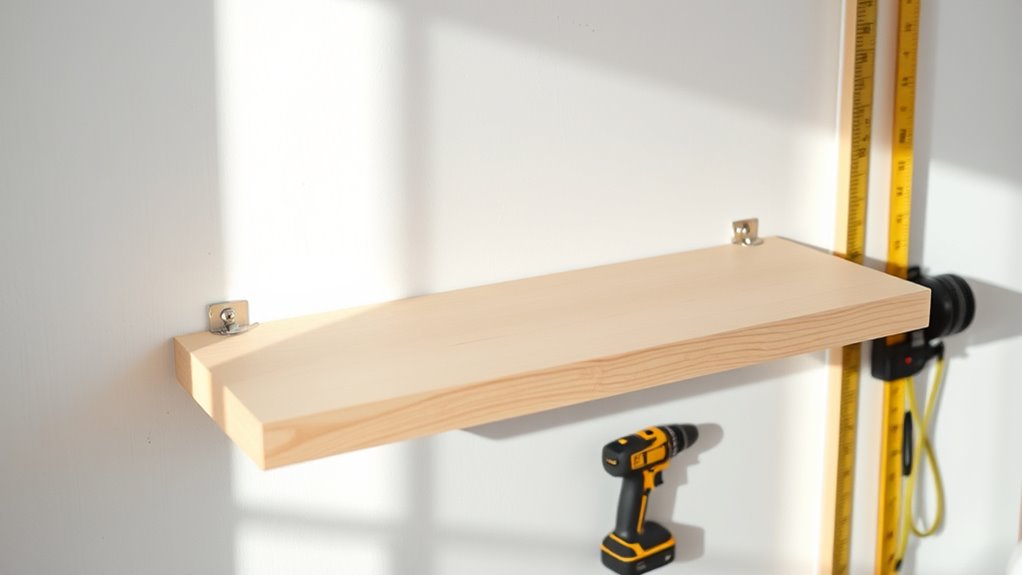
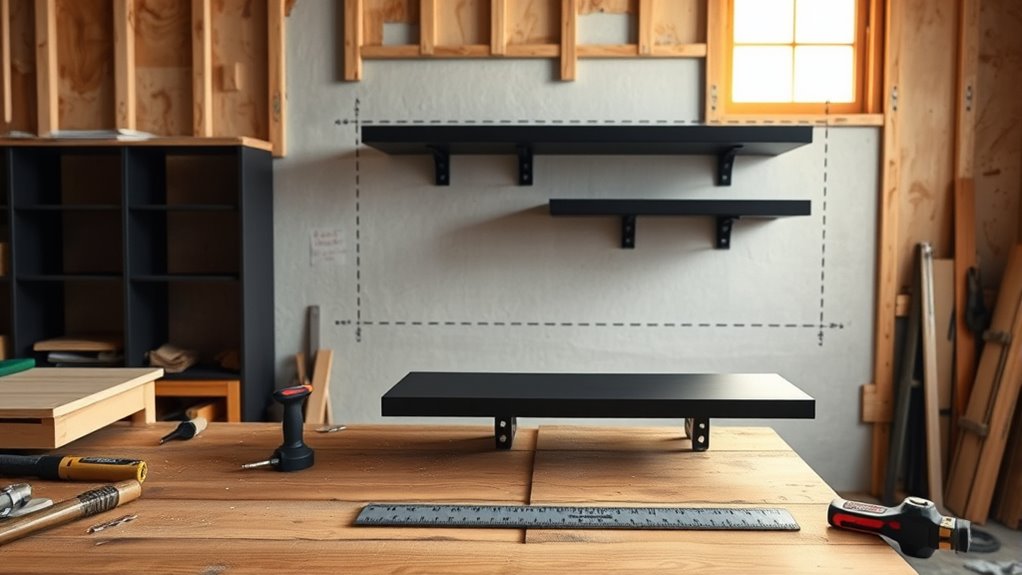
Floating shelves are a stylish and practical way to maximize your space while adding a modern touch to any room. Before you start, it’s essential to plan carefully, especially when it comes to choosing materials and mounting techniques. Your material selection will influence not only the look but also the durability and weight capacity of your shelves. Opt for sturdy, high-quality wood like oak, maple, or plywood for a balance of strength and aesthetics. If you want a sleek, modern look, glass or metal can also work, but make sure they’re rated for the weight you plan to put on them. Consider the environment of your room—moisture-resistant materials are advisable for kitchens or bathrooms. Once you’ve selected your materials, focus on the mounting techniques. The key to successful floating shelves lies in how you secure them to the wall; proper mounting ensures stability and safety. There are several mounting methods to think about, but a common approach involves using cleats—wooden or metal strips attached to the wall that support the shelf from behind. To do this, measure and cut a cleat that matches the length of your shelf, then securely screw it into wall studs using appropriate anchors if studs aren’t available. The cleat acts as a hidden support, giving the illusion that the shelf is floating. Alternatively, some prefer installing heavy-duty brackets directly into wall studs. This method offers strong support but requires precise placement to ensure the brackets are level and aligned. Whichever mounting technique you choose, locate the wall studs using a stud finder—this will give you solid anchoring points that can handle the weight of your shelves and items. For added stability, use lag bolts or heavy-duty anchors suitable for your wall type. When attaching the shelf to the mounted supports, drill pilot holes into the shelf to prevent splitting, then secure it with screws that go into the cleat or brackets. Make sure everything is level before tightening fully. Remember, careful planning in your materials selection and understanding of mounting techniques will pay off by producing a sturdy, attractive floating shelf that lasts. Understanding your wall type and the appropriate mounting method will help ensure a secure installation. Take your time marking and measuring, double-check your alignments, and don’t rush the installation process. With meticulous attention to detail, your DIY floating shelves will not only enhance your space but also stand as a testament to your craftsmanship.
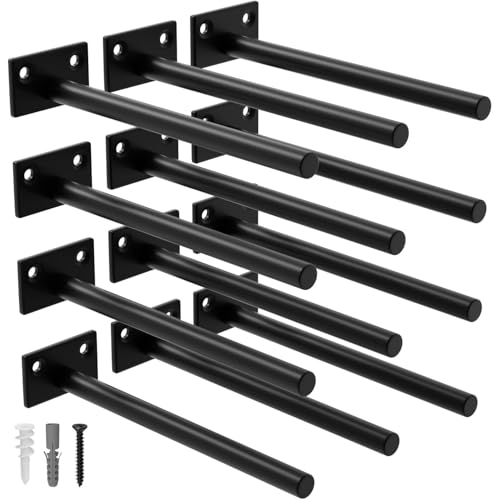
LEOPO 12-Pack 8 inch Floating Shelf Brackets, Hidden Shelf Bracket for Wood, Concealed Blind Shelving Support,Invisible Coated Brackets for DIY Decorative,Fit for Kitchen, Bathroom,Study Room
Superior Quality: Our floating shelf bracket is expertly crafted from premium steel, ensuring exceptional durability and an impressive…
As an affiliate, we earn on qualifying purchases.
As an affiliate, we earn on qualifying purchases.
Frequently Asked Questions
What Tools Are Essential for Installing Floating Shelves?
You’ll need a drill, level, tape measure, and a stud finder to install floating shelves effectively. These tools help you secure the shelves firmly, ensuring they can hold decorative accents or storage solutions safely. A pencil for marking, a screwdriver, and possibly a saw if you need to cut shelves to size are also handy. With the right tools, you’ll create a stylish, functional space perfect for displaying decor or organizing essentials.
How Do I Prevent Shelves From Wobbling?
To prevent shelves from wobbling, start by accurately wall stud identification to guarantee secure anchoring. Use appropriate heavy-duty brackets or anchors rated for your shelf’s weight capacity, and make sure to attach the brackets directly into the wall studs. Double-check that all screws are tight and the shelf is level. If needed, add additional brackets for extra stability, especially for heavier items.
Can Floating Shelves Hold Heavy Items Safely?
Yes, floating shelves can hold heavy items safely if you use sturdy brackets and proper anchors. When planning, consider your decorative accents and aesthetic considerations, ensuring the shelves blend well with your space. Distribute weight evenly and avoid overloading. Secure the shelves into wall studs whenever possible, which provides extra support. This way, your shelves remain stable, functional, and attractive, even with heavier objects.
How Do I Repair Damaged or Loose Shelves?
Nearly 70% of shelf damage occurs from improper reinforcement. To repair damaged or loose shelves, first remove the shelf and inspect the brackets and wall anchors. Use shelf reinforcement brackets if needed, and tighten or replace any loose screws or anchors. Apply wood glue or filler to cracks or chips, then sand smooth before reattaching. Proper damage repair guarantees your shelves stay sturdy and safe for use.
Are There Specific Wall Types Suitable for Floating Shelves?
You can install floating shelves on various wall types, but your wall texture and shelf material matter. For drywall, use appropriate anchors to secure the brackets, especially on textured surfaces. For tile or concrete walls, opt for masonry anchors or screws. Wooden or plaster walls also work well; just make certain you choose the right anchors. Matching your shelf material with the wall type and texture helps ensure stability and safety.

Stud Finder Wall Scanner Detector – 5 in 1 Electronic Wall Wood Metal Stud Locator Edge Center Sensor Beam for Live AC Wire Pipe Metal Lumber Joist Drywall Framing Detection
Enhanced Precision and Speed Stud Finder Model : Features advanced sensors for top accuracy and consistency. Efficiently locates…
As an affiliate, we earn on qualifying purchases.
As an affiliate, we earn on qualifying purchases.
Conclusion
Building your own floating shelves is like planting seeds—you start with a plan, secure the roots firmly, and watch your space flourish. I once installed a set in my living room, and they instantly transformed the room into a gallery of my favorite books and trinkets. With careful planning and solid anchoring, your shelves will stand tall and proud, holding up your cherished items just like a sturdy tree supports its branches. Happy DIYing!

Ansoon Zinc Self-Drilling Drywall Anchors with Screws Kit, 25 Heavy Duty Metal Wall Anchors and 25#8 x 1-1/4'' Screws – 50 Pieces All Together
Anchors pre-drills precise hole in types of drywall ,no hole preparation required, made of durable zinc .
As an affiliate, we earn on qualifying purchases.
As an affiliate, we earn on qualifying purchases.
LEOPO 12-Pack 8 inch Floating Shelf Brackets, Hidden Shelf Bracket for Wood, Concealed Blind Shelving Support,Invisible Coated Brackets for DIY Decorative,Fit for Kitchen, Bathroom,Study Room
Superior Quality: Our floating shelf bracket is expertly crafted from premium steel, ensuring exceptional durability and an impressive…
As an affiliate, we earn on qualifying purchases.
As an affiliate, we earn on qualifying purchases.