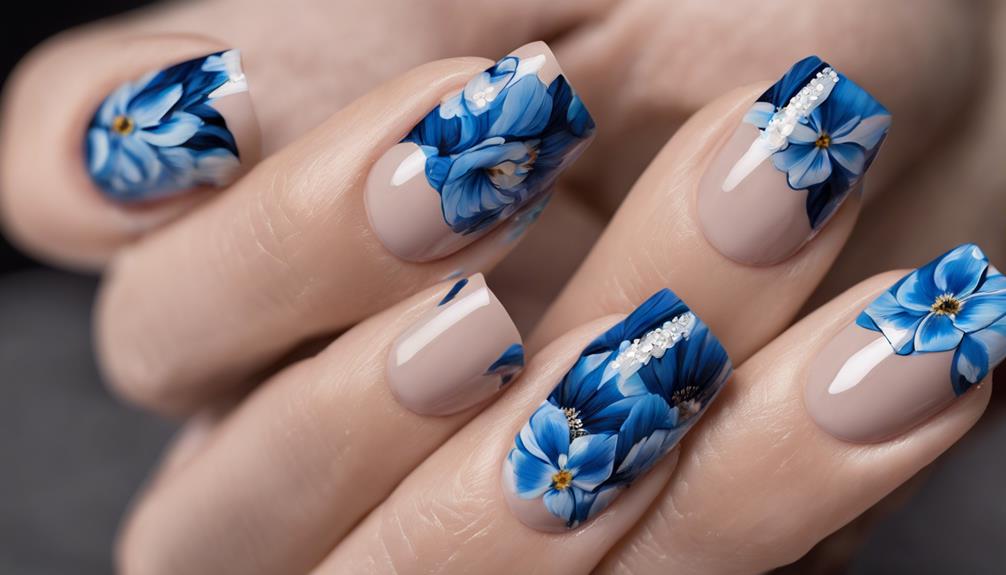
Embark on a creative adventure with our step-by-step guide for gorgeous blue flower nail designs. Begin by applying a protective base coat to create a smooth surface. Use a light blue polish as the base color and a darker blue shade for detailed petals. Add delicate flower centers with nail dotting tools. Finish off your masterpiece with a glossy top coat for lasting shine. Explore different shades and techniques for a truly unique look. Share your masterpieces to inspire others. Explore more innovative techniques, trendy inspirations, and color combinations for your blue floral nail art journey.
Key Takeaways
- Start with a light blue base color for the design.
- Create intricate flower petals using fine nail art brushes.
- Add details like flower centers with nail dotting tools.
- Finish with a glossy top coat for a polished look.
- Seal the design to protect and enhance the blue flower nail art.
Base Coat Application
When applying the base coat for your blue flower nail design, start by making sure a clear pink base coat like Dazzle Dry is used for a smooth canvas. The base coat plays an important role in creating the perfect foundation for your nail art. It not only protects your natural nails but also helps the colors and designs adhere better, ensuring longevity.
After applying the clear pink base coat, be certain it's completely dry before moving on to the next steps. This step is vital to prevent any smudges or color mixing that could ruin your intricate design.
Selecting a top coat that's fast-drying and long-lasting will further enhance the durability of your nail art. The top coat not only seals in your design but also adds a beautiful shine to the finished look. When applying the top coat, make sure you cover the entire nail evenly to protect your design and extend its wear-time.
Dark Brown Floral Design
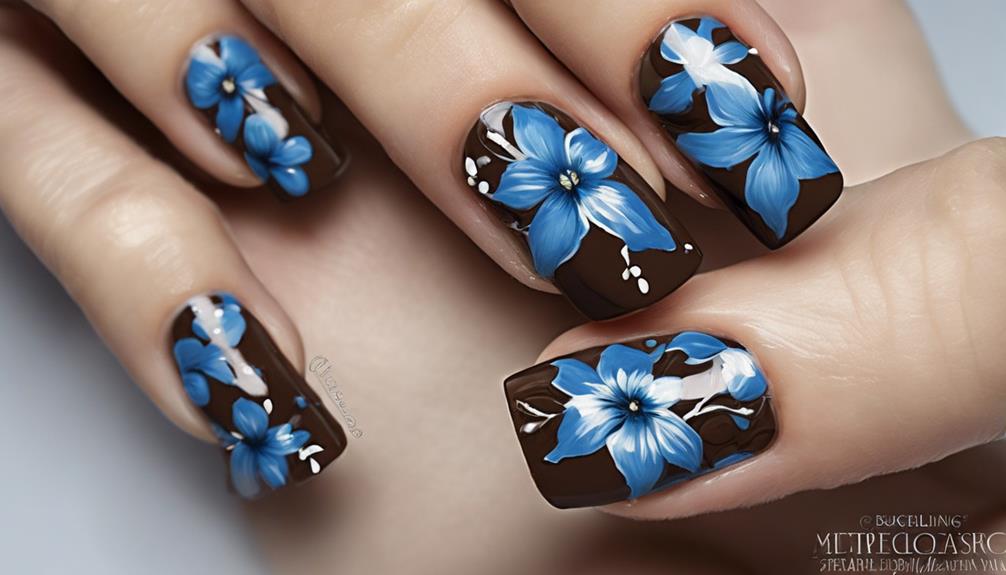
When creating a dark brown floral design on your nails, the rich brown petal details and deep hue contrasts will make your manicure stand out.
Incorporating black and white glitter adds a touch of elegance and intricate detail to the design.
Enhance the overall look with extra pink glitter to speed up the drying process and achieve a polished finish.
Rich Brown Petal Details
To achieve intricate petal details in the floral design, start by using OPI dark brown color to outline the shape of the petals with precision. The key is to apply the dark brown polish in a precise manner, ensuring each petal is defined sharply.
Varying the pressure while painting will add depth and dimension to the flowers, creating a realistic and captivating look. For an extra touch of elegance, consider incorporating black and white glitter accents to enhance the richness of the brown petals.
Deep Hue Contrasts
Starting with a bold and rich OPI dark brown color, the dark brown floral design creates striking contrasts that elevate the overall look with intricate details and depth.
Enhance the deep hue with black and white glitter to add complexity and sophistication to the design. By incorporating dark brown against a clear pink base, you can achieve a bold and eye-catching manicure that exudes elegance.
Experimenting with different shades of brown allows you to find the perfect contrast that suits your style. The combination of dark brown and floral elements results in a stunning and sophisticated nail design that's sure to impress.
Don't hesitate to try out this dark brown floral design for a chic and polished look that stands out.
Black and White Glitter Details
Enhance the blue flower nail design with mesmerizing black and white glitter details for a sophisticated and eye-catching finish. To achieve this look, start by applying an OPI dark brown base color to provide a striking contrast for the floral design. Next, delicately incorporate black and white glitter onto the nails to add a touch of elegance and allure. The combination of these glitter details will elevate the overall aesthetic of the blue flower nail art, making it truly stand out and captivate attention.
The black and white glitter not only enhances the beauty of the design but also adds depth and dimension, creating a visually stunning effect. By carefully placing these glitter elements, you can achieve a polished and professional finish that exudes sophistication. The contrasting colors of the glitter against the blue flowers will create a mesmerizing look that's perfect for any occasion. Experiment with different placement and amounts of glitter to find the perfect balance that suits your style preferences.
Adding Extra Pink Glitter

When incorporating some extra pink glitter to elevate the blue flower nail design with a touch of shimmer and dimension, it's crucial to do so strategically. The addition of pink glitter can truly enhance the overall look, bringing sparkle and depth to the floral pattern.
Not only does it add a beautiful shimmer, but it also helps speed up the drying process, making it a practical and aesthetically pleasing choice.
When applying the extra pink glitter, it's important to focus on specific areas of the design to highlight and accentuate the blue flowers.
Applying Glossy Top Coat
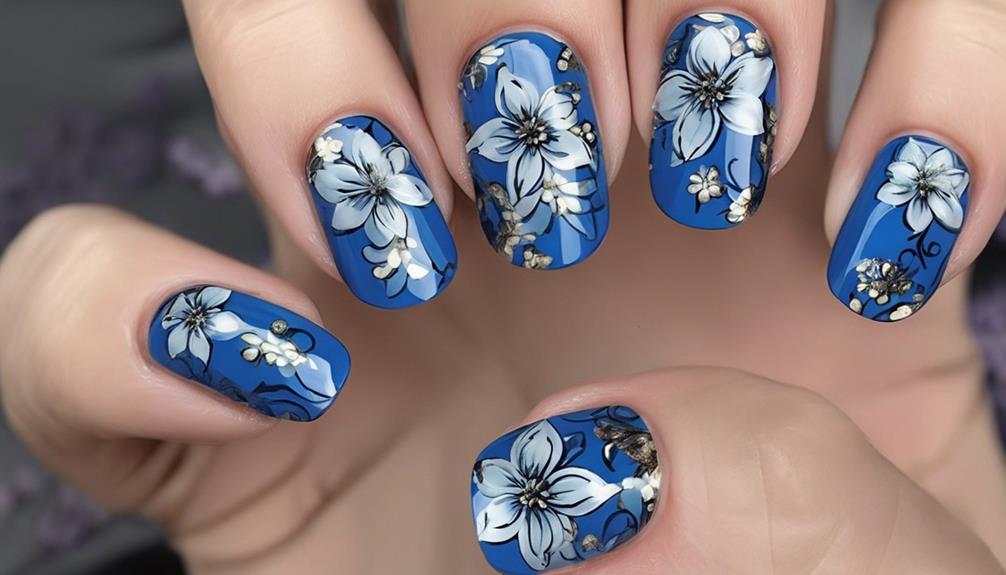
To seal and protect the stunning blue flower nail design, we apply a high-quality top coat that not only extends its longevity but also adds a shiny finish for a polished appearance. This final step in the nail art process is essential for maintaining the beauty of the design.
The glossy top coat helps smooth out any uneven surfaces or textures on the nails, ensuring a flawless look. Not only does it enhance the overall aesthetic appeal of the blue flower design, but it also prevents chipping and peeling, keeping your nail art intact for a longer period.
When choosing a top coat, opt for a premium product to achieve a professional salon-like finish. A good top coat won't only protect your nail art but also provide a lasting shine that enhances the vibrancy of the blue flowers. Remember, the top coat is the finishing touch that seals in your hard work and creativity, so invest in a high-quality product for best results.
Color Combination Experimentation

Let's explore different color combinations to enhance your blue flower nail designs. When experimenting with colors, consider the following:
- Combine shades of blue like navy, sky blue, and teal for a sophisticated and harmonious look.
- Mix in contrasting colors such as white or silver to create a striking contrast and make the blue tones stand out.
- Incorporate different finishes like matte, metallic, or glitter to add texture and visual interest to your nail art.
Sharing Your Unique Creations
When it comes to sharing your unique nail art creations, showcasing them on social media platforms like Instagram and Pinterest can help you reach a broader audience.
Engaging with followers by responding to comments and questions builds a supportive community around your nail art.
Showcase Your Designs
We enhance the visibility of our blue flower nail designs by sharing them on popular social media platforms and engaging with fellow enthusiasts. When showcasing your designs, consider the following:
- Utilize proper lighting and angles in your photos to accentuate the intricate details and vibrant colors of your nail art.
- Join online communities and forums to connect with other nail art enthusiasts, exchange ideas, and receive valuable feedback on your designs.
- Create video tutorials or live demonstrations to guide others through your step-by-step process, inspiring them to try similar designs.
Engage With Followers
Engaging with our followers through sharing our unique blue flower nail designs is an important aspect of building a vibrant online nail art community. By posting high-quality images on social media and using relevant hashtags like #nailart and #bluefloralnails, we can reach a broader audience and attract fellow nail art enthusiasts.
Encourage interaction by soliciting feedback and opinions on your creations, fostering a sense of community and collaboration. Collaborating with other nail artists can spark inspiration for fresh and distinctive designs. It's essential to show appreciation for your followers by responding to their comments and messages, creating a welcoming and engaging environment.
Together, we can cultivate a supportive community where creativity and passion for nail art thrive.
Inspire Nail Art
To inspire nail art enthusiasts, consider sharing your unique blue flower nail creations on popular social media platforms such as Instagram and Pinterest.
Here are three ways to showcase your artistry and encourage creativity in the nail art community:
- Utilize high-quality nail art brushes and tools for intricate and precise floral designs.
- Engage with other nail artists by joining online forums and groups to exchange ideas and techniques.
- Collaborate with fellow enthusiasts to present diverse interpretations of blue flower nail art, fostering a culture of innovation and inspiration.
Frequently Asked Questions
How to Do Your Nails Step by Step?
We start by prepping nails with a base coat for protection.
Using a fine brush, we carefully craft intricate blue flower designs, layering various blues for depth.
Adding hints of white or silver glitter highlights petals beautifully.
A final top coat seals the design, ensuring longevity.
This step-by-step process yields stunning nails that showcase our artistry and attention to detail.
How Do You Do a Flower Manicure?
When doing a flower manicure, we start by applying a clear base coat to prep the nails.
Then, we paint the petals using a soft brush and vibrant blue polish, creating a delicate floral design.
Next, we add green accents for leaves and finish with a glossy top coat to seal in the beauty.
This process yields a stunning and charming flower manicure that's sure to impress.
How Do You Dye Your Nails With Flowers?
To dye your nails with flowers, we can press dried flower petals onto a tacky layer of gel polish or nail glue.
Gently press the petals onto the nail, arranging them in a desired pattern.
Seal the design with a top coat to secure the flowers in place and enhance the overall look.
This method allows for a unique and delicate floral design that adds a touch of nature to your nails.
How Do You Paint Flowers on Your Toenails?
To paint flowers on your toenails, start with a base coat for a smooth surface. Use a thin nail art brush to delicately create petals and leaves. Opt for blue nail polish shades to achieve a stunning floral design.
Layer different blues and add shimmer for depth. Finish with a top coat to protect and extend the life of your beautiful flower design.
Conclusion
To sum up, did you know that blue flowers symbolize tranquility and peace? Incorporating stunning blue flower nail designs can bring a sense of calm and serenity to your overall look.
So why not try out these step-by-step designs to add a touch of beauty and elegance to your nails? Experiment with different color combinations and share your unique creations with the world.
Let your nails bloom with creativity and style!