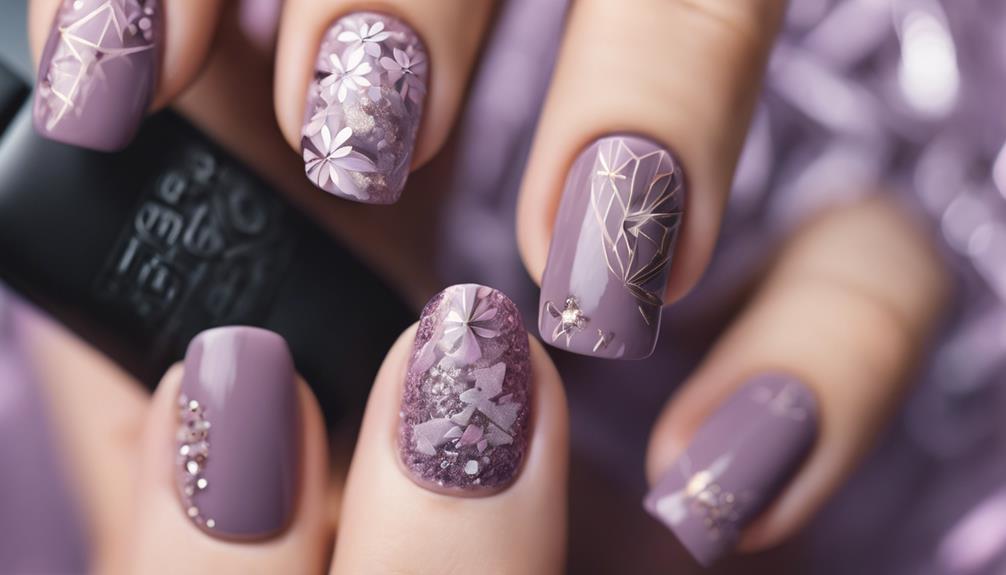

Discover 7 stunning mauve nail design ideas to showcase your style. From delicate floral patterns to glittery accents and modern abstract designs, the options are endless. Embrace chic and feminine floral mauve manicures with textured ombre techniques and dual-toned petals. Enhance elegance with glittery mauve nails that sparkle on any occasion. Embrace the artistic twist with abstract mauve designs featuring unique color combos and negative space techniques. Don't miss out on opulent gold accents, minimalist patterns, ombre art, and intricate embellishments for a luxurious touch. Express your creativity with these mesmerizing mauve nail ideas. And if you’re feeling bold, why not pair your mauve manicure with stunning royal blue nail ideas for a striking and sophisticated look? Experiment with dual-toned nails, geometric designs, and dazzling accents to make a statement. Whether you’re looking for a subtle and delicate touch or a bold and dramatic style, these mauve and royal blue nail designs are sure to elevate your nail game.
Key Takeaways
- Floral Mauve Manicure with delicate flower patterns and fanned petals.
- Glittery Mauve Nails for versatile elegance with sparkling accents.
- Abstract Mauve Designs for modern artistic twist with unique patterns.
- Mauve and Gold Accents for opulent and luxurious nail art.
- Minimalist Mauve Patterns with chic stripes and subtle designs.
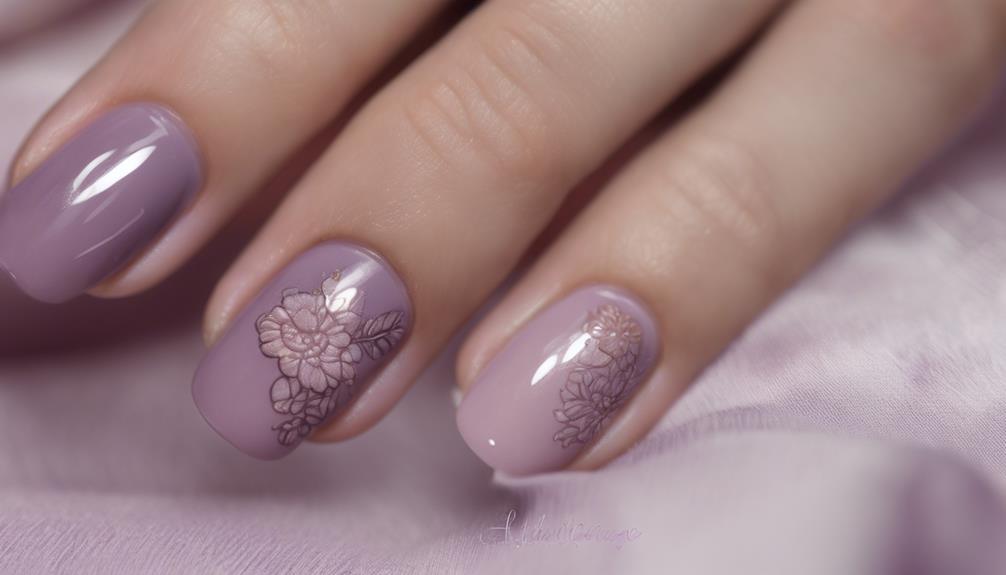
Floral Mauve Manicure
For a chic and feminine look, consider adorning your nails with a stunning floral mauve manicure. Floral nail art in mauve hues offers a versatile and elegant option that adds a touch of femininity to your overall style.
These manicures often feature delicate flower patterns over a white base on accent nails, creating a soft and sophisticated look. Dotted flowers are a simple yet charming design choice for a floral mauve manicure, adding a playful element to your nails.
Additionally, textured ombre techniques can be utilized to create unique and eye-catching floral nail art designs in mauve tones, providing a modern twist to the classic floral look. Fanned petals in dual-toned mauve shades can also brighten up your nails with a distinctive floral appearance, perfect for those seeking a more bold and vibrant nail design.
Embrace the beauty of floral mauve manicures for a timeless and stylish nail art choice.
Glittery Mauve Nails
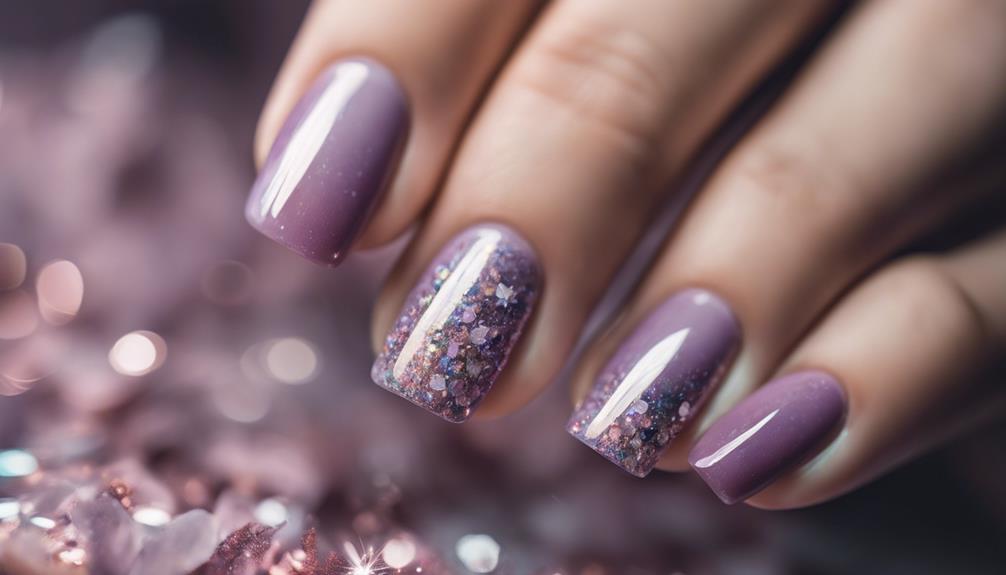
Get ready to elevate your nail game with glittery mauve nails!
Sparkling mauve nail art, mauve glitter gradients, and shimmering mauve tips are all trendy options to add a touch of glamour to your fingertips.
Whether you're heading to a party or special event, these shimmering mauve nails are sure to make a statement.
Sparkling Mauve Nail Art
Enhancing your nails with a shimmering touch of glamour, glittery mauve nail art elevates your manicure to a dazzling level. The sparkling mauve nail art design is a popular choice for those seeking a sophisticated yet eye-catching look.
Here are three key aspects to ponder when opting for this stunning style:
- Glittery Appeal: The combination of glitter and mauve nail polish creates a mesmerizing effect that catches the light and sparkles with every movement, making your nails stand out elegantly.
- Versatile Elegance: Sparkling mauve nails are versatile and suitable for various occasions, from formal events to casual outings, adding a touch of elegance to your overall look.
- Easy Application: Achieving this dazzling nail art design is simple; all you need to do is apply a coat of glitter polish over your mauve base to create a captivating and glamorous finish that will surely impress.
Whether you're attending a special event or just want to add some glamour to your everyday style, glittery mauve nails are a perfect choice for a chic and sophisticated manicure.
Mauve Glitter Gradient
When aiming for a chic and sophisticated nail design, consider exploring the enchanting allure of a Mauve Glitter Gradient, where mauve polish seamlessly blends with glitter accents for a dazzling finish. This stunning combination creates a visually appealing shift from a solid mauve color to a sparkling, glittery effect, perfect for adding a touch of glamour and sophistication to your overall look.
Mauve glitter gradient nails offer a versatile option that can be customized with different shades of mauve and various types of glitter to suit individual preferences and styles. Popular for special occasions and events, these nails are sure to make a statement and elevate your ensemble.
The gradual effect adds depth and dimension to your manicure, making it a standout choice for those seeking a unique and eye-catching nail design. Whether you prefer a subtle shimmer or a more intense sparkle, the Mauve Glitter Gradient is a timeless option that exudes elegance and charm.
Shimmering Mauve Tips
How can you achieve a stunning shimmering effect with glittery mauve tips for your next manicure?
Glittery mauve nails are a perfect way to add glamour and sparkle to your look. Here's how you can create this dazzling nail design:
- Start by applying a base coat of mauve polish to your nails. This will serve as the foundation for the glittery effect.
- Next, choose your preferred method of adding glitter. You can either opt for a glitter top coat for a subtle shimmer or apply glitter nail polish for a more intense sparkle.
- Gently dab or brush the glitter onto the tips of your nails, focusing on the areas where you want the most shimmer. Build up the glitter to your desired level of sparkle for a truly eye-catching finish.
With the shimmering combination of mauve polish and glitter, your nails will be ready for any special occasion or to simply elevate your everyday look.
Abstract Mauve Designs

For a modern and artistic twist to your nail look, consider exploring abstract mauve designs featuring swirls, geometric shapes, and intricate patterns. Abstract mauve nail designs often incorporate swirls, negative space, and abstract elements to create a chic and trendy appearance.
The combination of unique color combinations and intricate designs in abstract mauve nail art offers a versatile look suitable for any occasion. Negative space techniques are commonly utilized in these designs to add a modern and artistic feel, allowing for creativity and individuality in each nail art creation.
By incorporating swirls and geometric shapes, abstract mauve designs can elevate your style and make a bold statement. These designs aren't only eye-catching but also provide a sophisticated touch to your overall look.
Embrace the creativity and uniqueness of abstract mauve nail art to showcase your personality and stand out from the crowd.
Mauve and Gold Accents

Enhancing your mauve nail design with opulent gold accents elevates the overall look to a luxurious and sophisticated level. The combination of mauve and gold creates a stunning contrast that exudes elegance and glamour.
Here are three ways to incorporate gold accents into your mauve nail design to achieve a chic and polished finish:
- French Tips: Add a touch of gold to the tips of your mauve nails for a classic yet stylish look. The subtle gold detailing beautifully complements the soft hue of mauve, making your nails stand out with sophistication.
- Geometric Patterns: Create intricate geometric patterns using gold nail art tape or detailing brushes on a mauve base. The geometric shapes combined with the richness of gold accents can add a modern and edgy twist to your nail design.
- Accent Nails: Opt for a statement nail by painting one or two nails entirely in gold while keeping the rest mauve. This bold choice showcases your creativity and adds a luxurious touch to your overall nail look.
Minimalist Mauve Patterns

When exploring minimalist mauve patterns for your nails, consider incorporating chic mauve stripes that exude elegance.
Subtle geometric accents can add a touch of sophistication to your overall look.
Embracing negative space in your design can bring a modern and minimalist aesthetic to your nails.
Chic Mauve Stripes
Achieving a sleek and contemporary nail look, opt for chic mauve stripes as your go-to minimalist design. Mauve stripes offer a simple yet stylish option for those who appreciate understated elegance in their nail art.
Here are three key points to ponder when selecting chic mauve stripes for your next manicure:
- Timeless Elegance: Mauve stripes provide a timeless and sophisticated touch to your nails. The combination of the soft mauve hue with the clean lines of the stripes creates a look that exudes class and refinement.
- Versatility: Mauve stripes are incredibly versatile and can effortlessly complement a wide range of outfits. Whether you're dressing up for a formal event or keeping it casual with everyday wear, chic mauve stripes will seamlessly fit into your style.
- Understated Charm: The minimalist nature of mauve stripes adds a subtle charm to your nails without being overpowering. It's a perfect choice for those who prefer a more subdued yet chic nail design.
Subtle Geometric Accents
Incorporate subtle geometric accents into your mauve nail design for a modern and minimalist aesthetic. Adding delicate geometric patterns like lines, triangles, or squares discreetly to your mauve nails can elevate your manicure to a whole new level.
These minimalist patterns bring a chic and sophisticated look that's versatile and suitable for various occasions. Geometric details offer a stylish touch without overpowering the overall design, making them a perfect choice for those who prefer a more understated nail art style.
Mauve nail art with geometric accents provides a contemporary twist to your manicure, giving it a unique and artistic flair. The combination of mauve hues with geometric shapes creates a visually appealing contrast that's both elegant and eye-catching.
Whether you opt for a subtle accent nail or incorporate geometric patterns on all your nails, this design choice is sure to make a statement while maintaining a sense of sophistication and modernity.
Elegant Negative Space
For an elegant touch to your mauve nail design, consider incorporating minimalist negative space patterns. Mauve negative space nail art allows for a chic and sophisticated look that highlights the beauty of your natural nails while adding a modern twist to your manicure.
Here are three ways to achieve an elegant negative space design in mauve:
- Half-Moon Negative Space: Create a half-moon shape near the cuticle area using mauve polish, leaving the rest of the nail bare for a subtle yet striking design.
- Diagonal Negative Space Lines: Paint diagonal lines across the nail in mauve, leaving negative space in between for an elegant and geometric pattern.
- French Tip Negative Space: Opt for a French tip design with negative space instead of white polish, giving your nails a sophisticated and minimalist appearance that's perfect for any occasion.
Mauve Ombre Nail Art
To create a stunning mauve ombre nail art, start by selecting two to three shades of mauve polish for a seamless color blend.
Mauve ombre nail art involves a gradual shift from light to dark hues of mauve, creating a soft and blended look reminiscent of a sunset or gradient.
Using either a sponge or brush, you can expertly merge the colors to achieve a flawless ombre effect on your nails. This nail art technique offers versatility, allowing you to personalize your design by choosing different shades of mauve or even incorporating complementary colors for a unique twist.
Mauve ombre nails are currently on-trend and provide a subtle yet stylish way to add a pop of color to your overall look. Whether you prefer a more understated ombre or a bolder color shift, mauve ombre nail art is a chic and sophisticated choice for your next manicure.
Intricate Mauve Embellishments

Enhance your mauve nail designs with intricate embellishments like rhinestones, studs, and gems for a touch of glamour and sophistication. Adding these elements can elevate your manicure to the next level, making it perfect for special occasions or just to add a bit of flair to your everyday look.
Here are three ways you can incorporate intricate embellishments into your mauve nail design:
- Rhinestones: By strategically placing rhinestones on your mauve nails, you can create a chic and elegant look that catches the light and adds a touch of sparkle.
- Studs: Studs come in various shapes and sizes, allowing you to experiment with different patterns and designs on your nails. They can add a modern and edgy vibe to your mauve manicure.
- Gems: Whether you opt for small gemstones or larger ones, gems can bring a luxurious feel to your nails. They're perfect for adding a hint of opulence to your mauve nail design.
Frequently Asked Questions
What Colors Go With Mauve Nails?
When it comes to pairing colors with mauve nails, you have a variety of options to choose from.
Neutral tones like white, black, and nude offer a classic and sophisticated look.
If you prefer a more harmonious palette, consider shades of pink, lavender, or burgundy.
For a bold contrast, jewel tones such as emerald green or sapphire blue work well.
To add a touch of modern flair, metallic accents like gold, silver, or rose gold can elevate your mauve nail design. For a more subtle look, opt for delicate rose gold nail designs that complement the softness of mauve. The combination of these two colors creates a sophisticated and chic manicure that is perfect for any occasion. Whether you prefer a simple accent nail or a full set of rose gold nail designs, the pairing with mauve will leave your nails looking on-trend and stylish.
Which Nail Color Looks Elegant?
Looking to enhance your nails with an elegant touch? Consider opting for a classic nude shade. Nude nail colors exude sophistication and versatility, making them a timeless choice for any occasion.
The neutral tones of nude polish effortlessly complement various outfits and skin tones, adding a touch of understated elegance to your overall look.
Embrace the simplicity and chicness of nude nails for a polished and refined appearance.
What Color Nail Polish for Spring 2024?
For spring 2024, a popular choice for nail polish is the sophisticated and versatile color mauve.
Soft pastel shades like lavender and lilac are also trending.
Metallic and shimmer finishes in purple tones are expected to be a hit.
French manicures with a purple twist, incorporating gradient shades, are anticipated to stand out.
Dark purple hues combined with glitter accents create a luxurious and glamorous look perfect for the upcoming season.
What Nail Color Goes Well With Purple?
When considering what nail color pairs well with purple, several options can enhance the overall look. Metallic silver or gold accents provide a luxurious touch, while white or nude shades offer a chic contrast.
Dark green or teal hues create a sophisticated appearance. Pastel yellow or peach colors can introduce a fresh and playful element to purple nail designs.
The key is to experiment with different combinations to find the perfect match for your style and preference.
Conclusion
To sum up, the versatility of mauve nail designs offers endless possibilities for expressing your style and creativity.
As the saying goes, 'beauty is in the eye of the beholder,' and with these stunning mauve nail designs, you can truly make a statement.
Whether you prefer floral patterns, glitter accents, or minimalist designs, there's a mauve nail look for everyone.
So go ahead, try out one of these fabulous designs and show off your unique flair!