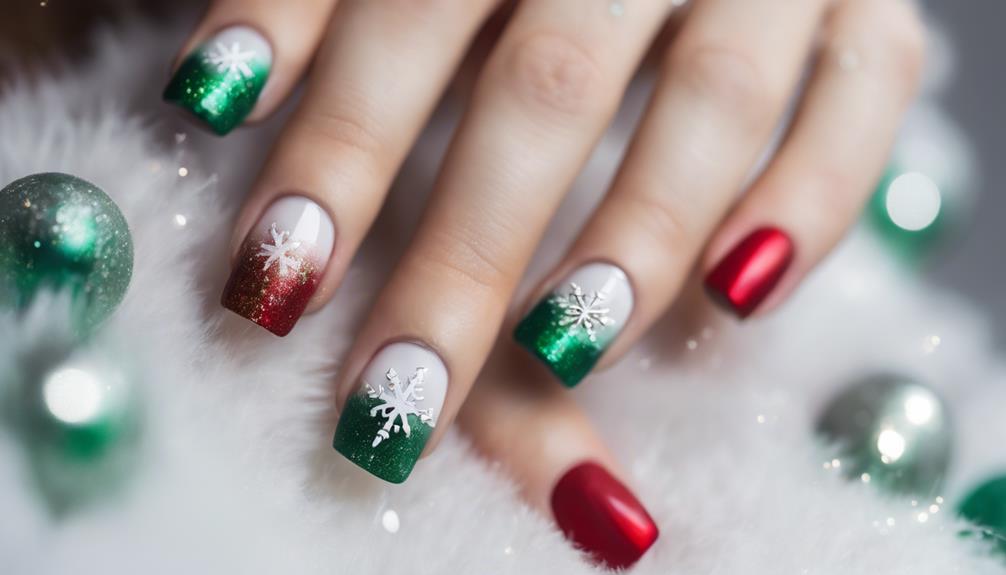
Get ready to deck the halls with your nails! You can create a festive look with Santa-inspired nails, featuring his iconic hat, beard, and suit. Or, try ombre tips in red, white, and green for a classic holiday look. You can also paint a holiday tree, complete with ornaments and a star on top. For a more whimsical look, create snowflake nail art or go for a merry and bright striped design. Add some reindeer antlers or a snowglobe scene for extra flair. There are so many merry and bright ideas to explore – and we're just getting started!
Key Takeaways
• Create Santa-inspired nails with red and white polish, adding facial details with black and pink polish.
• Blend red, white, and green polish for festive ombre tips, layering colors on a sponge for a unique look.
• Paint a green triangular shape for a holiday tree, adding a brown trunk and colorful ornaments.
• Use nail art brushes or stamping plates to create intricate snowflake patterns, layering shades of blue for a gradient effect.
• Incorporate glittering snowglobe nails with a whimsical winter scene, customizing with different glitter colors and shapes for a unique look.
Santa's Little Helper Nails
Get into the holiday spirit by transforming your nails into Santa's loyal companions, complete with festive attire and adorable facial features. To create these charming nail designs, start by painting Santa's hat, beard, and suit using red and white polish. Add details like eyes and a nose using black and pink polish for a cute and festive design.
For the reindeer, begin with a light brown base, then add antlers and facial features using polish. Make Rudolph stand out by painting his nose red using glitter polish for a sparkly touch.
These nail art ideas will surely get you in the mood for the holiday season. Finish off the design with a topcoat to seal in the festive holiday nail art. With these adorable nail designs, you'll be the talk of the town at your holiday gatherings. Spread joy and cheer with your festive holiday nail designs and show off your creativity with themed designs like candy canes, snowflakes, and reindeer. Don’t forget to snap a few pictures of your beautiful nails to share with friends and family on social media and spread the holiday spirit. Whether you’re attending a family gathering or a festive party with friends, your fabulous holiday nails will surely be the highlight of your look.
Red and Green Ombre Tips
Now it's time to get creative with Red and Green Ombre Tips!
You'll achieve a stunning ombre gradient effect by blending red, white, and green polish on a sponge, creating a festive color combo that screams Christmas cheer.
With this look, you'll be rocking a stylish, on-trend manicure that's perfect for the holiday season.
Ombre Gradient Effect
To achieve a stunning red and green ombre gradient effect on your nails, start by applying a white base coat to create a crisp canvas for your festive design. This will help your colors pop and guarantee a smooth shift between shades.
Next, use band-aids to create a clean French tip gap for a crisp look. Now, it's time to get creative! Layer red, white, and green polish on a sponge to achieve a smooth gradient effect. Gently dab the sponge onto your nail, working from dark to light.
Peel back the band-aids to reveal a sharp line separating the French tip from the ombre gradient. Finish the design with a top coat to seal in the colors and protect the nail art. This will add a glossy finish and ensure your design lasts throughout the holiday season.
With these simple steps, you'll be rocking a festive, ombre-inspired manicure that's sure to impress!
Festive Color Combo
You can create a bold, festive look by pairing red and green ombre tips with a crisp French tip design. To achieve this, use band-aids to create a clean French tip gap for a seamless shift between the red and green ombre design.
Next, apply red, white, and green polish on a makeup sponge to achieve a seamless gradient effect on the tips. When you're ready, peel back the band-aids carefully to reveal a crisp and defined line for the French tip. Don't forget to clean up any excess polish around the cuticles with acetone for a professional finish.
Finally, seal the design with a topcoat to protect the ombre tips and ensure longevity. With these steps, you'll have a bold, festive nail design that's perfect for the holiday season. The red and green ombre tips will add a pop of color to your look, while the French tip design adds a touch of elegance.
Get creative and have fun with this festive color combo!
Festive Holiday Tree Design
Create a festive holiday tree design on your nails by painting a triangular shape with green polish, adding a brown trunk at the base. This classic Christmas symbol is sure to get you in the holiday spirit!
To guarantee some extra festivity, use red, gold, and silver polish to create ornaments that hang from the branches. You can use a dotting tool to create colorful lights that twinkle on the tree.
For a finishing touch, add a yellow star on top of the tree – it's the perfect way to complete your holiday look.
To secure your design lasts throughout the holiday season, don't forget to seal it with a topcoat. With this festive design, you'll be the envy of all your friends and family.
Plus, it's easy to customize to fit your personal style – try using different shades of green or adding some glitter accents to make your tree truly unique. Whatever you choose, this festive holiday tree design is sure to spread some holiday cheer!
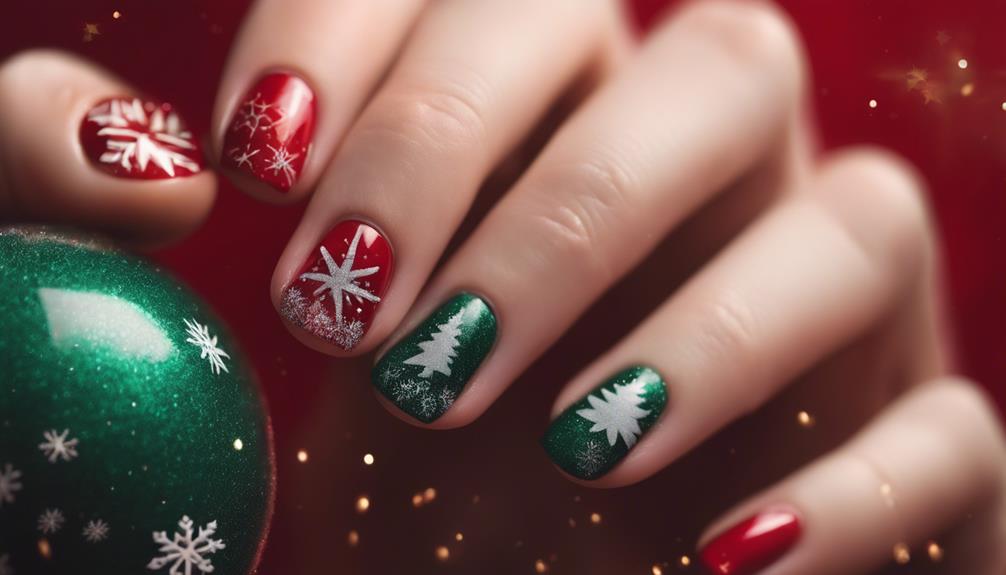
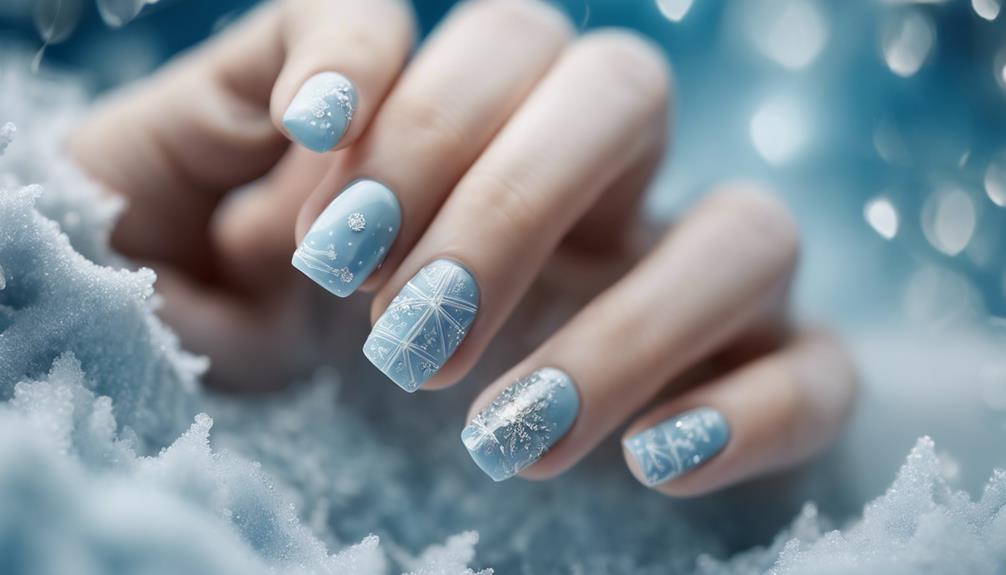
Snowflake Nail Art Inspiration
As you explore snowflake nail art, you'll discover two main paths to creating a winter wonderland on your nails: Winter Wonderland Designs and Delicate Pattern Creations.
With Winter Wonderland Designs, you can craft a serene, icy landscape that transports you to a magical snowy night.
Meanwhile, Delicate Pattern Creations will guide you in crafting intricate, lace-like snowflakes that shimmer and shine on your nails.
Winter Wonderland Designs
Snowflakes, the quintessential winter wonderland motif, can be beautifully recreated on your nails with a few simple yet effective techniques. To get started, you'll need a thin nail art brush or a stamping plate to add intricate snowflake patterns to your nails.
You can use white, silver, and blue polish to create a winter wonderland effect. For a gradient effect, layer different shades of blue, or add some glitter for a sparkling snowfall look. To take your design to the next level, consider adding rhinestones or studs to create a 3D effect.
Finish with a matte topcoat to give your snowflake nails a frosty, winter wonderland finish. With these techniques, you can create a stunning winter wonderland design that's sure to impress.
Delicate Pattern Creations
To take your winter wonderland nail art to the next level, you can explore delicate pattern creations that feature intricate snowflake designs that will leave everyone in awe.
Snowflake nail art is a popular choice for winter and holiday-themed manicures, and it's easy to see why. With a fine nail art brush, you can create intricate snowflake designs with ease. You can use white and blue polish for a wintry look that's both elegant and festive.
If you're not comfortable with freehand painting, don't worry! Nail stamping plates can help you achieve delicate patterns like snowflakes. Adding a touch of glitter or rhinestones can enhance the festive vibe, making your nails truly sparkle.
With a little practice, you can create stunning snowflake designs that will be the envy of all your friends. So why not give it a try? Your nails will thank you, and you'll be sure to spread some holiday cheer!
Merry and Bright Stripes
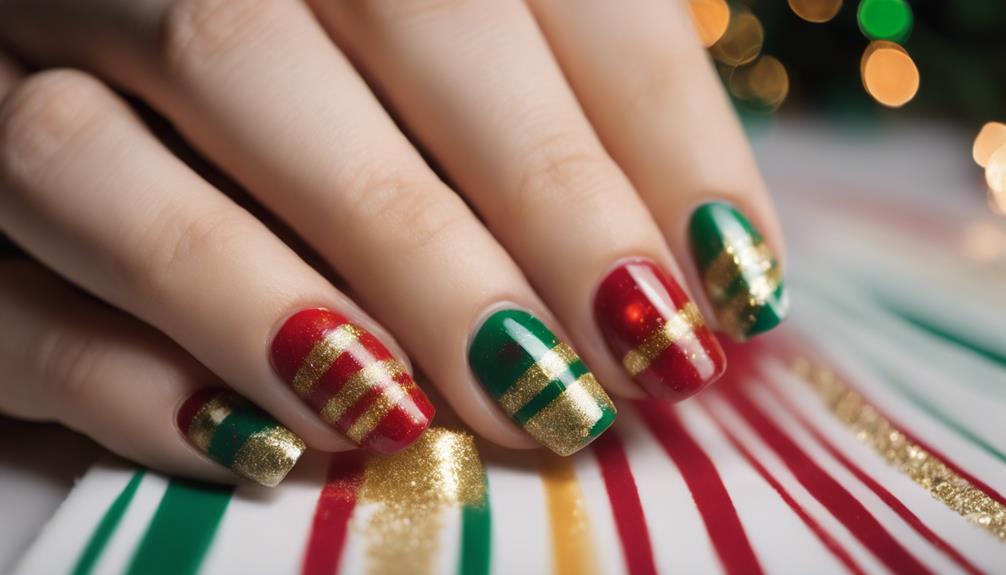
You'll create a festive and fun look by painting red and green stripes on a white base coat, alternating between thick and thin stripes for a visually appealing effect. To achieve this merry and bright look, use a thin nail art brush to carefully paint the stripes.
You can add an extra touch of festivity by incorporating gold glitter or metallic stripes into your design. Don't be afraid to experiment with different color combinations, like red and silver or green and white, to create a unique look that's all your own.
When you're happy with your design, finish it off with a glossy topcoat to seal the deal and add a shiny finish. This look is perfect for the holiday season, and the best part is that it's easy to customize to fit your personal style.
Reindeer Antler Accent Nails

Give your holiday nail art a playful twist by incorporating reindeer antler accent nails into your festive look. This popular Christmas nail art design features intricate antler patterns that are sure to catch attention. To achieve this look, you'll typically paint detailed antlers on one or two nails, adding a touch of whimsy to your overall design.
Using a thin brush or nail art pen, you can create precise lines and shapes that bring the antlers to life.
Feel free to get creative by pairing the antlers with other Christmas elements, like a bright red nose or delicate snowflakes. To take your design to the next level, consider adding some sparkle with glitter or rhinestones. This will give your antlers an extra touch of magic and make them stand out even more.
With a little practice and patience, you'll be sporting a festive holiday look that's sure to spread cheer. So why not give reindeer antler accent nails a try and add some playful flair to your holiday nail art?
Glittering Snowglobe Nails

As you move from whimsical reindeer antlers to winter wonderland scenes, create a magical atmosphere with Glittering Snowglobe Nails, a festive design that captures the essence of the holiday season. This nail art design features a clear base with snowflake glitter, giving it a winter wonderland effect. To create the snowglobe base, use a dotting tool and add a tiny tree or house inside. Seal the design with a topcoat to give it a glass-like finish.
| Glittering Snowglobe Nails Tips | Design Elements | Customization Ideas |
|---|---|---|
| Use a dotting tool for details | Snowflake glitter, tiny tree/house | Try different glitter colors/shapes |
| Seal with a topcoat | Clear base, snowglobe effect | Add a few snowflakes on top |
| Experiment with designs | Whimsical winter scene | Mix glitter colors for a unique look |
This design is perfect for the holiday season and adds a touch of whimsy to your manicure. You can play around with different glitter colors and shapes to customize your snowglobe nails, making it a unique and festive holiday nail art design.
Frequently Asked Questions
What Are Good Nail Colors for Christmas?
When choosing nail colors for Christmas, you're spoiled for choice! Traditional shades like red, green, gold, and silver evoke festive feelings, while darker greens and deep reds recall holly and mistletoe.
White adds a wintery touch, perfect for snow-inspired designs. You can't go wrong with metallic or glitter finishes to give your nails extra sparkle.
Experiment with different shades and techniques to create a unique look that's all yours!
How to Decorate Your Nails for Christmas?
Hey, get ready to sleigh the holiday season with your nail game! To decorate your nails for Christmas, start with a white base coat to make those festive colors pop.
Add some sparkle with glitter polish and seal it with a topcoat for long-lasting wear.
Experiment with techniques like gradients, French tips, or detailed nail art to create a unique look that's merry and bright.
You'll be the belle of the holiday ball with these tips!
What Color Is Best for Holiday Nails?
What's the best color for your holiday nails? Well, it ultimately depends on your personal style!
If you're going for a classic look, red and green are always a great combo.
Want to add some glamour? Silver and gold are perfect for a sophisticated vibe.
Or, if you're feeling icy, blue and silver can give you a winter wonderland feel.
Whatever you choose, don't forget to add some glitter polish for extra sparkle!
What Color Are Nails in December?
You might think December nails are all about bold reds and greens, but you'd be surprised! While those classic colors are popular, many people opt for metallic shades like silver and gold to add a touch of glamour.
And let's not forget about winter-themed colors like icy blues and whites for a frosty, elegant look. Sparkly glitter polish is also a common choice, adding a festive vibe to nail designs.
Conclusion
As you deck the halls, don't forget to deck out your nails!
With these 7 festive Christmas nail art ideas, your hands will be the merriest on the block.
Imagine twinkling snowflakes, jolly old Saint Nick, and merry stripes dancing across your fingertips.
Get ready to sleigh the holiday season with nails that shine brighter than the Christmas tree lights.
With a little creativity and some sparkly polish, your holiday cheer will be contagious!