Connect with us

Nail Tips

Nail Art Project Ideas: 7 Creative Designs

Master the art of nail design with these 7 innovative ideas that will take your creativity to new heights, but that's just the beginning…

Published

on

creative nail art projects

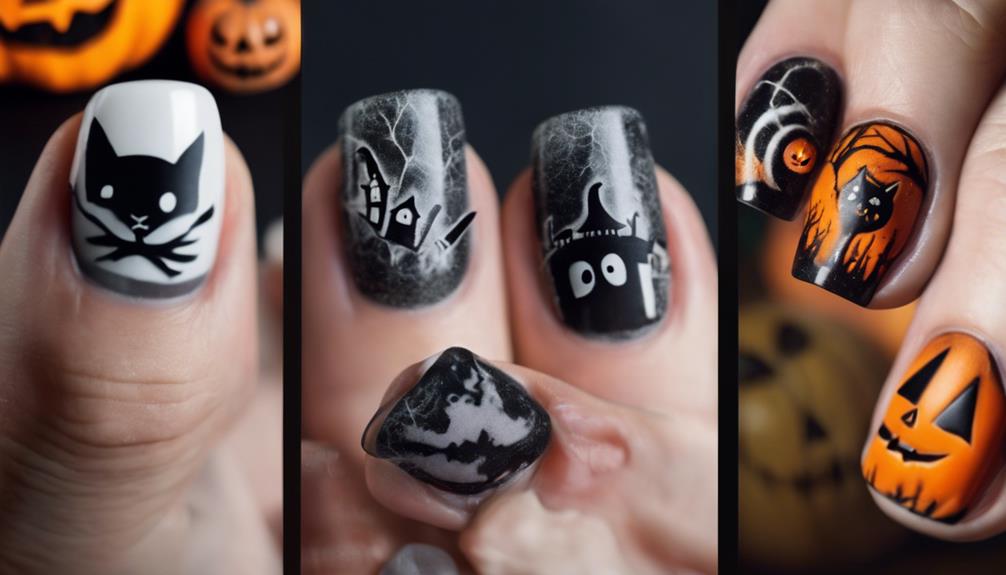
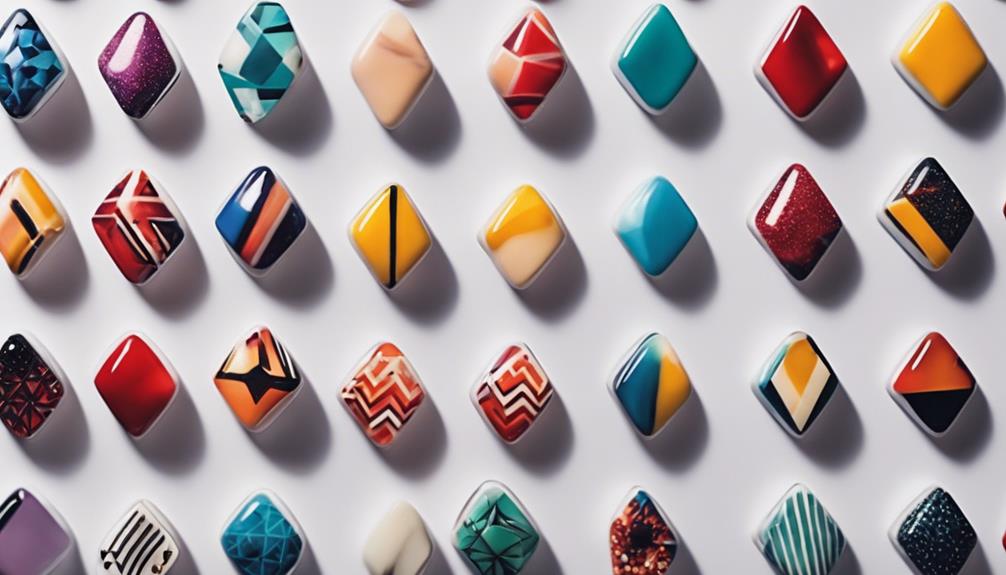
You're ready to elevate your nail art to the next level! Discover 7 creative designs that will awaken your inner artist. Try candy-themed nail art with vibrant colors and glittery designs, or geometric patterns with sharp, clean lines. Embrace your wild side with animal print inspiration or add some glamour with sparkling nail art designs. Whimsical acrylic nail designs, striped nail art, and heartfelt designs will also inspire you to express yourself. From playful motifs to luxurious accents, these ideas will ignite your creativity. Want to learn more about these innovative designs and how to master them?

Key Takeaways

• Explore candy-themed nail art with vibrant colors, glitter, and playful motifs like stripes and swirls for a fun and playful look.

• Create geometric patterns with sharp, clean lines, angular nail shapes, and versatile angular shapes for a modern touch.

• Get inspired by animal prints like leopard, zebra, or tiger, using nail polish, art pens, or stickers, and adding metallic accents for flair.

• Add luxury with glittering nail art designs, experimenting with holographic nails, glittery French tips, and metallic accents for glamour and shine.

Advertisement

• Express your creativity with whimsical acrylic nail designs, showcasing unique style with playful motifs, vibrant colors, and intricate patterns.

Candy-Themed Nail Art Designs

Get ready to satisfy your sweet tooth with candy-themed nail art designs that burst with colorful creativity! With these sweet treats-inspired nail art designs, you'll be the talk of the town.

To create these mouth-watering masterpieces, start by alternating golden and rose gold base coats with sequences, polka dots, and leopard patterns. Then, use a variety of colorful nail polish to mimic the appearance of sweets like candy with glittery designs and vibrant colors.

Experiment with different candy-inspired motifs such as stripes, swirls, and sprinkle patterns for a fun and playful look. You can also incorporate small hearts with different colors on white swirls on a black base coat to achieve a whimsical candy-themed nail design.

Don't be afraid to explore the use of pastel shades, sparkles, and glossy finishes to enhance the sweet and sugary feel of your candy-themed nail art. With these creative ideas, you'll be sure to satisfy your sweet tooth and create stunning nail art that's almost too sweet to be true!

Advertisement

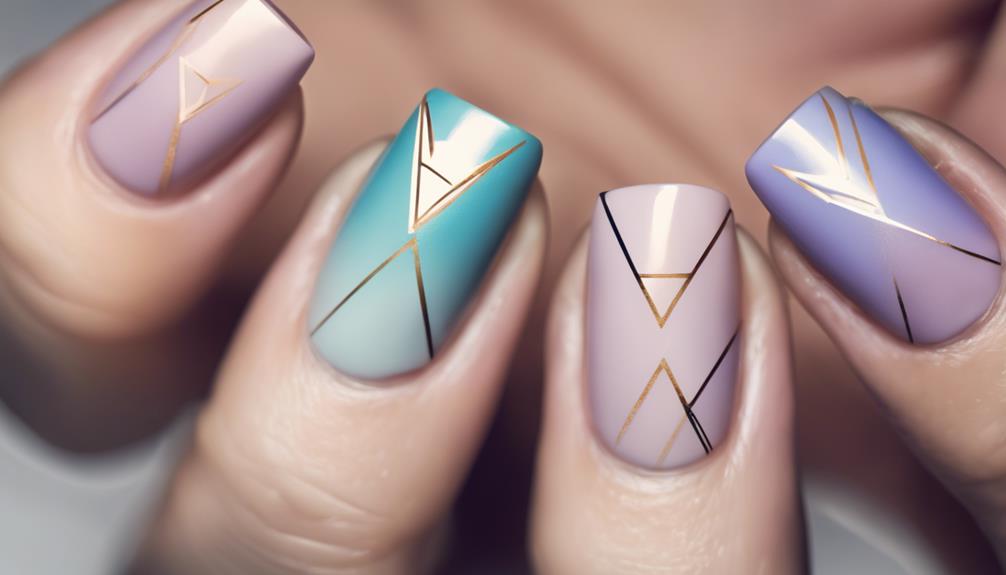
Geometric Patterns for Nail Art

nail art geometric designs

When you think of geometric patterns for nail art, you probably imagine angular nail shapes and symmetrical designs that create a sense of harmony.

To achieve this look, you'll want to focus on creating sharp, clean lines and balanced compositions that draw the eye.

Angular Nail Shapes

You can create a striking geometric pattern on your nails by incorporating angular shapes, which involve straight lines and sharp angles to add an edgy touch to your nail art design.

Angular nail art is all about creating geometric patterns using triangles, squares, diamonds, and other angular shapes. With angular nail art, you can achieve a modern and edgy look by using contrasting colors and bold patterns. The best part? Angular nail shapes are versatile and can be customized to suit different preferences and styles.

Experiment with negative space, color blocking, and intricate geometric arrangements to create unique angular nail designs. You can pair bold angular shapes with soft pastel colors for a chic look or go all out with bold colors and patterns for a statement look.

Angular nail art is perfect for those who want to add a touch of sophistication and glamour to their nail art design. With a little creativity, you can create stunning angular nail art that's sure to turn heads.

Advertisement

Symmetrical Designs

By incorporating symmetrical designs into your nail art, you can create a cohesive look that mirrors perfectly on both hands, taking your geometric patterns to the next level.

Symmetrical designs involve creating geometric patterns that mirror each other on both hands, resulting in a balanced and harmonious appearance.

To achieve this look, you'll need to incorporate straight lines, shapes, and angles, which can include intricate details like chevron patterns, stripes, and geometric shapes for a modern and stylish look.

Animal Print Nail Art Inspiration

unique animal themed nail designs

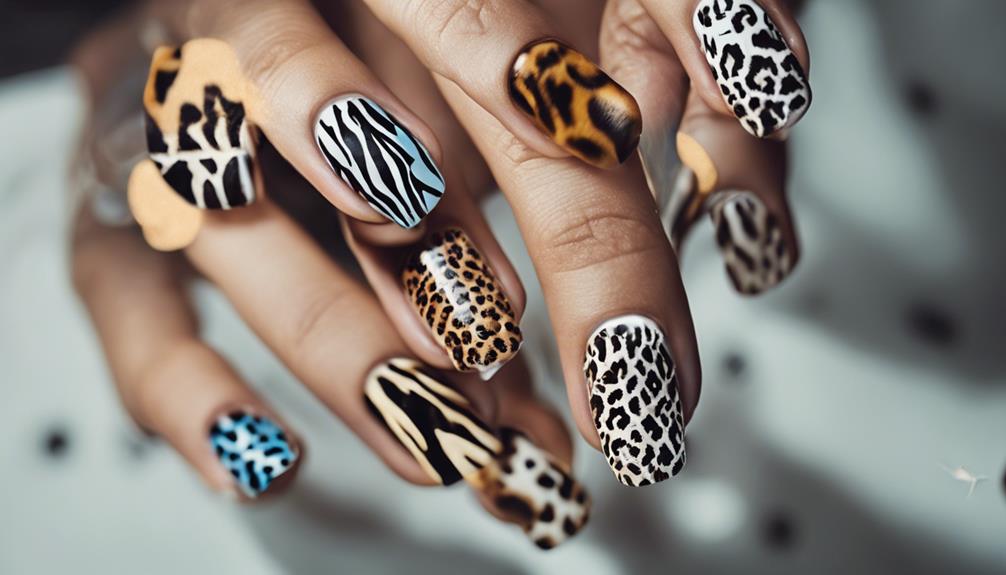
Get ready to awaken your wild side with animal print nail art inspiration, which taps into the natural world to create bold, eye-catching designs. You can ignite your creativity by incorporating patterns like leopard spots, zebra stripes, or tiger stripes into your nail art. To achieve an authentic look, use colors like black, brown, white, and gold to mimic animal fur patterns.

Here are some ways to get started:

  1. Choose your animal print: From leopard to zebra, there are many options to choose from. You can also mix and match different prints for a unique look.
  2. Pick your tools: Use nail polish, nail art pens, or nail stickers to create your design. Each method offers a different level of complexity and precision.
  3. Add some flair: Consider adding metallic accents or combining different animal prints on each nail for a modern twist.

Glittering Nail Art Designs Ideas

creative nail art designs

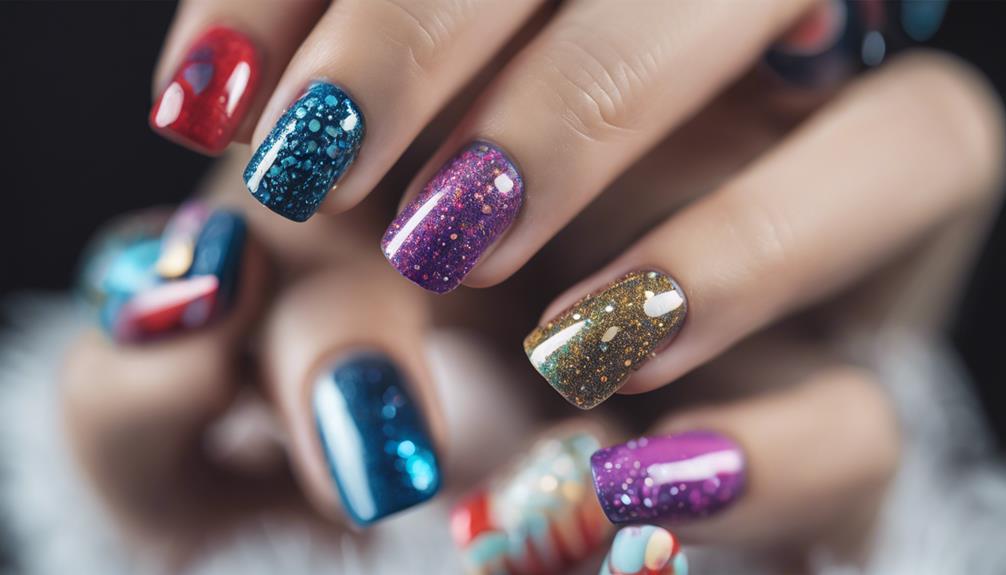
Now that you've got the basics of glittering nail art down, it's time to get creative with some show-stopping designs!

You'll love experimenting with sparkling holographic nails, adding a touch of glamour with glittery French tips, or making a statement with metallic glitter accents.

Advertisement

These ideas will take your nail art game to the next level, so let's get started!

Sparkling Holographic Nails

As you explore the world of sparkling holographic nails, you'll discover a mesmerizing fusion of iridescent and holographic glitter that creates a futuristic, show-stopping look. This trendy nail art design is perfect for special occasions or events, and with the right techniques, you can achieve a multi-dimensional, rainbow-like effect on your nails.

To get started, you'll need a base coat, holographic powder or polish, and a top coat. Here's a quick rundown of the process:

  1. Apply a base coat to protect your nails and promote adhesion.
  2. Use a holographic powder or polish to create the iridescent effect.
  3. Seal your design with a top coat and cure under a UV or LED lamp for a long-lasting finish.

With holographic nails, the possibilities are endless. You can customize your design with different shapes, patterns, and colors to create a unique and dazzling look.

Whether you're looking to make a statement or simply want to add some extra glamour to your everyday look, sparkling holographic nails are sure to turn heads.

Glittery French Tips

You can add a touch of luxury to the classic French manicure by incorporating glitter accents on the nail tips, creating a glamorous and trendy look that's perfect for special occasions or everyday glamour.

Advertisement

Glittery French tips are a great way to elevate your nail game and make a statement. To create this look, you'll need to apply glitter polish to the tips of your nails. You can choose from a variety of glitter shades, such as silver, gold, or rose gold, to match your personal style. For a fun twist, try using colorful glitter to add some personality to your look.

The best part about glittery French tips is that they're versatile and can be customized to fit your unique style. You can experiment with different nail shapes and lengths to create a one-of-a-kind look. Plus, you can adjust the glitter placement to suit your taste.

Whether you're heading to a party or just want to add some sparkle to your everyday look, glittery French tips are the perfect way to do it. So go ahead, get creative, and add some glamour to your nails!

Metallic Glitter Accents

By incorporating metallic glitter accents into your nail art designs, you can instantly add a touch of glamour and shine to your look, making your nails truly stand out. With metallic glitter, you can create a dazzling and eye-catching effect on your nails that's sure to turn heads.

Here are a few ways to incorporate metallic glitter accents into your nail art designs:

Advertisement
  1. Accent nail: Paint a single nail with metallic glitter for a bold, eye-catching look.
  2. Intricate patterns: Use metallic glitter to create intricate patterns and designs on your nails.
  3. Gradient effect: Gradually blend metallic glitter into a gradient effect for a mesmerizing look.

Experimenting with different metallic glitter colors and shapes can help you achieve unique and personalized nail art designs. Whether you're going for a bold, glamorous look or a more subtle, elegant vibe, metallic glitter accents can elevate your nail art game.

With a little creativity, you can take your nail art to the next level and make a statement with metallic glitter accents.

Whimsical Acrylic Nail Designs

creative acrylic nail art

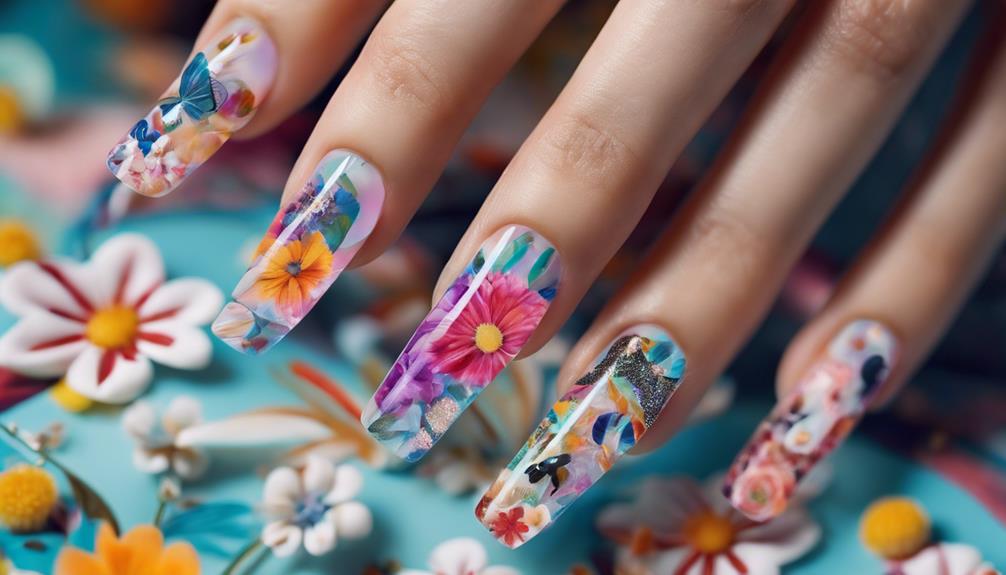
With acrylic nails as your canvas, you can express your creativity and bring whimsical designs to life, featuring intricate patterns and playful motifs that showcase your unique style. Whimsical acrylic nail designs are all about having fun and experimenting with vibrant colors, intricate detailing, and unique shapes. The sturdy base of acrylic nails provides the perfect platform for your creative freedom, allowing you to get as intricate as you like with your design.

These designs often feature floral patterns, cartoon characters, and abstract shapes, resulting in a fun and playful aesthetic. As a nail art enthusiast, you'll love the endless possibilities that whimsical acrylic nail designs offer. You can mix and match different elements to create a look that's truly one-of-a-kind.

Whether you're looking to make a statement or simply express your personality, whimsical acrylic nail designs are the perfect way to do so. So don't be afraid to get creative and let your imagination run wild – after all, that's what whimsy is all about!

Striped Nail Art Designs Ideas

creative striped nail designs

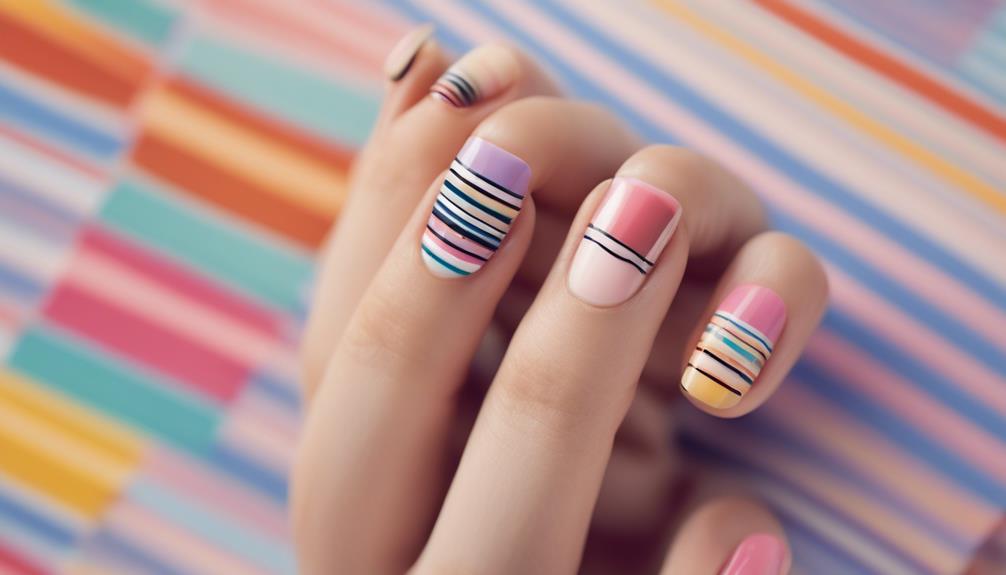
Striped nail art designs offer a versatile canvas for self-expression, allowing you to mix and match colors, patterns, and embellishments to create a unique look that's all your own. With endless possibilities, you can experiment with different stripe directions, widths, and colors to create a one-of-a-kind design.

Whether you're a seasoned nail artist or a beginner, striped nail art is an excellent way to add some creativity to your nail game.

Here are some ideas to get you started:

Advertisement
  1. Classic Combo: Pair bold, bright colors like red and yellow with neutral shades like white and black for a striking contrast.
  2. Glitzy Glam: Add some sparkle to your striped nail art with glitter, rhinestones, or other embellishments.
  3. Geometric Twist: Combine vertical and horizontal stripes in a crisscross pattern for a modern, edgy look.

Heartfelt Nail Art Designs Inspiration

creative nail art ideas

You can express your love and affection through creative nail art with heartfelt designs that feature small hearts in different colors on white swirls over a black base coat. This adorable combination is sure to make your nails stand out and convey your sweet sentiments.

To take your heartfelt nail art to the next level, try using gel nail paints and adding some sparkles for a vibrant and eye-catching look. The addition of hearts to your nail art design adds a romantic touch to your manicure, making it perfect for special occasions or just because.

Don't be afraid to experiment with different color combinations and patterns to create unique and personalized heartfelt nail art designs that reflect your personality. With a little creativity, you can create a one-of-a-kind design that showcases your love and affection.

Frequently Asked Questions

What Is 5 Basic Nail Art Design?

When it comes to basic nail art designs, you've got five fantastic options to get started!

You can create stripes, either horizontal or vertical, for a classic look.

Dots are another fun and easy design, perfect for adding some personality to your nails.

Advertisement

Geometric shapes, like triangles or squares, can add a touch of modernity.

Chevrons are also a great choice, offering a trendy vibe.

And finally, you can't go wrong with a simple, yet elegant, swirl design.

What Nail Design Is Trending Right Now?

You're wondering what's hot in the nail design scene right now? Well, let me tell you – ombre nails with bold color combos are killing the game!

Paw-print designs are also a hit among animal lovers, while gemstone French manicures are adding a touch of luxury to nail art.

Advertisement

And if you want something chic, gold polka-dots on pale pink nails are a trendy choice.

How to Make Easy Nail Art?

You're enthusiastic to immerse yourself in the world of nail art, and it's as easy as pie! Start by selecting a base coat color that speaks to you, and apply it smoothly to your nails.

Next, grab your trusty nail art tools, like brushes and dotting tools, to create intricate designs. Don't be afraid to experiment with techniques like ombre or geometric patterns.

What Is Best for Nail Art?

When it comes to what's best for nail art, you've got to take into account a few things.

First, think about your personal style – do you like bold and bright or understated elegance?

Advertisement

Then, factor in your nail shape, length, and condition.

Finally, decide on the occasion – are you dressing up or keeping it casual?

Conclusion

As you dip your brush into the world of nail art, the possibilities unfold like a canvas of endless creativity. Your fingertips transform into tiny masterpieces, telling stories of whimsy and wonder.

From candy-themed treats to geometric patterns, each design is a brushstroke of self-expression. So, let your imagination run wild, and your nails become a work of art that's uniquely you – a masterpiece that's as bold, bright, and beautiful as you are.

Advertisement

Continue Reading
Advertisement

Nail Tips

10 Nail Art Studio Ideas That Will Inspire You

Amplify your nail art skills with these 10 studio ideas that blend creativity, innovation, and style, taking your nail game to new heights.

Published

on

By

nail art inspiration galore

You're about to ignite your creativity! Get ready to be inspired by 10 nail art studio ideas that will elevate your nail game to the next level. From bold and bright acrylic nails to elegant floral designs, geometric patterns, and mesmerizing holographic effects, the possibilities are endless. Discover abstract masterpieces, metallic marvels, whimsical characters, and minimalist chic styles that will make you stand out. Whether you're a nail art newbie or a seasoned pro, these ideas will ignite your imagination and encourage you to experiment with new techniques and designs. And, there's more to explore…

Key Takeaways

• Explore bold and bright acrylic nails for vibrant colors and unique designs that make a statement.

• Create elegant and feminine looks with intricate floral patterns in soft pastel colors.

• Add an edgy touch with geometric nail art featuring Chevron, Houndstooth, and abstract shapes.

• Incorporate holographic effects for a futuristic and mesmerizing look that shifts in different lighting conditions.

Advertisement

• Embrace minimalism with clean lines, simple designs, and strategic use of negative space for a chic look.

Bold and Bright Acrylic Nails

When you opt for bold and bright acrylic nails, you're not just getting a stylish look, you're making a statement that commands attention with vibrant colors and unique designs. These eye-catching creations are perfect for those who want to express their individuality through nail art.

With acrylic nails, you can experiment with bold color combinations, intricate patterns, and unique shapes that'll make your nails stand out.

Acrylic nails provide the perfect canvas for creating bold and bright nail art. Because they're durable and long-lasting, you can enjoy your striking design for weeks to come. Popular choices include neon colors, glitter accents, and geometric designs that add an extra wow factor to your look.

The best part? Your nail technician can customize your acrylic nails to suit your individual style, allowing for endless possibilities in creating bold and bright nail art.

Advertisement

Whether you're looking to make a statement at a special occasion or simply want to elevate your everyday look, bold and bright acrylic nails are the perfect way to do so.

Elegant Floral Nail Designs

elegant floral nail art

One elegant way to add a touch of sophistication to your nail art is through elegant floral nail designs, which feature intricate flower patterns in soft pastel colors like rose pink, lavender, and mint green. These delicate designs can incorporate various floral elements such as roses, lilies, daisies, and cherry blossoms, giving you a romantic and feminine look.

Nail artists use techniques like hand-painting, stamping, and 3D embellishments to create realistic and detailed floral designs on your nails. The best part? Elegant floral nail designs are versatile and suitable for both everyday wear and special occasions like weddings, proms, and parties. They're a popular choice among those who appreciate feminine and classy nail art that adds a touch of elegance to their overall look.

With floral nail art, you can achieve a sophisticated and refined appearance that's perfect for any occasion. Whether you're looking for a subtle or dramatic look, elegant floral nail designs can be tailored to your personal style, making them a great addition to your nail art repertoire.

Geometric Shapes and Patterns

exploring math through art

You can add an edgy, modern touch to your nail art with geometric shapes and patterns, which offer a fresh alternative to traditional floral designs. These designs can be created using nail art tools like striping tape, nail stencils, and dotting tools. Geometric nail art offers a modern and artistic look that can be customized with various colors and finishes.

Here are some popular geometric patterns in nail art:

Pattern Description Tools Needed
Chevron Zig-zag pattern Striping tape, nail polish
Houndstooth Small, broken checks Nail stencils, dotting tool
Geometric Grid Grid pattern with shapes Nail stencils, striping tape
Abstract Shapes Random shapes and lines Dotting tool, nail polish

Geometric nail art allows for endless creativity and versatility in design, making it a favorite among nail art enthusiasts. You can experiment with different colors, finishes, and tools to create unique and eye-catching nail art ideas. Whether you're a beginner or an experienced nail artist, geometric shapes and patterns offer a world of possibilities to explore.

Advertisement

Holographic Nail Art Inspiration

shiny holographic nail designs

Take your nail art to the next level with holographic nail art inspiration, which adds an extra dimension to your designs with its mesmerizing, rainbow-colored effects. You'll be amazed by how this style can elevate your nail game!

Holographic nail art features iridescent, rainbow-like effects that shift in different lighting conditions, creating a mesmerizing and futuristic look that stands out and sparkles.

To achieve this stunning effect, you can use holographic nail powders, holographic nail wraps, or holographic nail stickers. Popular brands like ILNP, Color Club, and Cirque Colors offer a range of holographic nail polishes to get you started.

The holographic trend has gained popularity in recent years, with many nail artists incorporating holographic elements into their designs. With holographic nail art, you can create unique and eye-catching designs that are sure to turn heads.

Abstract Nail Art Creations

innovative nail design inspiration

Explore the world of abstract nail art creations, where geometric shapes, bold colors, and unique patterns come together to create modern and artistic designs that showcase your creativity. You'll love experimenting with different textures and finishes to create one-of-a-kind looks that reflect your personality.

Here are some exciting aspects of abstract nail art:

  1. Negative space: Create a striking contrast by leaving some areas of the nail blank, allowing the natural nail to peek through.
  2. Metallic accents: Add a touch of luxury with metallic hues that catch the light, elevating your design to the next level.
  3. Asymmetrical patterns: Break free from symmetry and create intriguing designs that defy traditional nail art norms.
  4. Artistic inspirations: Draw inspiration from abstract art movements like cubism, surrealism, and minimalism to create truly unique designs.

With abstract nail art, the possibilities are endless, and the freedom to experiment is exhilarating. Whether you prefer subtle and minimalist or bold and vibrant designs, this style allows you to express yourself like never before.

Ombre Nail Art Trends

ombre nails are in

Immerse yourself in the world of ombre nail art trends, where gradient colors blend seamlessly to create a chic, modern look that's perfect for making a statement.

With ombre nail art, you can achieve a stylish and modern touch to any manicure. This popular trend involves blending two or more colors seamlessly on the nails for a gradient effect, creating a versatile and customizable look. You can experiment with various color combinations, from soft pastels to vibrant neons, and apply the design to different nail shapes and lengths.

Advertisement

To try ombre nail art, you can use DIY nail techniques like sponge, brush, or airbrush methods to create a smooth progression between colors. This trend is perfect for those who want to experiment with unique and eye-catching designs.

With ombre nail art, you can add a touch of sophistication and glamour to your everyday look. So, get creative and try out this trendy nail art style that's sure to turn heads!

3D Nail Art Masterpieces

creative nail designs showcased

Now that you've mastered the art of ombre nail art, step up your game with D Nail Art Masterpieces, where intricate 3D designs and raised elements take nail art to new heights. This level of nail art requires advanced skills in sculpting and painting to create lifelike and eye-catching designs. With D Nail Art Masterpieces, you can create stunning 3D effects that will make your nail art stand out.

Here are some key things to know about D Nail Art Masterpieces:

  1. Intricate designs: D Nail Art Masterpieces feature intricate 3D designs with raised elements, making them a true showstopper.
  2. Advanced skills: To create these masterpieces, you'll need advanced skills in sculpting and painting.
  3. Specialized tools: Artists use specialized tools like nail drills, brushes, and sculpting gels to achieve stunning 3D effects.
  4. Statement nails: D Nail Art Masterpieces are perfect for special occasions or as statement nails for those seeking bold and unique nail art.

With D Nail Art Masterpieces, the possibilities are endless. From flowers to animals, the level of detail and realism is unmatched.

Metallic Nail Polish Designs

shiny unique manicure trends

What's the secret to adding a touch of glamour to your nails? The answer lies in metallic nail polish designs! These shiny and reflective finishes instantly elevate your look, making you feel like a million bucks.

With a variety of shades to choose from, such as gold, silver, rose gold, and bronze, you can create versatile looks that suit your mood and style.

Metallic nail polish designs are perfect for special occasions or adding a bold statement to your everyday style. You can use them for accent nails, full manicures, or combine them with other nail art techniques for a unique look.

Advertisement

The best part? They're incredibly easy to apply and can be paired with nail decals, rhinestones, or glitter for added dimension.

Whether you're looking to make a statement or simply add some sophistication to your look, metallic nail polish designs are the way to go. So, get creative and experiment with different shades and combinations to find your new go-to look!

Whimsical Nail Art Characters

creative nail art designs

As you explore the world of whimsical nail art characters, you'll discover a domain of creative possibilities.

You can bring cartoonish creature designs to life with playful pattern combos that will make your clients smile.

From cute critters to fantastical beings, the key to success lies in mastering the art of combining bold colors, intricate details, and playful elements to create truly show-stopping designs.

Cartoonish Creature Designs

With a flick of creativity, you can transport yourself to a whimsical world where cartoonish creatures come alive on your nails. Cartoonish creature nail art designs are all about embracing your inner child and letting your imagination run wild. These whimsical characters, like unicorns, mermaids, and cute animals, are brought to life on your nails with intricate detailing techniques.

Advertisement

Here are some popular cartoonish creature designs to inspire you:

  1. Mermaid Magic: Add some underwater charm to your nails with shimmering scales and flowing locks.
  2. Unicorn Dreams: Create a mythical masterpiece with pastel hues, glitter, and a dash of magic.
  3. Cute Critters: Bring adorable animals like pandas, koalas, or rabbits to life on your nails with bold colors and playful details.
  4. Character Cameos: Pay homage to beloved cartoon characters like SpongeBob, Pikachu, or Disney princesses on your nails.

These cartoonish creature designs are perfect for those who love quirky and lighthearted nail art. So, don't be afraid to get creative and showcase your personality with a whimsical nail art design that's all about fun and imagination!

Playful Pattern Combos

You can elevate your whimsical nail art game by combining playful patterns like polka dots, stripes, and stars to create a fun and creative look that's uniquely yours.

Whimsical nail art characters, which often feature cute animals, cartoon characters, or emojis, can be taken to the next level with playful pattern combos. By incorporating bright colors, glitter accents, and intricate details, you can create a truly eye-catching design.

Nail artists often use hand-painted techniques or nail stickers to bring these whimsical characters to life on your nails. Whether you're looking for a special occasion design or just want to showcase your unique style, playful pattern combos can add a charming touch to your nail art.

Minimalist Nail Art Chic

stylish and understated nails

Embracing the beauty of simplicity, minimalist nail art chic defines itself through clean lines, simple designs, and strategically used negative space. You'll love how this understated style creates a chic and sophisticated look that's perfect for any occasion.

With minimalist nail art, you can say goodbye to over-the-top designs and hello to a more refined, modern aesthetic.

Advertisement

Here are some key characteristics of minimalist nail art chic:

  1. Neutral colors: Soft, muted hues that add a touch of elegance to your nail art.
  2. Geometric shapes: Simple, clean lines and shapes that create a modern, sophisticated look.
  3. Subtle accents: Delicate details that add a hint of personality to your nail art.
  4. Negative space: Strategically used empty space that creates a sleek, minimalist look.

Frequently Asked Questions

Where Is the Best Nail Inspo?

You're on the hunt for the best nail inspiration, and you're spoiled for choice! From Pinterest's endless boards to Instagram's #nailsofinstagram with over 16 million posts, you'll find a wealth of creative designs.

Kiara Sky's Instagram and Cosmopolitan Magazine's lists are also great resources. And if you want to learn from a pro, Nail Career Education on YouTube has got you covered.

Where will you find your next nail obsession?

What Nail Art Is Popular?

You're wondering what's hot in the world of nail art, right? Let's face it, trends come and go, but currently, negative space nails, holographic nails, and matte nails are stealing the show.

Chrome nails and abstract nail art are also super popular. French manicures, ombre nails, and marble nails remain timeless faves. These styles are everywhere, and you can't go wrong with incorporating them into your next nail art design!

Advertisement

How to Pick a Nail Business Name?

You're starting your own nail business – exciting! Now, it's time to pick a name that represents your style and attracts the right clients.

Begin by brainstorming words that reflect your personality, target audience, and services.

Make sure to research competitor names to stand out, and check for domain name availability.

Keep your name short, memorable, and easy to spell for effective branding.

Take your time, and don't be afraid to get creative – your business name is the first impression you'll make on potential clients!

Advertisement

What Are the Benefits of Nail Art?

As you immerse yourself in the world of nail art, you'll discover its numerous benefits.

You'll find that it's an amazing way to express yourself, boosting your confidence and enhancing your personal style.

It's a fun, relaxing activity that lets you stay on-trend with the latest fashion and beauty trends.

Plus, it's a great conversation starter, allowing you to showcase your individuality and personality.

Conclusion

You've made it to the end of our nail art studio inspiration journey! With these 10 ideas, you're now equipped to express your creativity and create stunning nail art that turns heads.

Advertisement

Did you know that according to a recent survey, 75% of women consider nail art a form of self-expression? It's no wonder, then, that the nail art industry is booming!

Feel empowered to experiment, get creative, and make a statement with your nail art – after all, it's a form of self-expression that's uniquely yours!

Continue Reading

Nail Tips

10 Clever Nail Art Storage Ideas

Maximize your nail art space with these ingenious storage solutions that will revolutionize your creative process and leave you wanting more.

Published

on

By

organize nail art supplies

You're just one clever storage solution away from transforming your nail art space into a haven of creativity and productivity. From clear containers to magnetic organizers, repurposed spice racks to tiered polish displays, the possibilities are endless. Imagine having all your tools and supplies at your fingertips, effortlessly corraling creative chaos into an inspiration hub. With DIY carts, compact travel cases, and hanging racks, you can create a space that sparks imagination and efficiency. Get ready to elevate your nail art game with these 10 clever storage ideas – and discover even more innovative ways to ignite your creativity!

Key Takeaways

• Utilize vertical space with over-the-door organizers or hanging racks to maximize storage and keep tools and supplies within easy reach.

• Repurpose common items like spice racks or lipstick holders to create unique and functional storage solutions for nail art supplies.

• Invest in clear containers or jars to store and display nail art decorations, making it easy to find what you need at a glance.

• Consider a portable nail art station or travel case to keep essential tools and polishes organized and within reach, even on-the-go.

Advertisement

• Designate a specific area or workstation for nail art creations, using a combination of storage solutions to keep tools and supplies organized and easily accessible.

Clear Container Nail Art Station

With a clear container nail art station, you can effortlessly corral your creative chaos, transforming your workspace into a hub of organized inspiration.

By utilizing transparent containers, you can store your nail art essentials like brushes, dotting tools, striping tape, and embellishments in one convenient spot. This setup allows you to quickly grab the tools you need, making your nail art creations a breeze.

Clutter becomes a thing of the past as you can easily find what you need, when you need it. A clear container nail art station helps you stay focused on your craft, rather than wasting time searching for misplaced supplies.

As you arrange your supplies in a visually appealing way, you'll find that your workspace becomes a reflection of your creativity. With everything at your fingertips, you'll be inspired to try new nail art designs and experiment with different techniques.

Advertisement

Your clear container nail art station becomes a haven for creativity, sparking your imagination and driving your passion for nail art.

Magnetic Nail Tool Organizer

nail tool storage solution

You can take your nail art organization to the next level by utilizing a magnetic nail tool organizer, which securely holds your tools in place with strong magnets. This clever storage solution is designed to keep your workspace clutter-free and your tools within easy reach. Made from durable materials like acrylic or metal, these organizers are built to last and can withstand frequent use.

With a magnetic nail tool organizer, you can store a variety of nail tools, including clippers, files, scissors, and more. The strong magnets guarantee that your tools stay in place, preventing them from getting lost or damaged. Plus, the organizers come in different sizes and designs, so you can choose the one that best fits your storage needs.

Repurposed Spice Rack Storage

reimagined spice rack solution

Turn an ordinary spice rack into an extraordinary nail art storage solution by repurposing it to hold your supplies, keeping them neatly organized and easily accessible. This clever hack allows you to utilize the compact size of a spice rack to fit in small spaces like on a vanity or in a drawer. You can categorize your nail art tools and accessories on the shelves, making it easy to find what you need when you need it.

Here's a breakdown of how you can customize your spice rack storage:

Category Storage Idea
Nail Polish Store up to 12 bottles on the top shelf
Nail Art Tools Organize brushes, dotting tools, and stampers on the middle shelf
Nail Care Store nail clippers, files, and cuticle care tools on the bottom shelf
Miscellaneous Use the smallest shelf for rhinestones, stickers, or other small nail art supplies

Transform the spice rack into a decorative and functional storage solution for your nail art collection by adding labels or painting it to match your personal style. With this creative storage idea, you'll be able to find what you need quickly and easily, making your nail art sessions more efficient and enjoyable.

Tiered Nail Polish Display

colorful nail polish organization

Take your nail polish collection to the next level by showcasing it in a visually appealing tiered display that's both functional and decorative. With a tiered display, you can showcase your nail polish collection in a way that's easy on the eyes and easy to access. Plus, it's a great way to add some style to your vanity or storage area.

Look for tiered displays made of acrylic or metal for durability and aesthetic appeal. Arrange your nail polishes on the tiers by color or brand to create an organized and attractive presentation. This won't only make your collection look amazing, but it'll also help you find the perfect shade in no time.

Advertisement

Another perk of tiered displays is that they can save space on your vanity or in your storage area while adding a decorative element to the room.

To keep your display fresh and engaging, consider rotating the nail polishes on the tiers periodically to showcase different colors. With a tiered display, you'll be able to enjoy your nail polish collection in a whole new way!

DIY Nail Art Supply Cart

creative nail art organization

With a dedicated DIY nail art supply cart, you'll have all your essentials within easy reach, making it a breeze to get creative with your nail designs. Create a mobile workstation using a rolling utility cart, perfect for moving around your nail polish station or storage area. Organize your supplies with clear storage containers or jars, labeling each one so you can quickly find what you need.

Category Storage Solution Benefits
Nail Art Supplies Clear Containers Easy to see contents, easy to clean
Nail Art Tools Hooks or Holders Keeps tools organized, saves space
Nail Polish Nearby Shelf Convenient access to polish collection

Customize your cart with additional hooks or holders for your nail art tools, like brushes and dotting tools. Keep the cart near your nail polish station for convenient access to all your nail art supplies. With everything in one place, you'll be inspired to try new nail designs and experiment with different techniques. Your DIY nail art supply cart will become your go-to workstation, making it easy to express your creativity and bring your nail art visions to life.

Adhesive Nail Polish Swatch Strips

colorful nail polish samples

When starting to use adhesive nail polish swatch strips, you'll want to contemplate how to organize them in a way that makes sense for you. Do you group similar shades together, or keep them in alphabetical order?

You'll also need to think about how you'll color code your strips, whether by brand, finish, or color family. By figuring out these details, you'll be able to maximize the benefits of using adhesive swatch strips in your nail polish collection.

Strip Organization Methods

You can efficiently categorize your nail polish collection by using adhesive nail polish swatch strips, which allow you to visually identify the colors at a glance. These strips are a game-changer for nail art enthusiasts, saving you time and effort when searching for the perfect shade.

Advertisement

By painting a small swatch of each nail polish color onto the strip, you can quickly scan your collection and find the perfect match for your next nail art project. This organization method is especially useful when you have a large collection of nail polishes, making it easy to distinguish between similar shades.

No more digging through your stash or opening multiple bottles to find the right color – with swatch strips, you can see at a glance which polish is which. This system also adds a touch of visual appeal to your storage system, making it a win-win for nail art enthusiasts.

Color Coding Options

How do you currently navigate your vast nail polish collection when searching for the perfect shade, and how can adhesive nail polish swatch strips simplify this process? With so many colors to choose from, it can be overwhelming to find the right one.

That's where color coding with adhesive nail polish swatch strips comes in. These strips are a game-changer for organizing your collection. Simply paint the strips with actual polish colors and stick them onto the top of your polish bottles. This way, you can quickly identify the colors you need without having to open each bottle individually. It's especially helpful when you're looking for a specific shade to pair with your top coats.

Adhesive nail polish swatch strips streamline your nail art process, making selecting colors a breeze. Your collection will look more organized, and you'll save time searching for the perfect shade. Give it a try and see how much easier it's to find the colors you need!

Advertisement

Adhesive Strength Matters

With your nail polish collection organized by color, it's equally important to guarantee the adhesive nail polish swatch strips holding those colors stay firmly in place. You want to make sure that your top drawer nail art storage is secure and reliable, and that's where adhesive strength comes in.

The adhesive nail polish swatch strips are designed with durable adhesive to provide a strong hold on nail polish bottles, preventing them from slipping or falling off. This means you can easily identify and select the perfect shade without worrying about the strips coming loose.

The strong adhesive backing on swatch strips allows for easy application and secure placement on various polish bottle sizes and shapes. With these strips, you can efficiently organize and display your nail polish colors without needing additional storage space or containers.

Compact Nail Art Travel Case

travel friendly nail art storage

Pack a punch in a small package with a compact nail art travel case that keeps your essentials within reach. As a nail artist, you know how important it's to have your tools and polishes on hand, especially when you're on-the-go. That's where a compact nail art travel case comes in – it's designed for convenience and spontaneity. This nifty case holds all your must-haves, from brushes to polishes, so you can whip up a quick touch-up or create a masterpiece anywhere, anytime.

The compact design makes it easy to stash in your purse or luggage, taking up minimal space while keeping your supplies organized and accessible. Whether you're a pro or a hobbyist, this travel case is perfect for travel or impromptu nail art sessions. It's the ultimate solution for keeping your nail art supplies in check, ensuring you're always ready to create.

Hanging Acrylic Nail Polish Rack

organizing nail polish collection

As you start to organize your nail polish collection, you'll find that a hanging acrylic nail polish rack is a game-changer. By installing one of these racks, you'll be able to keep your polishes neatly organized, making it easy to find the perfect shade for your next nail art project.

With its space-saving design and clear acrylic material, you'll be able to showcase your collection while keeping your workspace clutter-free.

Advertisement

Polish Organization Made Easy

You can efficiently store your nail polish collection and free up valuable space on your vanity by utilizing a hanging acrylic nail polish rack. This clever storage solution is designed to keep your nail polish bottles neatly upright and easily accessible. By repurposing lipstick racks, you can optimize your vanity organization and save space on countertops or in drawers.

Benefits Description
Space-Saving Keeps countertops and drawers clutter-free
Easy Access Displays polishes in an easily accessible way
Stylish Adds a decorative touch to your vanity
Practical Ideal for organizing your nail polish collection
Versatile Can be placed in drawers or on countertops

Space-Saving Design Solution

By repurposing an acrylic lipstick rack, you can create a hanging acrylic nail polish rack that efficiently stores your polish collection, freeing up valuable space on your vanity. This space-saving design solution is a game-changer for nail art enthusiasts. You can easily mount it on a closet or door, which means you'll no longer have to clutter your drawer with nail polish bottles. Instead, you can store other essentials in that drawer, like nail care tools or makeup.

The hanging acrylic nail polish rack allows you to arrange your polishes by color category, making it easy to find the perfect shade for your next nail art project. Plus, the upright display ensures that each bottle is visible, so you can quickly scan your collection and grab the one you need.

This clever storage solution transforms unused space into a functional and stylish display that's sure to impress. With this hanging rack, you'll be able to showcase your polish collection with pride while keeping your vanity organized and clutter-free.

Acrylic Rack Benefits

With a hanging acrylic nail polish rack, you'll enjoy the benefits of a clutter-free space, thanks to its ability to efficiently store your polish collection while keeping each bottle easily accessible. This space-saving solution is perfect for small areas, as it can be hung on walls or doors, maximizing vertical storage space.

Advertisement

The acrylic material is durable and allows for easy visibility, making it simple to locate your desired polish colors. The hanging rack creates a visually appealing display, keeping your polishes organized and within reach. You'll appreciate the ease of accessing your favorite shades without having to dig through a cluttered collection.

With an acrylic rack, you can quickly find the perfect shade to match your nail art design. Plus, the rack's compact design won't overwhelm your workspace, allowing you to focus on creating stunning nail art. By choosing a hanging acrylic nail polish rack, you'll be able to store your collection with style and functionality, making it an ideal addition to your nail art storage arsenal.

Glass Jar Nail Decoration Storage

decorative glass jar storage

Glass jars provide a stylish and practical storage solution for nail art decorations, allowing you to easily view and access your supplies. By reusing existing glass jars, you can add a touch of elegance to your space while keeping your small nail art decorations organized and within reach.

You can arrange decorative glass jars on a vanity or shelf, creating a visually appealing display of your nail art supplies. Plus, using glass jars for storage keeps your small decorations from getting lost or damaged.

As you utilize glass jars for nail art storage, you'll notice a significant enhancement in the overall organization and aesthetics of your nail art collection. You can easily see what's inside each jar, making it simple to find the decoration you need.

Glass jar storage is perfect for nail art enthusiasts who want to keep their supplies tidy and easily accessible. By incorporating glass jars into your storage routine, you'll be able to focus on creating stunning nail art designs rather than searching for misplaced decorations.

Advertisement

Over-the-Door Nail Art Organizer

organize nail art supplies

You can take your nail art storage to new heights by utilizing an over-the-door nail art organizer, which allows you to maximize space and keep your tools and supplies easily accessible. This clever storage solution is perfect for keeping your workspace clutter-free and your supplies within reach. Hang the organizer on a closet door or the back of a door to free up valuable storage space in drawers or on shelves.

The organizer typically features multiple pockets and compartments for storing nail art brushes, nail gems, stickers, and other accessories. You can keep your nail art polishes, striping tapes, and dotting tools neatly organized and visible in the clear pockets of the organizer.

Imagine being able to see every polish bottle and tool at a glance, making it easy to find what you need in an instant. An over-the-door nail art organizer is a practical and efficient solution for decluttering your workspace and streamlining your nail art supplies. With this handy storage system, you'll be able to focus on creating stunning nail art designs without the hassle of clutter getting in the way.

Frequently Asked Questions

How to Organize Nail Stuff?

You're wondering how to organize your nail stuff? Well, let's get started!

Begin by designating a specific area for your nail care essentials. Use drawers, storage units, or even repurposed organizers to keep everything tidy.

Consider a polish wall display or swatch wheels to keep track of your colors.

Advertisement

With a little creativity, you'll be enjoying a clutter-free nail station in no time!

How to Store a Nail Polish Collection?

Imagine having all 400 of your nail polish bottles neatly organized and within reach!

You can make this a reality by utilizing a 5-drawer unit, where you'll arrange polishes by color in separate drawers for easy access and a visually appealing display.

Just be mindful of drawer height limitations and use additional storage baskets for overflow.

How to Organize Nail Swatches?

You're wondering how to organize nail swatches?

Advertisement

Start by using nail polish swatch wheels to display colors at a glance. Label each swatch with the corresponding polish name for easy identification.

You can also use adhesive dots to swatch colors directly on the bottle, saving time and space. This way, you can quickly spot the perfect shade without opening every bottle.

How to Make Nail Polish Storage?

Are you tired of digging through a messy pile of nail polishes? To make nail polish storage, start by thinking outside the bottle – literally!

Use floating shelves or custom racks on a bare wall to create a visually appealing display.

You can also repurpose hanging storage organizers or utilize a designated drawer with dividers to keep your polishes organized by color.

Advertisement

Conclusion

You've got the creative vision, now harness it with these clever nail art storage ideas!

With solutions ranging from a clear container nail art station to a hanging acrylic nail polish rack, you'll be spoiled for choice.

Think of these ideas as the missing puzzle piece that'll elevate your nail art game to the next level.

Your tools and polishes will be singing 'nail harmony' in no time!

Advertisement

Continue Reading

Nail Tips

3 Easy Nail Art Step by Step Ideas

Master the art of nail design with these three easy and stylish step-by-step ideas that will take your nail game to the next level.

Published

on

By

nail art tutorial steps

Transform your nails into miniature works of art with these three easy and stylish ideas! Try geometric patterns made easy with nail tape and a matte top coat for a modern finish. Create simple floral nail designs with pastel shades and delicate petal details. Or, follow a beginner's guide to nail art, practicing with dotting tools and nail tape to master simple designs like dots and stripes. With these ideas, you'll be on your way to creating stunning nail art. And, as you explore further, you'll discover even more inspiration to take your nail art skills to the next level!

Key Takeaways

• Ensure clean, trimmed, and shaped nails before starting your nail art design for best results.

• Use nail tape to create bold, modern geometric patterns with precise shapes like triangles and squares.

• Experiment with simple designs like dots and stripes, and practice using nail art tools like dotting tools and nail tape.

• Apply a base coat for protection and better polish adherence, and finish with a matte top coat for a sophisticated look.

Advertisement

• Try a simple floral design with a light base color, experimenting with shades of pink, red, or purple for delicate petals.

Geometric Patterns Made Easy

Create bold, modern nail art with geometric patterns that are surprisingly easy to achieve.

With a few simple steps, you can create stunning nail designs that'll make a statement. To start, use nail tape to create precise geometric shapes like triangles, squares, and stripes. This will give you a crisp, clean look that's perfect for a modern take on nail art.

Next, experiment with different colors to make your geometric patterns pop. You can choose bold and bright hues or go for a more subtle look with pastels. The key is to have fun and play around with different combinations until you find one that you love.

To finish off your look, opt for a matte top coat for a modern and sophisticated finish. This will help to bring your design together and give it a polished look. And don't be afraid to try negative space designs by leaving parts of your nails bare with geometric accents.

Advertisement

You can also combine geometric patterns with other nail art techniques like ombre or glitter for a unique look. With these easy tips, you'll be on your way to creating stunning geometric nail art in no time!

Simple Floral Nail Designs

easy diy nail art

Floral patterns add a touch of elegance to your nail art, and with a few simple steps, you can achieve a beautiful, delicate look. To start, choose a light base color like pastel pink or white for a fresh floral look. This will provide a clean canvas for your design.

At your local nail studio, you can experiment with different shades of pink, red, or purple to create delicate flower petals using a thin nail art brush. Don't be afraid to try out unique flower shapes and sizes to make your design truly personalized. Add some green leaf details with a small brush to complete the look.

If you want to add a pop of contrast, try incorporating shades of blue into your design. For some valuable tips and tricks, remember to finish with a clear top coat for a glossy and long-lasting manicure. With these simple steps, you'll be on your way to creating stunning floral nail art that's sure to turn heads.

Nail Art for Beginners Guide

nail art step by step guide

As you've mastered the art of simple floral nail designs, it's time to take your skills to the next level with a beginner's guide to nail art that covers the basics and beyond. To get started, make sure your nails are clean, trimmed, and shaped for the best results.

Apply a base coat to protect your nails and help the nail polish adhere better. Now, it's time to get creative! Experiment with simple designs like dots, stripes, or geometric shapes using your left hand – yes, it's okay to start with your non-dominant hand!

Practice using nail art tools like dotting tools, nail brushes, and nail tape for precise designs. Remember, the key to mastering nail art is practice, so don't be discouraged if it takes a few tries to get it right.

Advertisement

Frequently Asked Questions

How to Do Simple Nail Art at Home?

You want to learn how to do simple nail art at home?

Start by prepping your nails with a base coat to protect them.

Then, use nail tape or stickers to create clean lines and shapes.

Experiment with different colors and textures to create unique designs.

Practice using dotting tools or toothpicks to create intricate patterns.

Advertisement

Finish with a top coat to seal in the design and add shine.

With these easy steps, you'll be a pro at simple nail art in no time!

What Are the 5 Basic Nail Art Designs?

Did you know that 80% of women consider nail art a form of self-expression?

When it comes to getting creative with your nails, you're probably wondering what the basics are.

You'll be glad to know that there are five fundamental nail art designs to get you started. These include stripes, dots, ombre, geometric patterns, and floral designs.

Advertisement

Each of these styles offers a unique look that's easy to achieve and customize to your personal taste.

Which Nail Art Technique Is One of the Easiest Techniques?

You're curious about which nail art technique is one of the easiest to master, right? Well, you're in luck!

The water marble technique is a great starting point for beginners. It's incredibly easy to learn and requires minimal effort.

By swirling nail polish in water and transferring the pattern onto your nails, you can create unique, intricate designs with ease.

Give it a try, and you'll be amazed at how stunning your nail art can be!

Advertisement

How to Alternate Three Colors on Nails?

You're on the verge of discovering a secret: 60% of women consider their nail game a reflection of their personality!

Now, let's proceed to revealing three colors on your nails. Start by applying a base coat, then choose three complementary colors and paint each nail in a consistent order. Use nail polish striping tape or brushes for clean lines.

Allow each color to dry before applying the next, and finish with a top coat to seal in the colors and add shine.

Voilà! Your three-color masterpiece is ready!

Conclusion

You've mastered three easy nail art step-by-step ideas, and now you're ready to explore your creativity! From geometric patterns to simple florals, you've got the skills to create stunning nail art.

Advertisement

Don't be afraid to experiment, mix and match designs, and make them your own. With practice, you'll be a pro in no time, and your friends will be green with envy over your trendy talons.

So go ahead, get creative, and show off your unique style to the world!

Continue Reading

Trending