
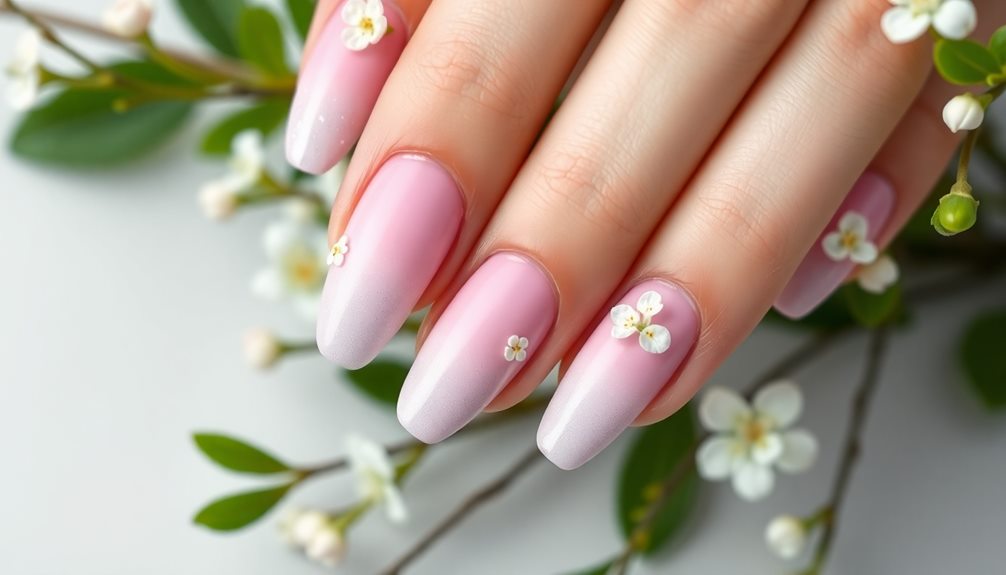
Ombre spring nails are a fun way to brighten up your look! You can create beautiful gradient designs using soft pastels like baby pink or mint green. Start by shaping your nails and applying a base coat, then use a makeup sponge to blend two colors for that perfect ombre effect. Don't forget to finish with a shiny or matte top coat for a polished finish! Remember, keeping your nails hydrated is key, so use cuticle oil daily. With these tips, you'll have fresh nails that reflect the joys of spring. There's even more exciting inspiration just ahead!
Key Takeaways
- Embrace vibrant pastel shades like baby pink and mint green for a refreshing spring ombre look.
- Utilize sponging techniques to blend contrasting colors smoothly, creating a stunning gradient effect.
- Incorporate floral designs or hearts in pastel hues to celebrate the season's joy and romance.
- Maintain your ombre nails with regular manicures, cuticle oil, and a protective top coat.
- Follow seasonal trends on social media for creative inspiration and unique color combinations.
Introduction

As spring blooms around us, ombre nails emerge as a stylish choice that perfectly captures the season's essence. Imagine your fingertips adorned with soft hues, like Baby Pink or mint green, creating a sweet and cheerful look!
Ombre nail designs let you play with colors, blending them into a stunning gradient look that's as fresh as the flowers outside. You can easily create this look using fun techniques like sponging or brushing, making your nails stand out. With the rise of bold colors and highlights in fashion, top trends in grooming can inspire your nail art choices as well.
Spring is all about lightness and joy, so pastel nails are a perfect match. You might even try adding cute floral accents to your ombre nails, giving them a special touch just for the season. If you love the classic vibe, consider blending pastel shades with French tips for a unique twist!
To keep your ombre nails looking fabulous, remember to give them a little extra care. Regular maintenance and hydration are key to ensuring they stay fresh and healthy.
Seasonal Nail Trends Evolve

Seasonal nail trends are constantly evolving, and spring 2023 is no exception. This year, vibrant ombré nails are stealing the spotlight, especially in delightful pastel shades. Imagine your nails transitioning from a soft baby pink to a cheerful peach—it's like having a mini sunset on your fingers! These colorful combinations not only brighten your look but also perfectly match the fun, playful energy of spring.
For those looking for a refreshing twist, incorporating essential oils like lavender oil can provide calming effects that enhance your self-care routine while you pamper your nails. With the rising popularity of Japanese gel techniques, you can enjoy healthy nails while rocking intricate nail art. People are excited to try out unique designs for spring celebrations and festivals, and ombré styles are the perfect way to stand out.
You might even want to experiment with a modern twist on the classic French manicure, blending pastel colors for a fresh update. Social media is buzzing with inspiration for spring nails, with hashtags like #springnails and #ombrenails helping you discover new ideas.
Popular Variations and Ideas
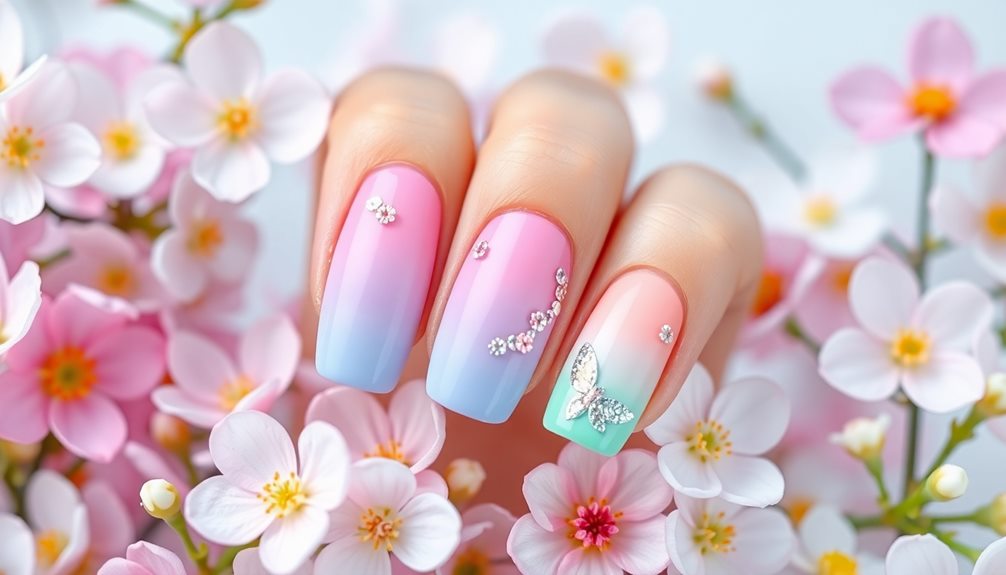
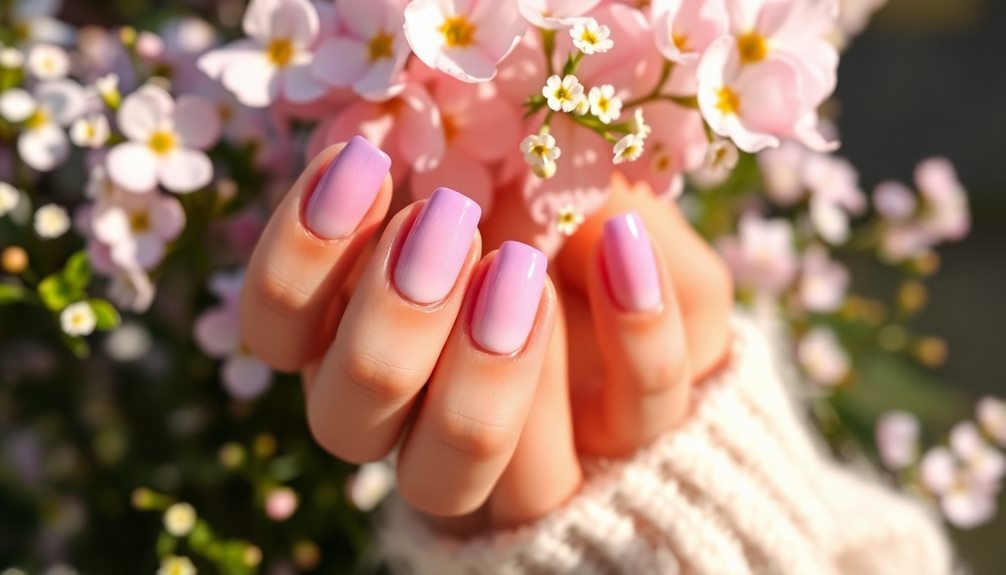
This spring, you'll find a range of popular variations for ombré nails that perfectly capture the season's essence. One fun idea is to try pastel ombré, blending colors like soft pinks, blues, and yellows. These shades create a delicate effect that feels just right for the season.
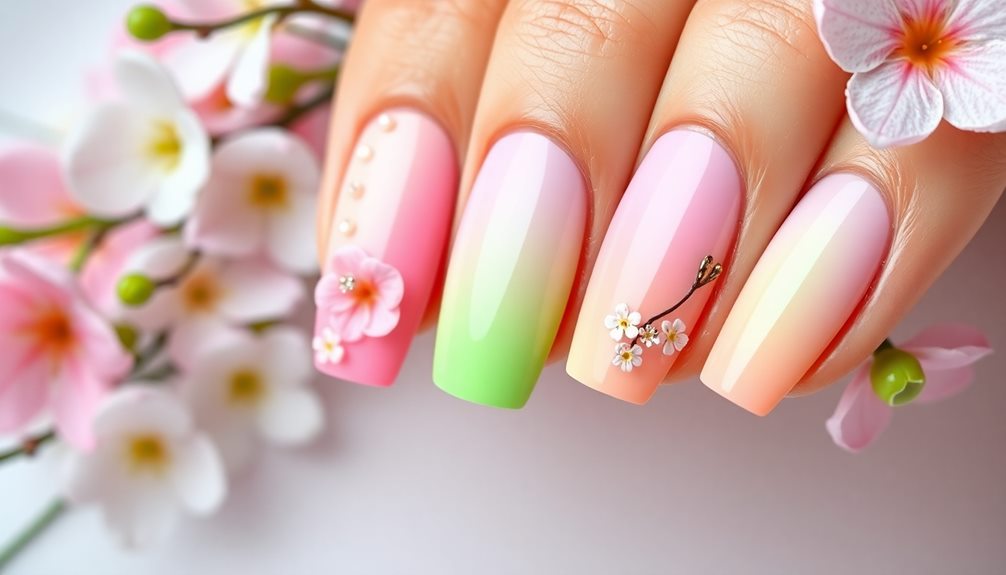
You can also incorporate nail styles for Valentine's Day by adding romantic designs like hearts in soft, pastel colors. If you're looking for something trendy, consider the "Peach Fuzz" ombre, which pairs beautifully with other spring shades and matches Pantone's Color of the Year!
Floral ombre designs are also super popular this time of year. Imagine lovely gradients that remind you of blooming flowers—what a lovely way to celebrate spring!
Plus, short nails can showcase intricate ombre patterns, making them both practical and stylish. You can play around with nail ideas like adding glitter accents or even negative space designs, giving your ombre nails a unique twist.
Tips and Tricks
Achieving a flawless ombré effect on your nails requires some handy tips and tricks to ensure a smooth and stunning finish. First, start by shaping and buffing your nails, then apply a base coat to create a nice foundation for your ombre nails.
Next, choose your colors—maybe a lovely pink gradient—and get ready to blend!
To achieve that beautiful ombre look, use a makeup sponge to dab and blend two contrasting polish colors. This will help you create a smooth transition between shades. If you want to keep things tidy, use liquid latex or nail tape around your nails to catch any polish that might go astray.
You can try different techniques, like the gradient brush method for more control or the reverse ombre for a fun twist!
Once you're happy with your design, finish off your gradient nails with a shiny top coat. This won't only make your nails sparkle but also protect your nail art from chipping. If you're feeling adventurous, a matte top coat can give your ombre nails a unique look.
Enjoy your fabulous spring nails!
Care and Maintenance
To keep your ombré nails looking fresh and vibrant, regular care and maintenance are essential. First, don't forget to apply cuticle oil daily! This helps keep both your nails and cuticles hydrated, which is super important for the health of your nails and the beauty of your ombré designs.
Next up, schedule regular manicures every 2-3 weeks. This isn't just a treat; it helps maintain the bright colors of your ombré nails and fixes any growth or chipping issues.
Speaking of protection, reapply a top coat every few days. This shiny layer protects your nails from wear and tear, making sure your ombré art stays fabulous!
Also, be mindful of the products you use. Avoid harsh chemicals and pick gentle removers instead; they'll help prolong the lifespan of your nail art.
Lastly, a balanced diet rich in vitamins and minerals supports strong and healthy nails. When your nails are healthy, your ombré designs will look even better!
Common Mistakes to Avoid

When it comes to creating the perfect ombré nails, there are several common mistakes you should steer clear of. First, don't apply too much polish at once! This can lead to uneven blending, making your nails look messy. Instead, use a makeup sponge to build the color gradually for a smoother ombré effect.
Another mistake is skipping the base coat. A base coat protects your natural nails from staining and damage, so always start with it!
Also, remember to allow enough drying time between layers. If you rush, you'll end up with smudged nails—yikes! Patience is key for achieving that flawless look.
Don't forget the top coat, either! Skipping it can leave your ombré nails vulnerable to chipping and looking dull. A top coat enhances shine and durability, making your nails pop for the perfect spring vibe.
Lastly, using the right tools is essential. A regular brush won't help in the blending process, so reach for a makeup sponge or gradient brush instead.
Avoid these common mistakes, and you'll be on your way to fabulous ombré nails everyone will admire!
Frequently Asked Questions
What Colors Are Best for Ombre Spring Nails?
When choosing colors for ombre spring nails, you'll want to consider soft pastels like lavender, mint green, and blush pink. These shades blend beautifully, creating a fresh, vibrant look perfect for the season.
Can I Do Ombre Nails Without Professional Help?
Absolutely, you can do ombre nails without professional help! With the right tools, practice, and a little patience, you'll create a stunning look. Just choose your colors, blend, and enjoy your beautiful DIY nails!
How Long Do Ombre Nails Typically Last?
Ombre nails typically last around two to three weeks, depending on your nail growth and care. If you keep them hydrated and avoid harsh chemicals, you'll enjoy your beautiful look longer.
Are Ombre Nails Suitable for Short Nails?
Absolutely, ombre nails can look fantastic on short nails! They create a stylish gradient effect that enhances your fingers' appearance. Just choose colors that complement each other, and you'll have a chic look in no time!
What Tools Do I Need for DIY Ombre Nails?
For DIY ombre nails, you'll need a makeup sponge, nail polish in two or more colors, a base coat, top coat, and a small brush for cleanup. You're ready to create your stunning design!
Conclusion
So, get ready to dazzle this spring with your fabulous ombre nails! With so many fun colors and styles to choose from, you can truly express yourself. Remember to take care of your nails and avoid common mistakes, like skipping the base coat. Whether you go for pastel shades or bold hues, you're sure to turn heads. So grab your nail polish and let your creativity shine! Happy painting, and may your nails be as bright as your smile!