Connect with us

Nail Tips

Step-by-Step Partial Nail Avulsion Treatment Guide

Discover the meticulous steps for successful partial nail avulsion treatment, ensuring optimal outcomes and preventing future complications.

Published

on

nail avulsion treatment steps

When performing a partial nail avulsion procedure, we focus on detailed processes to guarantee successful outcomes. Understanding the technique, preparing adequately, executing the nail removal precisely, providing post-care, and identifying potential complications are essential aspects.

By following each step meticulously, one can promote healing and prevent future issues, leading to a smoother recovery process.

Key Takeaways

  • Clear the nail edge and surrounding tissue for precise avulsion.
  • Use local anesthesia to ensure a painless experience during the procedure.
  • Thoroughly inspect the nail bed for any remaining spicules.
  • Apply phenol post-avulsion to prevent regrowth of the nail.
  • Follow post-treatment care instructions for optimal healing and recovery.

Understanding Partial Nail Avulsion

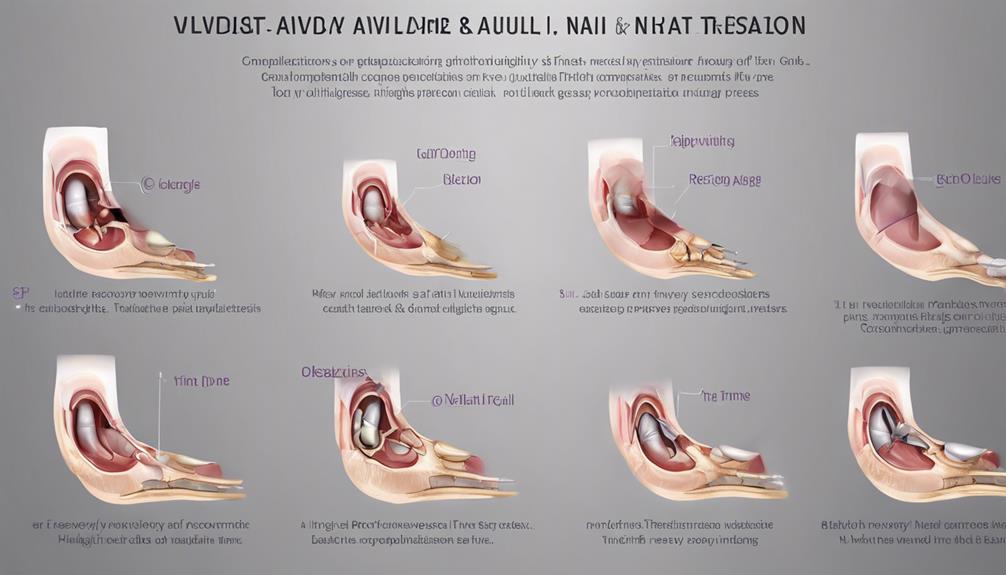
When considering partial nail avulsion, it's important to understand the underlying reasons for this surgical intervention. Partial nail avulsion, also known as a lateral nail avulsion, is a procedure commonly used to address ingrown toenails. This technique involves the removal of a portion of the nail, specifically targeting the edge that has penetrated the surrounding soft tissues, causing pain and inflammation.

By excising the problematic section of the nail, the goal of the partial nail avulsion procedure is to alleviate discomfort and prevent the recurrence of ingrown nails. The importance of this procedure is vital to make sure that the nail is trimmed adequately without damaging the nail bed. Additionally, in some cases, a chemical may be applied to the nail bed to prevent regrowth of the removed section.

Understanding the intricacies of the partial nail avulsion procedure is fundamental in providing effective treatment for individuals suffering from ingrown toenails.

Preparing for the Procedure

getting ready for surgery

Before the Partial Nail Avulsion procedure, the affected toe must be adequately numbed with local anesthesia to guarantee a pain-free experience. This ensures a smooth process and comfort for the patient.

Here are some essential steps to prepare for the procedure:

Advertisement
  • Clearing the Nail Edge: Carefully removing the ingrown nail edge and any surrounding tissue is vital for a successful outcome.
  • Understanding the Nail Bed: Proper knowledge of the nail bed and lateral nail fold helps in precise nail avulsion and matricectomy.
  • Local Anesthetic Application: Skillful administration of local anesthetic guarantees the numbness of the area, allowing for a painless procedure.
  • Using the Nail Elevator: The nail elevator tool assists in separating the nail from the underlying tissue, aiding in its removal.
  • Phenol Application: Applying phenol to the germinal nail matrix post-avulsion prevents regrowth by causing a chemical matricectomy.

These steps, along with techniques like digital blocks and monitoring for granulation tissue, are integral parts of preparing for a successful Partial Nail Avulsion procedure.

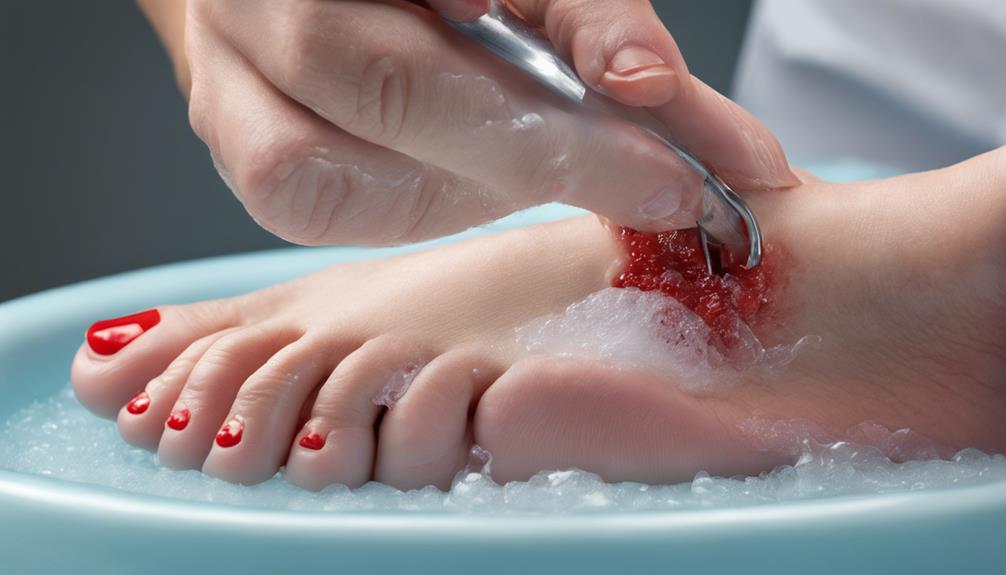
Executing the Nail Avulsion Treatment

In executing the Nail Avulsion Treatment, our primary focus is on carefully removing the entire nail plate to effectively address ingrown toenails. This procedure involves gently lifting the nail edge and separating it from the nail bed to guarantee complete extraction.

By performing partial nail avulsion under local anesthesia in a clinical setting, we aim to alleviate discomfort and prevent complications such as infection. Throughout the process, special attention is given to inspecting the nail bed for any remaining nail spicules or irregularities that could hinder proper nail growth post-treatment.

Our approach prioritizes precision and thoroughness to promote excellent healing and nail regrowth. By adhering to these meticulous steps, we aim to provide patients with a successful nail avulsion experience that addresses their ingrown toenail concerns effectively.

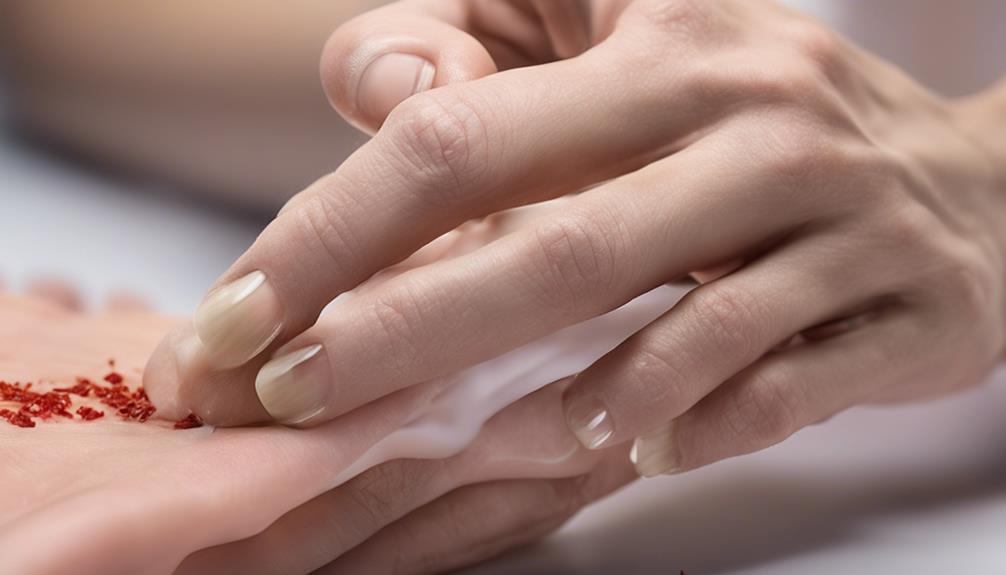
Post-Treatment Care Instructions

helpful post treatment care advice

Upon completing the partial nail avulsion treatment, proper post-treatment care instructions are essential for ideal healing and recovery. Following the surgical techniques used during the procedure, it's important to focus on postoperative care to guarantee successful outcomes. Care for the nail bed and surrounding soft tissue is crucial in promoting the growth of a healthy nail and preventing ingrowing nails.

Here are key post-treatment care instructions:

  • Elevate the affected foot to reduce swelling and promote healing.
  • Keep the bandage on for the first 24-48 hours to protect the wound site.
  • Wash around the wound gently with clean water twice a day after 48 hours.
  • Apply petroleum jelly and a nonstick bandage to cover the wound.
  • Avoid swimming, self-removal of stitches, and misuse of pain medications for proper recovery.

Potential Complications and Recovery Time

addressing surgical complications promptly

After undergoing partial nail avulsion, patients should be aware of potential complications that may arise and the expected recovery time for best healing. Complications such as infection, bleeding, or incomplete removal of the nail matrix can occur post-surgery. Proper wound care is vital to prevent infection and guarantee ideal healing of the nail bed.

Recovery time following partial nail avulsion typically ranges from 2-4 weeks for complete regeneration of the nail plate and lateral nail bed. In cases of infection, early intervention is necessary to prevent further complications and delays in the healing process. Adequate monitoring of the proximal nail fold and regular follow-up appointments are essential to track progress, address any concerns, and ensure successful outcomes post-matricectomy.

Advertisement

Frequently Asked Questions

How Do You Treat a Partial Nail Avulsion?

We treat a partial nail avulsion by surgically removing a portion of the nail to alleviate pain and prevent infection. Local anesthesia is applied, the nail edge is trimmed, and Phenol is used to stop regrowth.

What Is the Procedure for Nail Avulsion?

We remove the nail plate completely to address ingrown toenails causing pain and infection. Nail avulsion, often complemented by matrixectomy, provides relief and prevents future issues. Proper post-op care is vital for success.

What to Do After Nail Avulsion Surgery?

Following nail avulsion surgery, we must guarantee the toe stays elevated to reduce swelling, adhere to wound care instructions for cleanliness, and avoid wetting the site for 48 hours. Applying petroleum jelly and a bandage aids healing. Reach out to a provider if complications arise.

What Is the First Aid for Nail Avulsion?

First aid for nail avulsion involves cleaning the area with mild soap, applying antiseptic, and covering with a sterile dressing. Elevate to reduce swelling. Seek medical help for severe pain, excessive bleeding, signs of infection, or if reattachment isn't possible.

Can the Treatment for a Ripped Off Acrylic Nail be Applied to a Partial Nail Avulsion?

Yes, the same acrylic nail treatment option for a ripped off nail can be used for partial nail avulsion. It can help protect the exposed nailbed and promote healthy regrowth. Make sure to keep the area clean and dry to avoid infection.

Advertisement

Conclusion

To summarize, partial nail avulsion is a procedure that can effectively treat ingrown toenails. Remember, 'an ounce of prevention is worth a pound of cure.'

By following the step-by-step guide outlined above, you can guarantee a successful treatment outcome. Always consult with a healthcare professional for proper diagnosis and treatment recommendations.

Take care of your feet, they carry you through life!

Continue Reading
Advertisement

Nail Tips

Sparkle and Shine With 7 Glamorous Las Vegas Nail Designs

Glimmer in Las Vegas luxury with 7 dazzling nail designs that promise to elevate your style – discover the next level of glamour.

Published

on

By

las vegas nail designs

Immerse yourself in Las Vegas glamour with these 7 stunning nail designs: Glitzy Gold Leaf, Neon Lights Ombre, Sequin Sparkle, Diamond Dust, Vegas Showgirl Glam, Casino Royale Chic, and Sin City Skyline. These intricate designs are perfect for special occasions, offering a touch of elegance and luxury. Skilled technicians in Vegas specialize in creating unique, detailed nail art that dazzles with vibrant colors and metallic accents. With impeccable attention to detail, they bring your nail fantasies to life, embodying the city’s flair. Enter a world of sophistication and style with these glamorous Las Vegas nail designs.

Key Takeaways

  • Neon Lights Ombre Nails for vibrant Vegas vibes.
  • Showgirl Glam Nails with dazzling sparkle and flair.
  • Sin City Skyline Mani inspired by the cityscape.
  • Opulent Las Vegas Nightlife Design for luxury.
  • Sparkle and Shine Nail Designs for glamorous allure.

Glitzy Gold Leaf Design

Let's explore creating the Glitzy Gold Leaf Design for your nails, a luxurious and elegant choice popular in Las Vegas for special occasions. This sophisticated nail art involves intricate gold leaf accents that exude glamour and sophistication.

The eye-catching design is perfect for those seeking a stunning and elegant look that will make their nails stand out. Nail technicians in Las Vegas are highly skilled at crafting these exquisite designs, ensuring a professional and flawless result every time.

The versatile nature of the Glitzy Gold Leaf Design allows for customization to suit various nail shapes and lengths, offering a stylish option for everyone looking to add a touch of luxury to their nails. Whether it's a formal event or a special occasion, this nail design is sure to impress with its intricate detailing and sparkling effect that captures the essence of elegance and sophistication.

Neon Lights Ombre Nails

vibrant nail art trend

Neon Lights Ombre Nails are all about vibrant neon colors blending seamlessly, creating a mesmerizing ombre effect that catches the eye.

This design smoothly shifts from one hue to another, capturing the essence of Las Vegas' dazzling lights.

Plus, under blacklight, these nails glow, adding an extra touch of allure to your look.

Advertisement

Vibrant Neon Color

Immerse your nails in the vibrant glow of Neon Lights Ombre, capturing the essence of Las Vegas nightlife with a bold and dynamic flair. Neon Lights Ombre Nails feature vibrant neon colors blending seamlessly for a striking and eye-catching look. This design captures the energetic and dazzling essence of Las Vegas nightlife, perfect for a fun and bold statement. The neon color gradient adds a pop of brightness to your nails, reflecting the lively atmosphere of Las Vegas.

  1. Customize colors and intensity for a personalized touch.
  2. Create a dynamic and modern style with neon ombre.
  3. Ideal for those seeking a trendy and lively manicure.

Smooth Ombre Transition

Indulging in the seamless blending of vibrant neon colors, the Ombre technique creates a stunning and eye-catching look for Neon Lights Ombre Nails. The electrifying mix of bold neon shades captures the essence of Las Vegas nightlife, resembling the city's dazzling lights at night.

This modern and trendy style is perfect for those wanting to make a bold fashion statement. Neon Lights Ombre Nails offer versatility, allowing customization with various neon color combinations to suit individual preferences.

The smooth shift between colors adds a touch of sophistication to the design, making it a popular choice for those seeking a vibrant and alluring nail look that stands out in any setting.

Glowing Under Blacklight

As we step into the vibrant world of Las Vegas Nail Designs, the electrifying allure of Neon Lights Ombre Nails comes alive under the pulsating glow of blacklight. These nails are a stunning display of creativity and style, combining vibrant neon colors in a seamless ombre design that captivates the eye.

Here are three key points to enjoy about Neon Lights Ombre Nails:

Advertisement

  1. The gradient effect of neon lights under blacklight creates a mesmerizing look.
  2. Vibrant colors like pink, purple, and blue blend seamlessly, adding depth to the design.
  3. The versatility of this nail art allows for personalized color combinations to suit individual tastes and preferences.

Neon Lights Ombre Nails are a popular choice for those seeking to make a statement with their nails in Las Vegas.

Sequin Sparkle Manicure

glittery nail polish application

Sequin Sparkle Manicure is a trendy nail design choice in Las Vegas, featuring shimmering sequins that bring a touch of glamour to your nails.

This style incorporates sequins of varying colors and sizes, creating a dazzling and eye-catching effect.

Perfect for special occasions or to elevate your everyday look, Sequin Sparkle Manicure offers a festive flair that sparkles and shines.

Glittery Glam Tips

For those seeking a touch of glamour and sophistication in their nail designs, the Glittery Glam Tips, featuring a Sequin Sparkle Manicure, offer a dazzling option.

When considering this glamorous nail design, keep in mind these essential tips:

  1. Shimmering Sequins: The Sequin Sparkle Manicure incorporates shimmering sequins strategically placed on the nails to create a stunning and eye-catching effect.
  2. Perfect for Special Occasions: Ideal for adding a touch of sparkle and shine, this manicure style is perfect for special occasions or to elevate your everyday style.
  3. Elegance and Sophistication: The Sequin Sparkle Manicure offers a unique and high-fashion nail art option that exudes elegance and sophistication, making it a popular choice in Las Vegas for those looking to stand out in the beauty industry.

Sequin Nail Art

Delving into the world of nail art, we venture into the enchanting world of Sequin Sparkle Manicures. Sequin nail art, also referred to as sequin sparkle manicure, is a popular choice in glamorous nail designs in Las Vegas.

This style involves the application of sequins or glitter to create an eye-catching and dazzling look. Perfect for special occasions where extra sparkle is desired, sequin nail art offers customization options with different sequin shapes, sizes, and colors.

Advertisement

Precision and skill are essential for a flawless and long-lasting manicure. The reflective properties of sequins add a mesmerizing effect under various lighting conditions, making this nail design truly captivating.

For those seeking a glamorous and attention-grabbing manicure, sequin nail art is a top choice.

Diamond Dust Nail Art

sparkling nail art trend

Using real diamond dust or glitter, nail technicians in Las Vegas create stunning and luxurious Diamond Dust Nail Art designs that sparkle and dazzle. This nail design is known for its glamorous appearance, adding a high-shine finish to manicures that catch the eye and exude luxury.

Here are three key points to help you appreciate Diamond Dust Nail Art:

  1. Customizable Designs: Nail technicians in Las Vegas skillfully incorporate diamond dust into various nail art designs, allowing for customization with different colors, shapes, and patterns to suit individual preferences and styles.
  2. Opulent Element: The use of diamond dust in nail art elevates the overall look, adding a unique and opulent element to manicures that stands out and shines brightly, making your nails glow like precious gems.
  3. Perfect for Special Occasions: Diamond Dust Nail Art is perfect for special occasions when you want your nails to make a statement. Its eye-catching finish ensures that your manicure grabs attention and adds a touch of luxury to any outfit.

Las Vegas Showgirl Glam

vibrant feathers and sequins

Imbued with the vibrant essence of Las Vegas entertainment, the Las Vegas Showgirl Glam nail design captivates with its bold colors and dazzling embellishments. This extravagant nail art draws inspiration from the iconic showgirl costumes of Las Vegas, featuring vibrant hues that echo the city's lively spirit.

Showgirl Glam nails are adorned with sparkling rhinestones, glitter accents, and intricate patterns, exuding a sense of luxury and glamour that mirrors the opulence of Las Vegas nightlife. The combination of elegance and extravagance in this design makes it a perfect choice for those seeking to make a bold statement and stand out from the crowd.

Showgirl-inspired nail art offers a creative and flamboyant touch, adding a hint of Vegas flair to your manicure experience. Embrace the show-stopping allure of Las Vegas with Showgirl Glam nails that showcase the vibrancy and excitement of this dazzling city.

Advertisement

Casino Royale Chic Nails

007 inspired nail art designs

What makes Casino Royale Chic Nails stand out among other nail designs in Las Vegas?

Casino Royale Chic Nails are distinctive for their bold colors and intricate designs that capture the essence of luxury and sophistication. Here's why they're a top choice:

  1. Bold Metallic Colors: These nail designs often feature shimmering gold, silver, and black hues that add a touch of elegance and opulence to your look. The use of metallic colors helps create a high-end and glamorous vibe that's perfect for Las Vegas.
  2. Intricate Designs: From playing card motifs to dice patterns and glitter accents, the intricate designs of Casino Royale Chic Nails showcase the creativity and skill of nail technicians in Las Vegas. These detailed elements bring a sense of exclusivity and style to your nails.
  3. Expert Nail Technicians: Nail technicians in Las Vegas excel at creating Casino Royale Chic Nails, demonstrating their expertise in nail artistry. Their attention to detail and ability to bring unique concepts to life make these nail designs a popular choice for those seeking a touch of Vegas flair.

Sin City Skyline Mani

bright lights dark secrets

Featuring iconic Las Vegas landmarks like the Stratosphere and the High Roller ferris wheel, the Sin City Skyline Mani captures the essence of the vibrant cityscape in intricate detail.

This nail design is a popular choice among those seeking to showcase their love for Las Vegas with style. Nail technicians in Las Vegas are skilled at creating this intricate design, using vibrant colors to bring the city skyline to life on your nails.

The Sin City Skyline Mani isn't only unique and eye-catching but also adds a touch of glamour and sophistication to your overall look. Whether you're a local or a visitor, this nail art option is sure to make a statement and turn heads wherever you go.

Embrace the spirit of Las Vegas with the Sin City Skyline Mani and let your nails shine bright with the beauty of this vibrant city.

Frequently Asked Questions

What Is the Most Popular Nail Design?

The most popular nail design in Las Vegas combines vibrant colors, glamorous elements, and intricate patterns. This design captures the essence of the city's vibrant and luxurious atmosphere, appealing to both locals and visitors. It's expertly crafted to offer elegance, excitement, and a unique style expression that reflects the spirit of Las Vegas.

Advertisement

Many nail salons in Las Vegas specialize in creating this popular design, showcasing the creativity and innovation of the city's nail industry. Customers often seek out this popular nail design for special events or to add a touch of glamour to their everyday look.

What Are the Latest Nail Designs?

The latest nail designs in Las Vegas are a vibrant mix of colors, glamorous elements, and intricate patterns. Inspired by the city's spirit and energy, nail artists create unique designs ranging from bold and vibrant to subtle and elegant.

These designs showcase creativity, precision, and attention to detail for stunning results. Customers can expect personalized nail art, long-lasting results, and a comfortable salon experience in Las Vegas.

What Nails Are Elegant?

When it comes to elegance in nail designs, classic styles like French manicures and simple, sophisticated colors reign supreme. Subtle shimmer or delicate embellishments can also elevate the elegance factor. Nail shapes like almond or oval are commonly associated with grace.

Neutral tones such as nude, soft pink, or pastel shades are popular choices. Regular nail maintenance, including shaping, cuticle care, and appropriate length, is key to achieving an elegant appearance.

Advertisement

How Do I Choose a Nail Design?

When choosing a nail design, we consider personal style and Las Vegas' glamorous vibe. Inspiration from the city's atmosphere helps us select designs that match outfits or occasions. Consulting experienced technicians at local salons guides our decisions.

Opting for designs reflecting our personalities adds glamour to our looks. Our choices are intentional, ensuring our nails sparkle and shine in any setting.

Conclusion

To sum up, these glamorous Las Vegas nail designs are like a shining beacon of creativity and style. They capture the essence of the city's glitz and glamour, adding a touch of sparkle to your everyday look.

So why not bring a little piece of Sin City into your life with these stunning nail art designs? Let your nails shine bright like the lights of the Las Vegas strip, and make a statement wherever you go.

Advertisement

Continue Reading

Nail Tips

Stunning Blue Flower Nail Designs Step-by-Step

Craft gorgeous blue flower nail designs with our step-by-step guide, captivating creativity and inspiring nail art enthusiasts.

Published

on

By

vibrant blue floral nails

Embark on a creative adventure with our step-by-step guide for gorgeous blue flower nail designs. Begin by applying a protective base coat to create a smooth surface. Use a light blue polish as the base color and a darker blue shade for detailed petals. Add delicate flower centers with nail dotting tools. Finish off your masterpiece with a glossy top coat for lasting shine. Explore different shades and techniques for a truly unique look. Share your masterpieces to inspire others. Explore more innovative techniques, trendy inspirations, and color combinations for your blue floral nail art journey.

Key Takeaways

  • Start with a light blue base color for the design.
  • Create intricate flower petals using fine nail art brushes.
  • Add details like flower centers with nail dotting tools.
  • Finish with a glossy top coat for a polished look.
  • Seal the design to protect and enhance the blue flower nail art.

Base Coat Application

When applying the base coat for your blue flower nail design, start by making sure a clear pink base coat like Dazzle Dry is used for a smooth canvas. The base coat plays an important role in creating the perfect foundation for your nail art. It not only protects your natural nails but also helps the colors and designs adhere better, ensuring longevity.

After applying the clear pink base coat, be certain it's completely dry before moving on to the next steps. This step is vital to prevent any smudges or color mixing that could ruin your intricate design.

Selecting a top coat that's fast-drying and long-lasting will further enhance the durability of your nail art. The top coat not only seals in your design but also adds a beautiful shine to the finished look. When applying the top coat, make sure you cover the entire nail evenly to protect your design and extend its wear-time.

Dark Brown Floral Design

beautiful dark floral pattern

When creating a dark brown floral design on your nails, the rich brown petal details and deep hue contrasts will make your manicure stand out.

Incorporating black and white glitter adds a touch of elegance and intricate detail to the design.

Enhance the overall look with extra pink glitter to speed up the drying process and achieve a polished finish.

Advertisement

Rich Brown Petal Details

To achieve intricate petal details in the floral design, start by using OPI dark brown color to outline the shape of the petals with precision. The key is to apply the dark brown polish in a precise manner, ensuring each petal is defined sharply.

Varying the pressure while painting will add depth and dimension to the flowers, creating a realistic and captivating look. For an extra touch of elegance, consider incorporating black and white glitter accents to enhance the richness of the brown petals.

Deep Hue Contrasts

Starting with a bold and rich OPI dark brown color, the dark brown floral design creates striking contrasts that elevate the overall look with intricate details and depth.

Enhance the deep hue with black and white glitter to add complexity and sophistication to the design. By incorporating dark brown against a clear pink base, you can achieve a bold and eye-catching manicure that exudes elegance.

Experimenting with different shades of brown allows you to find the perfect contrast that suits your style. The combination of dark brown and floral elements results in a stunning and sophisticated nail design that's sure to impress.

Advertisement

Don't hesitate to try out this dark brown floral design for a chic and polished look that stands out.

Black and White Glitter Details

Enhance the blue flower nail design with mesmerizing black and white glitter details for a sophisticated and eye-catching finish. To achieve this look, start by applying an OPI dark brown base color to provide a striking contrast for the floral design. Next, delicately incorporate black and white glitter onto the nails to add a touch of elegance and allure. The combination of these glitter details will elevate the overall aesthetic of the blue flower nail art, making it truly stand out and captivate attention.

The black and white glitter not only enhances the beauty of the design but also adds depth and dimension, creating a visually stunning effect. By carefully placing these glitter elements, you can achieve a polished and professional finish that exudes sophistication. The contrasting colors of the glitter against the blue flowers will create a mesmerizing look that's perfect for any occasion. Experiment with different placement and amounts of glitter to find the perfect balance that suits your style preferences.

Adding Extra Pink Glitter

sprinkling pink glitter generously

When incorporating some extra pink glitter to elevate the blue flower nail design with a touch of shimmer and dimension, it's crucial to do so strategically. The addition of pink glitter can truly enhance the overall look, bringing sparkle and depth to the floral pattern.

Not only does it add a beautiful shimmer, but it also helps speed up the drying process, making it a practical and aesthetically pleasing choice.

When applying the extra pink glitter, it's important to focus on specific areas of the design to highlight and accentuate the blue flowers.

Advertisement

Applying Glossy Top Coat

perfecting manicures with shine

To seal and protect the stunning blue flower nail design, we apply a high-quality top coat that not only extends its longevity but also adds a shiny finish for a polished appearance. This final step in the nail art process is essential for maintaining the beauty of the design.

The glossy top coat helps smooth out any uneven surfaces or textures on the nails, ensuring a flawless look. Not only does it enhance the overall aesthetic appeal of the blue flower design, but it also prevents chipping and peeling, keeping your nail art intact for a longer period.

When choosing a top coat, opt for a premium product to achieve a professional salon-like finish. A good top coat won't only protect your nail art but also provide a lasting shine that enhances the vibrancy of the blue flowers. Remember, the top coat is the finishing touch that seals in your hard work and creativity, so invest in a high-quality product for best results.

Color Combination Experimentation

playful color palette exploration

Let's explore different color combinations to enhance your blue flower nail designs. When experimenting with colors, consider the following:

  • Combine shades of blue like navy, sky blue, and teal for a sophisticated and harmonious look.
  • Mix in contrasting colors such as white or silver to create a striking contrast and make the blue tones stand out.
  • Incorporate different finishes like matte, metallic, or glitter to add texture and visual interest to your nail art.

Sharing Your Unique Creations

creativity through sharing ideas

When it comes to sharing your unique nail art creations, showcasing them on social media platforms like Instagram and Pinterest can help you reach a broader audience.

Engaging with followers by responding to comments and questions builds a supportive community around your nail art.

Showcase Your Designs

We enhance the visibility of our blue flower nail designs by sharing them on popular social media platforms and engaging with fellow enthusiasts. When showcasing your designs, consider the following:

  • Utilize proper lighting and angles in your photos to accentuate the intricate details and vibrant colors of your nail art.
  • Join online communities and forums to connect with other nail art enthusiasts, exchange ideas, and receive valuable feedback on your designs.
  • Create video tutorials or live demonstrations to guide others through your step-by-step process, inspiring them to try similar designs.

Engage With Followers

Engaging with our followers through sharing our unique blue flower nail designs is an important aspect of building a vibrant online nail art community. By posting high-quality images on social media and using relevant hashtags like #nailart and #bluefloralnails, we can reach a broader audience and attract fellow nail art enthusiasts.

Encourage interaction by soliciting feedback and opinions on your creations, fostering a sense of community and collaboration. Collaborating with other nail artists can spark inspiration for fresh and distinctive designs. It's essential to show appreciation for your followers by responding to their comments and messages, creating a welcoming and engaging environment.

Advertisement

Together, we can cultivate a supportive community where creativity and passion for nail art thrive.

Inspire Nail Art

To inspire nail art enthusiasts, consider sharing your unique blue flower nail creations on popular social media platforms such as Instagram and Pinterest.

Here are three ways to showcase your artistry and encourage creativity in the nail art community:

  • Utilize high-quality nail art brushes and tools for intricate and precise floral designs.
  • Engage with other nail artists by joining online forums and groups to exchange ideas and techniques.
  • Collaborate with fellow enthusiasts to present diverse interpretations of blue flower nail art, fostering a culture of innovation and inspiration.

Frequently Asked Questions

How to Do Your Nails Step by Step?

We start by prepping nails with a base coat for protection.

Using a fine brush, we carefully craft intricate blue flower designs, layering various blues for depth.

Adding hints of white or silver glitter highlights petals beautifully.

Advertisement

A final top coat seals the design, ensuring longevity.

This step-by-step process yields stunning nails that showcase our artistry and attention to detail.

How Do You Do a Flower Manicure?

When doing a flower manicure, we start by applying a clear base coat to prep the nails.

Then, we paint the petals using a soft brush and vibrant blue polish, creating a delicate floral design.

Next, we add green accents for leaves and finish with a glossy top coat to seal in the beauty.

Advertisement

This process yields a stunning and charming flower manicure that's sure to impress.

How Do You Dye Your Nails With Flowers?

To dye your nails with flowers, we can press dried flower petals onto a tacky layer of gel polish or nail glue.

Gently press the petals onto the nail, arranging them in a desired pattern.

Seal the design with a top coat to secure the flowers in place and enhance the overall look.

This method allows for a unique and delicate floral design that adds a touch of nature to your nails.

Advertisement

How Do You Paint Flowers on Your Toenails?

To paint flowers on your toenails, start with a base coat for a smooth surface. Use a thin nail art brush to delicately create petals and leaves. Opt for blue nail polish shades to achieve a stunning floral design.

Layer different blues and add shimmer for depth. Finish with a top coat to protect and extend the life of your beautiful flower design.

Conclusion

To sum up, did you know that blue flowers symbolize tranquility and peace? Incorporating stunning blue flower nail designs can bring a sense of calm and serenity to your overall look.

So why not try out these step-by-step designs to add a touch of beauty and elegance to your nails? Experiment with different color combinations and share your unique creations with the world.

Let your nails bloom with creativity and style!

Advertisement

Continue Reading

Nail Tips

Detroit Lions Nail Designs Tutorial for Game Day Glam

Amp up your game day style with Detroit Lions nail designs and elevate your glam effortlessly – find out how in this tutorial!

Published

on

By

game day glam nails

Looking to enhance your game day style with Detroit Lions nail designs? Prepare to boost your glam easily! You will need Detroit Lions football nail decals and high-quality waterslide nail art decals for this. Follow these steps: Cut out and soak the decal, slide it onto your nail, adjust, then seal it with a top coat for long-lasting wear. For extra durability, use a base coat, seal edges with top coat, and avoid water immediately after. Get creative with team colors, logos, and different nail shapes. Show off your team spirit with style following these tips. Enhance your game day look effortlessly with the Detroit Lions nail designs tutorial!

Key Takeaways

  • Easy application with water decals for Detroit Lions nail designs.
  • Customize sizes for perfect fit on nails.
  • Seal with top coat for long-lasting wear.
  • Enhance with team colors, logos, and accents.
  • Show team pride stylishly on game day.

Materials Needed for Detroit Lions Nail Designs

detroit lions nail art

To achieve Detroit Lions nail designs, you'll need to have Detroit Lions football nail decals, which are high-quality waterslide nail art decals commonly used in salons. These Detroit Lions decals come in multiple sizes on a 5.5 x 3 sheet, allowing for customization based on your nail size and design preference. Professionally printed in Milwaukee, WI, USA, these decals boast salon quality and are designed for easy application with included instructions.

When creating Detroit Lions nail art, having the right materials is important for achieving a professional look. Using these specially crafted Detroit Lions football nail decals guarantees that your design captures the spirit of the team accurately. Whether you're getting ready for game day or simply showing your support for the Detroit Lions, these decals are the perfect choice for adding a touch of team spirit to your nails. Get ready to showcase your love for the Lions with these high-quality nail art decals.

Step-by-Step Guide for Lions Nail Art

lions nail art tutorial

Let's explore creating stunning Detroit Lions nail art with a simple and easy-to-follow guide. To achieve the perfect game day look, start with clean, dry nails for best application results. Follow these steps for flawless Lions nail art:

Step Instructions
1 Cut out desired nail decal.
2 Soak decal in water for 10-20 seconds.
3 Slide decal onto nail carefully.
4 Adjust for desired placement.

Once the decal is in place, seal your design with a top coat for long-lasting wear and extra shine. Repeat this process for all nails to complete your Detroit Lions nail art look. By following these steps meticulously, you'll showcase your team spirit with style and precision. Mastering this nail art technique will surely elevate your game day glam.

Tips for Long-Lasting Game Day Nails

For extended wear of your game day nail design, be sure to apply a high-quality base coat before adding nail decals. This step is essential in ensuring the longevity of your manicure.

To further enhance the durability of your game day nails, consider the following tips:

Advertisement

  1. Seal the Edges: After applying the nail decals, make sure to seal the edges with a top coat. This extra layer will help prevent peeling and chipping, keeping your design intact throughout the game.
  2. Avoid Water Contact: To allow the nail decals to adhere properly, it's advisable to steer clear of direct water contact for at least an hour after application. This precaution will help maintain the integrity of the design.
  3. Reapply Top Coat: To prolong the life of your game day nail art, think about applying a second layer of top coat after a few days. This additional step can help refresh the shine and protection of your manicure, ensuring it looks flawless for longer.

Creative Variations of Lions Nail Designs

lion inspired nail art ideas

After mastering the tips for long-lasting game day nails, exploring creative variations of Detroit Lions nail designs opens up a world of unique and spirited possibilities. When considering designs to choose, incorporating the team colors of Honolulu blue and silver can instantly elevate the look.

Adding elements like the Lions logo, football motifs, or paw prints provides a personalized touch that showcases team spirit. To further enhance the design, consider including glitter accents, rhinestones, or nail art stickers for added flair.

Experimenting with different nail shapes such as stiletto, coffin, or almond can complement the overall aesthetic and make the design stand out. Additionally, choosing between a matte or glossy top coat finish can help achieve the desired effect for game day glam.

Show Your Team Spirit With Style

To showcase our team spirit with style, we can effortlessly elevate our game day look with Detroit Lions nail designs. These nail art decals are salon quality and feature the iconic Detroit Lions logo and colors, perfect for displaying our support for the team.

Here are three ways to show your team spirit with style using Detroit Lions nail designs:

  1. Easy Application Instructions: The Detroit Lions Nail Designs Tutorial includes simple application instructions, making it easy for us to achieve perfect game day glam nails without any hassle. The step-by-step guide ensures that even beginners can create a professional-looking manicure effortlessly.
  2. Customized Look: With multiple sizes available on a 5.5 X 3 sheet, we can personalize our nail art to suit our preferences. Whether we prefer a subtle accent nail or a bold statement manicure, these decals offer versatility in design.
  3. High-Quality Design: Professionally printed in Milwaukee, WI, USA, these nail art decals guarantee a high-quality design that will last through the game and beyond. Show your Detroit Lions pride with confidence, knowing that your stylish nail art is exceptional.

Frequently Asked Questions

What Shade of Blue Is Detroit Lions?

The Detroit Lions' official shade of blue is known as 'Honolulu Blue,' a vibrant color chosen by the team's founder in 1934. This distinctive hue, paired with silver in the team's uniforms and logos, represents the Lions' history and tradition.

Fans often incorporate Honolulu Blue into their game day attire, nail art, and accessories to show team spirit. Understanding this specific shade can help fans accurately represent the team's colors in their nail designs and overall game day glam.

Advertisement

How to Do the Best Nail Art?

To achieve the best nail art, start with a clean, dry base coat for protection and longevity. Use tweezers for precise application of Detroit Lions football nail decals, following instructions closely.

Seal with a top coat for durability and shine. Customize by adding glitter or rhinestones for a unique touch. Show off your team spirit confidently with these salon-quality decals.

Mastering this process guarantees flawless game day glam.

How to Draw Nail Art Designs?

When creating nail art designs, begin by applying a base coat for protection. Utilize a fine nail art brush or pen for intricate designs.

Incorporate details with contrasting colors to make the design stand out. Seal with a top coat for a glossy finish.

Advertisement

Practice on a nail art wheel for precision. These steps guarantee your nail art looks professional and lasts longer.

Why Do Lions Wear Honolulu Blue?

We wear Honolulu Blue as a tribute to the University of Detroit, where many players originated. This shade symbolizes the Detroit River and Lake St. Clair, reflecting the city's waters. Chosen in 1934, it has since become a distinctive part of our team's identity, standing out on the field and in our branding.

Fans also sport Honolulu Blue to show unwavering support for the Detroit Lions during games and events.

Conclusion

To sum up, integrating Detroit Lions nail designs into your game day look is a fun way to show team spirit with style. By following our step-by-step guide and tips for long-lasting nails, you can easily achieve game day glam.

Get creative with variations of Lions nail art to add a unique touch. So next game day, bring your A-game with some fierce and fabulous Detroit Lions nail designs!

Advertisement

Continue Reading
Advertisement

Affiliate Disclaimer
As an affiliate, we may earn a commission from qualifying purchases. We get commissions for purchases made through links on this website from Amazon and other third parties.

Advertisement

Vetted

Vetted2 weeks ago

Book Review: “The Creative Spark: Unleashing Your Inner Artist”

Reawakening Creativity in the Digital Era In a world where digital distractions often stifle our creativity, “The Creative Spark: Unleashing...

Vetted3 weeks ago

15 Best Hot Rollers for Long Hair That Will Give You Glamorous Curls

Discover the top 15 hot rollers for long hair that promise glamorous curls - find out which sets deliver the...

Vetted3 weeks ago

15 Best Purple Shampoos for Banishing Brassy Tones: Our Top Picks & Reviews

Uncover the ultimate solutions to keep brassy tones at bay with our top 15 purple shampoos - your key to...

Vetted3 weeks ago

15 Best At-Home Laser Hair Removal Devices for Silky Smooth Skin

Kickstart your journey to smooth skin with the top 15 at-home laser hair removal devices, promising professional results - find...

Vetted4 weeks ago

15 Best Automatic Hair Curlers for Effortless Waves and Curls

Jump into effortless waves and curls with the top 15 automatic hair curlers, offering innovative features and user-friendly designs that...

Vetted4 weeks ago

15 Best Root Lifters for Fine Hair That Will Transform Your Hairstyle

Boost your fine hair with the top 15 root lifters that will transform your hairstyle with lasting volume and control.

Vetted4 weeks ago

15 Best Curl Creams for Frizzy Hair That Will Tame Your Mane

Hunt for the ultimate frizz-taming curl creams among the top 15 picks, including Bounce.Me and Moroccanoil, to discover your perfect...

cozy farmhouse decor ideas cozy farmhouse decor ideas
Vetted4 weeks ago

15 Best Farmhouse Décor Ideas to Transform Your Home Into a Cozy Retreat

Immerse yourself in 15 farmhouse decor ideas that promise to transform your home into a cozy retreat, but which one...

top farmhouse sinks selection top farmhouse sinks selection
Vetted4 weeks ago

15 Best Farmhouse Sinks for Your Dream Kitchen Renovation

Perfect your kitchen renovation with the 15 best farmhouse sinks that blend style and functionality—discover the ideal choice for your...

glycolic acid serums guide glycolic acid serums guide
Vetted4 weeks ago

15 Best Glycolic Acid Serums With Droppers for a Radiant Complexion

Discover the powerful benefits of glycolic acid serums with droppers that can transform your skin, but which one will best...

glycolic acid glow essentials glycolic acid glow essentials
Vetted4 weeks ago

15 Best Glycolic Acid Products With Vitamin E and Witch Hazel for Glowing Skin

Unlock the secret to radiant skin with these 15 glycolic acid products infused with vitamin E and witch hazel—discover your...

glycolic acid urea products glycolic acid urea products
Vetted4 weeks ago

15 Best Glycolic Acid Products With Urea for Glowing Skin in 2024

Get ready to discover the 15 best glycolic acid products with urea for glowing skin in 2024, and unlock your...

Advertisement

Trending