
To craft your own boho lanterns and lampshades, start by selecting sturdy thrifted shades and planning your design with weatherproofing in mind. Wrap the frames with rattan or alternative materials using strong, waterproof adhesives, and weave patterns like basket or cage styles for a unique look. Make sure to create waterproof bases and seal electrical components properly for outdoor durability. If you continue, you’ll discover step-by-step tips to bring your personalized lighting projects to life with style and safety.
Key Takeaways
- Select weatherproof, vintage or thrifted lamp shades and evaluate their durability for outdoor or indoor boho lighting projects.
- Use waterproof sealants like silicone or varnish to protect the shade and electrical components from moisture.
- Wrap and secure the frame with durable materials such as rattan or synthetic fibers using waterproof adhesives for a rustic boho look.
- Incorporate creative weaving patterns, knots, and decorative elements like beads or tassels to personalize your lanterns and shades.
- Finalize assembly with reinforcement, waterproofing, and functional lighting options like LED bulbs for a stylish, durable DIY boho lighting fixture.
Gathering Materials and Planning Your Design

Before starting your DIY lighting project, it’s important to gather the right materials and plan your design carefully. Your goal is to create a focal point that turns heads, so choosing unique thrifted or vintage lamp shades is a smart move. Assess their size, shape, and material to make sure they’ll withstand outdoor conditions and fit your design vision. Think about statement lighting that will stand out in your space. Sketch your ideas, including measurements and pattern details, to visualize the final look. Don’t forget to think about weatherproofing options and practical materials, so your lanterns won’t go to break easily in the elements. Having a clear plan and the right supplies sets the foundation for a successful, eye-catching project. Additionally, considering rustic design elements can help your lighting seamlessly blend with a farmhouse or countryside decor style. Incorporating vintage and thrifted finds can add authentic charm and uniqueness to your DIY lanterns and lampshades. Also, understanding halal standards for materials and finishes can ensure your project aligns with your ethical and dietary preferences, especially if using natural or animal-derived components. Furthermore, researching financial management strategies can help you budget effectively and keep your project cost-efficient. Incorporating hackathon-inspired collaboration techniques during planning can also enhance your creative process and problem-solving skills.
Selecting and Preparing Thrifted Lamp Shades

Choosing the right thrifted lamp shades is a key step in transforming everyday finds into eye-catching lighting fixtures. Look for sturdy frames made of metal or plastic that can handle your DIY modifications, especially if you’re planning to turn them into rattan pendant lights. Check for any damage like cracks or tears, which could compromise the shade’s durability, particularly for outdoor use. Consider the shape and size of the shade to ensure it fits your light fixture and aligns with your design vision. Remove old fabric, electrical components, and glued embellishments to create a clean, customizable base. Proper preparation makes it easier to add your personal touch, whether you’re crafting boho-inspired lanterns or updating vintage shades into stylish lighting pieces. Additionally, understanding the best vacuums for hardwood floors can help you keep your workspace clean and dust-free during your DIY projects. When selecting shades, also consider local building codes and permits, especially if you plan to use electrical components for your custom lighting. Being aware of prophetic dreams can also inspire your creative process, encouraging intuitive design choices and innovative ideas. Exploring different unique and wicked planters can inspire creative ways to display your new lighting fixtures in your home decor. To further enhance your project, researching lighting safety guidelines can ensure your DIY creations are both beautiful and secure.
Creating a Waterproof Base for Outdoor Use
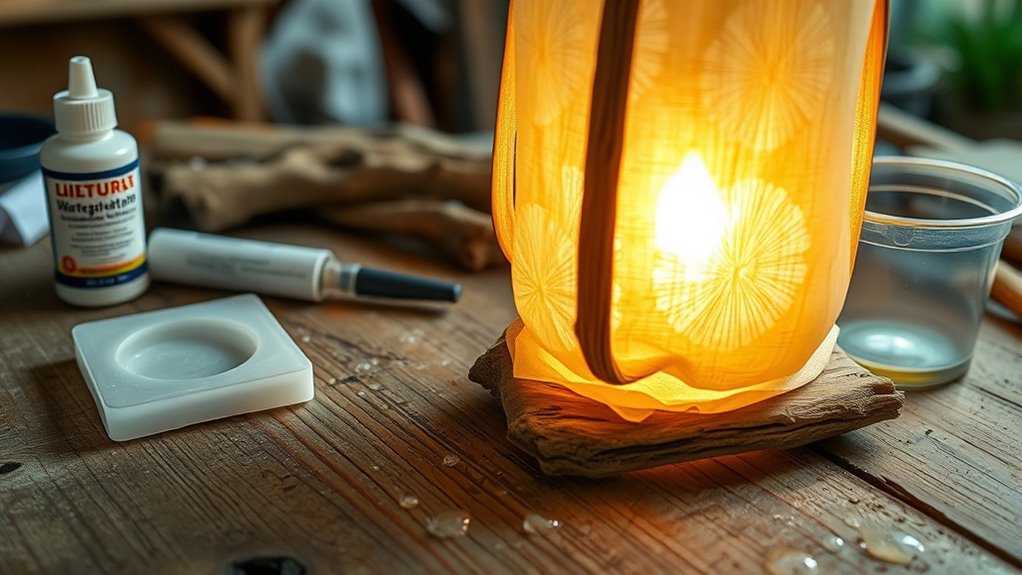
To safeguard your outdoor lighting, choose waterproof sealants like outdoor-grade silicone or varnish to seal all joints and surfaces. Elevate the lantern on a water-resistant stand and add drainage holes to prevent water buildup inside. These steps help safeguard your components and ensure your project withstands the elements. Incorporating low light office plants nearby can also help reduce the impact of moisture and humidity on your setup. Additionally, selecting appropriate weatherproof materials can further enhance durability and longevity in outdoor conditions. Proper sealing techniques also play a crucial role in maintaining the integrity of your DIY lanterns over time. Ensuring all materials are sourced sustainably aligns with environmentally conscious practices, which can contribute to the overall longevity of your project. Being mindful of trust issues in relationships can also teach us the importance of resilience and proper boundaries, which can be metaphorically applied to ensuring your lantern’s durability against weather challenges.
Waterproof Sealant Options
Looking for effective waterproof sealant options to protect your outdoor lighting projects? You have several choices to guarantee your creations withstand the elements. Silicone-based sealants, like clear outdoor caulk, offer flexible, waterproof barriers perfect for lanterns. Acrylic-based waterproof sprays can be applied to woven or fabric lampshades, repelling water and preventing damage. Polyurethane sealants provide durable, waterproof protection, making them ideal for sealing joints and seams on outdoor fixtures. Additionally, waterproofing epoxy resins coat surfaces with a hard, water-resistant layer, enhancing longevity. When selecting sealants, verify they’re UV-resistant and weatherproof for lasting outdoor durability. Using a waterproof sealant with ventilation considerations can also help prevent moisture buildup and mold growth on your outdoor lighting fixtures. Proper waterproofing techniques are essential to ensure your DIY projects remain protected over time, especially when considering dog-friendly outdoor environments. Ensuring proper maintenance and cleaning of your sealed fixtures can further prolong their lifespan and effectiveness.
Protecting Indoor Components
Ever wondered how to keep your indoor electrical components safe when bringing your DIY outdoor lamp to life? The key is creating a waterproof base. Start by sealing all connections with outdoor-grade silicone or waterproof electrical tape. Elevate your wiring on a raised, waterproof platform to prevent water from reaching the socket and cord. Use weatherproof or outdoor-rated sockets and cords designed to handle moisture and temperature swings. Applying a clear waterproof sealant or polyurethane coating over the base and wiring adds an extra layer of protection against rain and humidity. Ensuring proper electrical safety measures are followed, such as grounding and avoiding overloading circuits, can prevent potential hazards. Additionally, choosing weather-resistant materials for your lamp components can significantly improve durability in outdoor conditions. Incorporating personal development techniques like mindfulness and goal-setting into your project planning can help you stay patient and focused during your DIY process. Remember to regularly check your waterproofing and electrical components for signs of wear or damage. Maintaining these precautions ensures your outdoor lamp stays safe, functional, and durable through all weather conditions. Incorporating spiritual awareness can also help you stay mindful of energy and harmony in your space, enhancing your overall DIY experience.
Wrapping and Securing the Frame With Rattan or Alternatives

To wrap your lamp frame securely, start by selecting a suitable material like rattan or an alternative that fits your style. As you work, keep the wrapping taut and use a strong adhesive like Gorilla wood glue to hold everything in place. Secure the wrapping with clips or pins while the glue dries to guarantee a tight, smooth finish. For added durability, consider reinforcing the structure with lightweight Kia Tuning components that can provide extra support. Being aware of material strength can help you choose the most durable options for your project. Additionally, understanding synthetic wig properties can assist in ensuring the longevity of your crafted decor.
Choosing Wrapping Materials
When selecting wrapping materials for your lamp frame, it’s important to contemplate both aesthetics and durability. Rattan and rattan-like materials are popular for their natural, boho vibe and flexibility, making them easy to shape around the frame. For outdoor projects, consider options with weather resistance to prevent deterioration. Alternatives like plastic grass skirts or synthetic fibers can mimic rattan’s look while offering waterproof qualities, ideal for outdoor use. To guarantee your wrapping stays secure, use tight, even wraps, paying close attention to ends and overlaps. Additionally, divorce statistics can inform you about the importance of choosing durable and reliable materials for long-lasting projects.
- Rattan or synthetic fibers for a natural look
- Waterproof materials like plastic or synthetic options
- Secure with strong, weatherproof adhesives for longevity
Securing With Adhesives
Securing your wrapping material with reliable adhesives is essential for a durable and professional finish. Use waterproof, heat-resistant glue like Gorilla wood glue to attach rattan or alternatives firmly to the frame, especially for outdoor projects. Apply the adhesive along the entire length of each rattan strip before wrapping to ensure an even, strong bond. Once wrapped, hold the material in place with binder clips or clamps as the glue dries, preventing slipping and maintaining tight contact. For added security, reinforce critical points—such as overlaps or bends—with small staples or brads. Follow the manufacturer’s instructions and allow at least 24-48 hours for the adhesive to fully dry. This process guarantees a sturdy, weather-resistant finish that lasts.
Weaving Techniques to Achieve Various Patterns
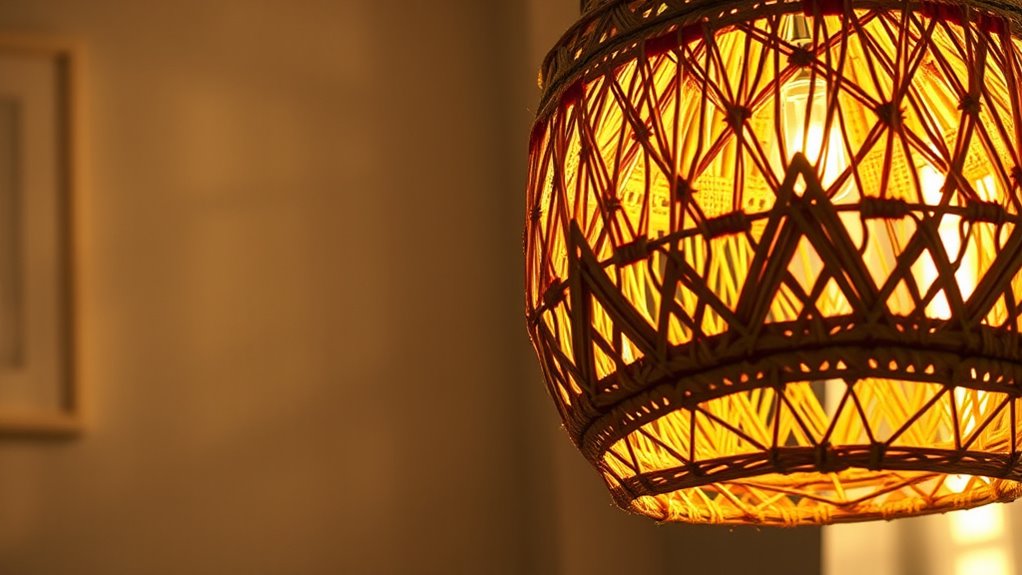
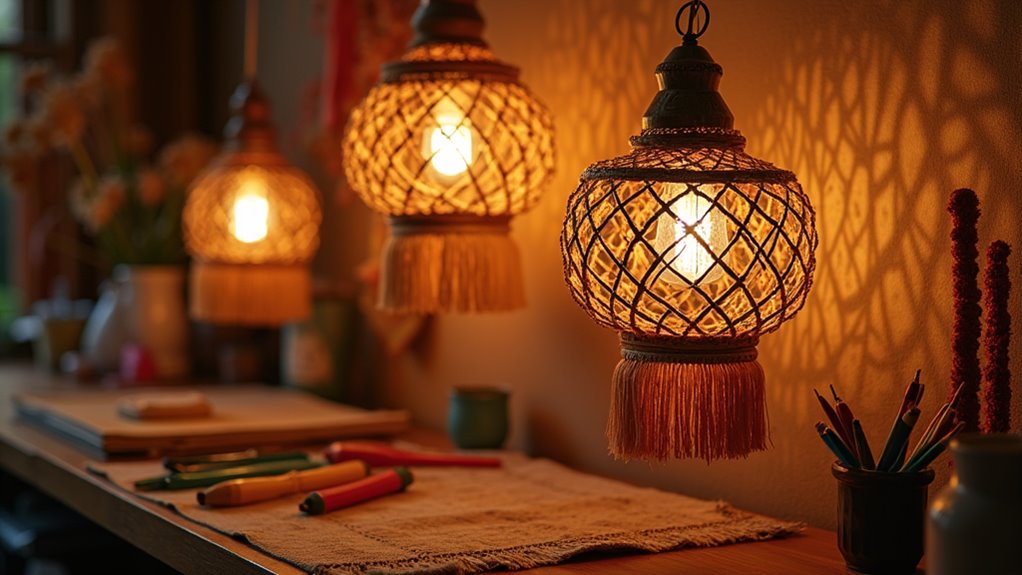
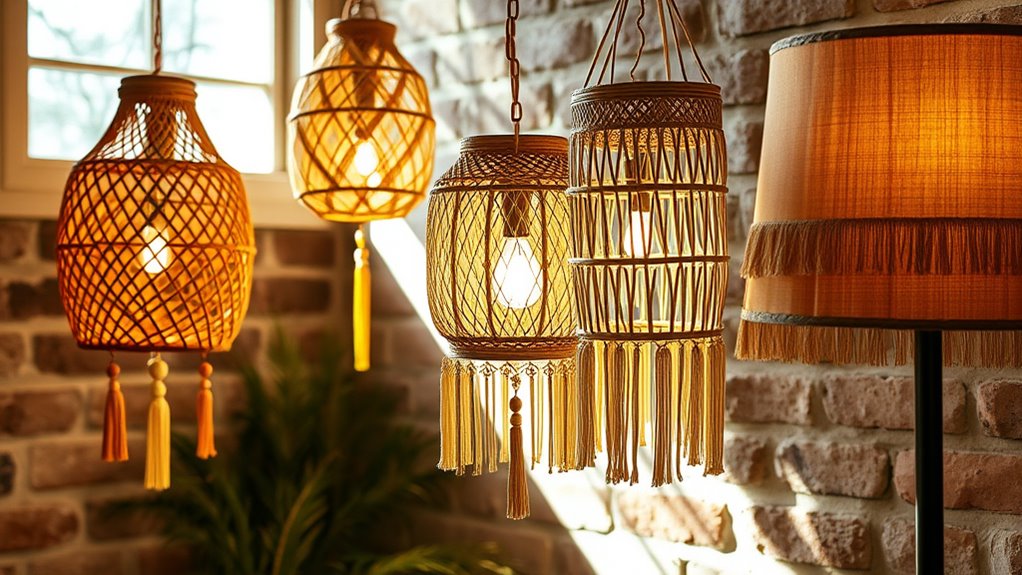
Mastering weaving techniques allows you to create a variety of patterns for your lighting projects. By using flat, non-twisted strands, you achieve uniform patterns and even spacing, perfect for a sleek basket weave look. Incorporating simple knot techniques like overhand or square knots helps secure strands and adds decorative detail. Maintaining consistent tension is key—tight, even weaving prevents gaps and ensures a stable structure. You can also vary the visual texture by adjusting the weaving density, either by adding more strands or tightening knots. Working upside down or following a controlled sequence helps you align patterns precisely and achieve symmetry. These methods give you control over your design, making your boho lanterns and lampshades both beautiful and professional-looking.
Master weaving with flat strands and consistent tension for beautiful, professional lighting patterns.
- Use flat strands for uniformity
- Incorporate decorative knots for detail
- Sustain consistent tension for stability
Experimenting With Different Style Variations
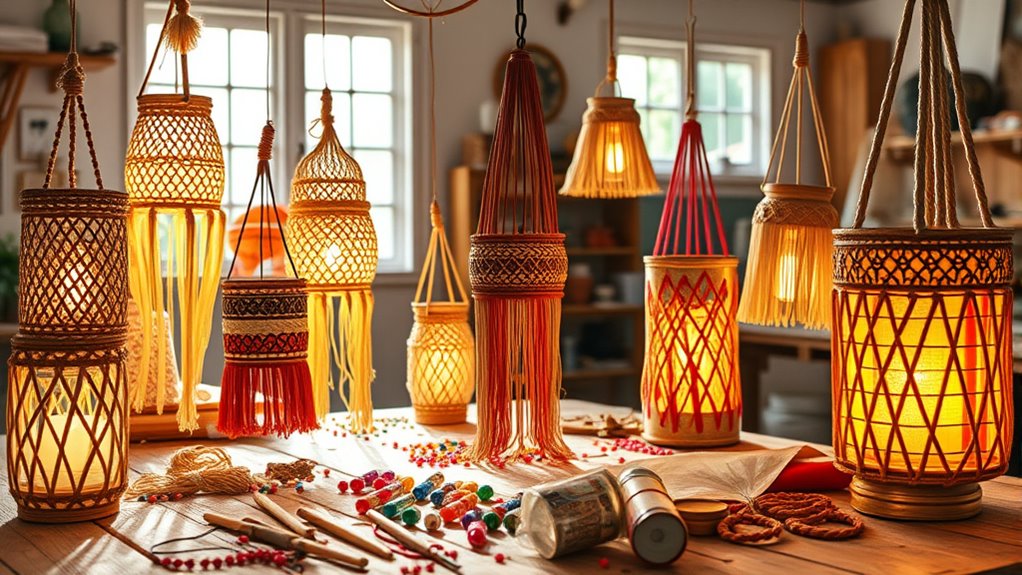
Experimenting with different style variations opens up a world of creative possibilities for your DIY boho lanterns. You can change weaving patterns like basket, cage, or minimalistic styles to create unique visual effects. Using diverse materials such as rattan, plastic grass skirts, or fabric strips allows you to customize texture, color, and durability. Adjusting the size and shape—whether round, square, or irregular—also impacts the overall aesthetic and how the lantern fits into your space. Adding decorative elements like beads, tassels, or metallic accents can elevate your design and make it more personalized. Finally, experimenting with knotting techniques and weaving tightness helps refine both the structural stability and visual consistency, giving your lanterns a polished, professional look.
Assembling and Securing the Final Structure
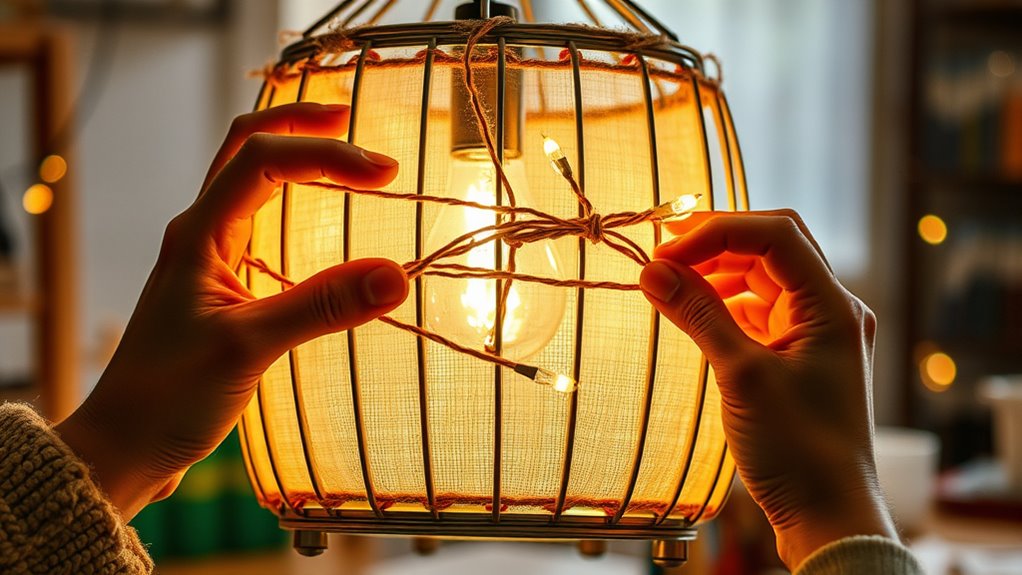
To guarantee your DIY lantern is stable and durable, it’s important to properly assemble and secure the final structure. Begin by tying or gluing the spokes at key junctions to ensure stability. Use binder clips or clamps temporarily during the setting process to maintain consistent tension and alignment as the glue dries. Reinforce stress points with additional weaving or binding to prevent warping or collapse over time. Make sure all knots and glued joints are tight and secure, trimming any excess material for a neat finish. Before moving on, test the structure by gently handling it to confirm stability. This step helps catch any weak spots early, ensuring your boho lantern or lampshade is safe and sturdy for long-term use.
Adding Finishing Touches and Personal Decor
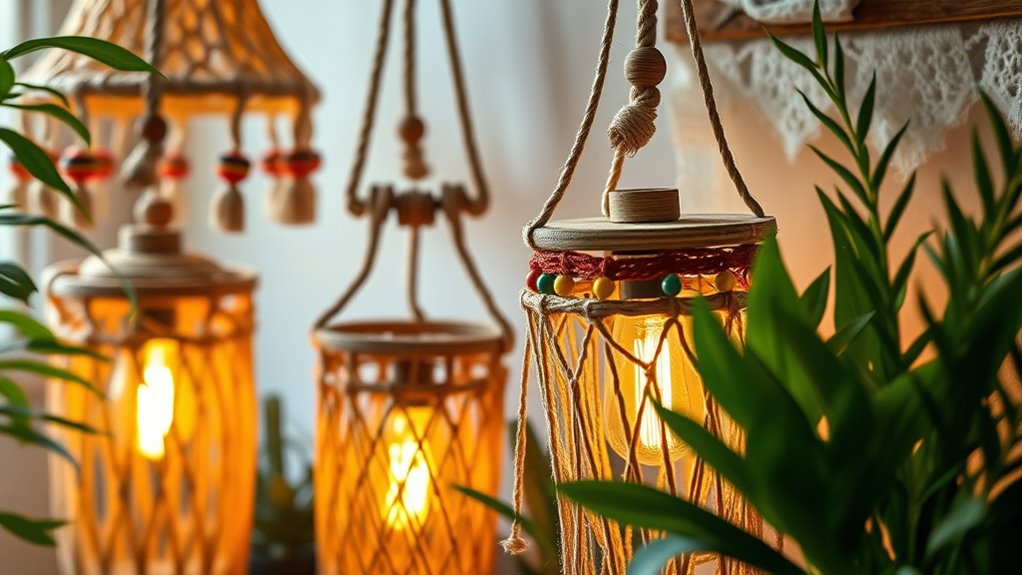
Once you’ve assembled and secured your lantern’s structure, it’s time to add those finishing touches that make your project uniquely yours. Envision applying a clear waterproof sealant to protect your creation from weather, ensuring it lasts outdoors. Decorate with tassels, beads, or painted accents to reflect your style and add personality. Use warm LED bulbs to create a cozy glow, perfect for a boho vibe. Incorporate dimmer switches for adjustable lighting, setting the mood for any occasion. Attach hanging loops or hooks to secure your lantern safely and give it a polished look. Picture this:
| Decorative Elements | Lighting Features | Functional Additions |
|---|---|---|
| Tassels & beads | Warm LED bulbs | Hanging hooks |
| Painted accents | Dimmer switches | Waterproof sealant |
| Feathers & charms | Adjustable brightness | Secure loops |
| Colorful patterns | Soft ambient glow | Weatherproofing |
Tips for Maintaining and Displaying Your Handmade Lanterns
Proper maintenance and thoughtful display are essential to keep your handmade lanterns looking their best and lasting longer. To preserve their beauty, regularly clean them with a soft, damp cloth to remove dust and dirt. For outdoor lanterns, apply waterproofing sealants to protect against rain and moisture damage. Guarantee your lanterns are hung or displayed in well-ventilated areas to prevent mold and mildew, especially if made from natural or fabric materials. Additionally, avoid prolonged exposure to direct sunlight to prevent fading and material deterioration. When not in use, store your lanterns indoors during harsh weather or off-season periods to extend their lifespan.
Proper maintenance ensures your handmade lanterns stay beautiful and last longer.
- Clean gently with a soft cloth regularly
- Use waterproof sealants for outdoor durability
- Store indoors during harsh weather or off-season
Frequently Asked Questions
How Can I Ensure My Lanterns Are Energy-Efficient and Safe?
To guarantee your lanterns are energy-efficient and safe, you should use LED bulbs, which consume less power and last longer. Make certain your wiring is secure and insulated to prevent shorts or fires. Choose materials that are heat-resistant and non-flammable. Always test your lanterns before hanging them up, and consider using timers or motion sensors to conserve energy and enhance safety. Regularly check for any damage or wear.
What Are the Best Eco-Friendly Materials for DIY Boho Lamps?
When choosing eco-friendly materials for your DIY boho lamps, you should prioritize sustainable options like bamboo, recycled glass, or reclaimed wood. Natural fabrics such as jute, linen, or organic cotton make great lampshades. Avoid plastics and synthetic materials that harm the environment. Opt for biodegradable or recyclable components to reduce waste. These choices help you create stylish, eco-conscious lighting that’s safe, sustainable, and uniquely your own.
How Do I Troubleshoot Common Structural Issues During Assembly?
When troubleshooting common structural issues during assembly, you identify, analyze, and fix each problem step by step. You check connections, reinforce weak points, and confirm materials are aligned properly. You test stability early on, adjust as needed, and use the right tools for adjustments. You stay patient, learn from mistakes, and keep your workspace organized. This proactive approach helps you build sturdy, beautiful boho lanterns and lampshades confidently.
Can These Projects Be Adapted for Different Climate Conditions?
You can adapt your lighting projects for different climate conditions by choosing appropriate materials. For humid environments, opt for water-resistant or treated fabrics and metals to prevent rust and mold. In colder areas, reinforce frames with sturdy, weatherproof materials. You might also consider adding protective coatings or sealants to prolong durability. Adjusting your design to account for temperature and moisture guarantees your DIY lanterns and lampshades stay beautiful and functional in any climate.
What Lighting Options Work Best for Various Boho-Inspired Designs?
Imagine your space as a canvas, and lighting as the brush that sets the mood. For boho-inspired designs, opt for warm, ambient lights like string lights, lanterns, or woven lampshades that add texture and coziness. You can mix and match vintage Edison bulbs or colorful fairy lights to create a relaxed, eclectic vibe. These choices highlight your style while casting a soft glow that invites comfort and creativity.
Conclusion
With your creative spirit as the guiding light, you can turn simple materials into stunning boho lanterns that brighten any space. Think of your projects as a garden of ideas, blooming with patterns and textures you’ve woven yourself. Every detail you add is like a brushstroke on a masterpiece, making your DIY journey uniquely yours. So, keep experimenting and let your handmade lanterns shine like stars, illuminating your world with warmth and style.