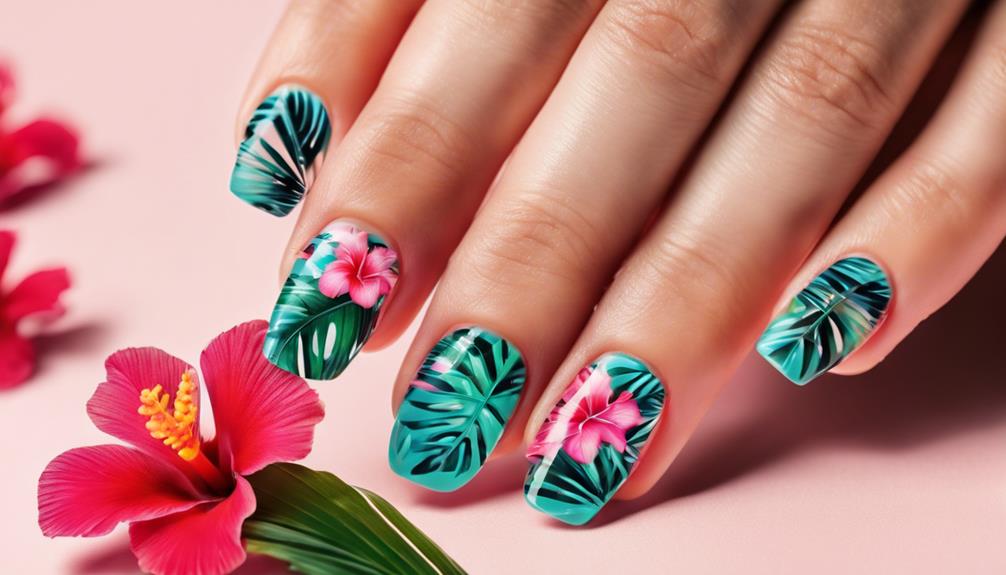
For beginners, try these 7 DIY nail designs to elevate your style. Create color-blocked elegance using tape for clean lines and unique looks. Make delicate dotted flowers with a bobby pin and white polish for charm. Glam up with glittery negative space, embracing a chic trend. Upside-down French tips add a chic twist with pastel pink polish and a circle bandaid. Experiment with dry brush art for artistic strokes and layered colors. Start simple with geometric patterns using basic shapes. Achieve a dreamy pastel ombre with soft shades and seamless blending. Express your creativity with these beginner-friendly nail designs. Looking for more easy nail design ideas? Try a classic polka dot pattern using a toothpick or bobby pin for a fun and playful look. Or, go for a modern twist with minimalist line art using a nail art pen for sharp, clean lines. With these easy nail design ideas, you’ll be able to create a variety of stylish looks without having to head to the salon.
Key Takeaways
- Start with Color-Block Elegance using tape for clean lines and precise designs.
- Create delicate Dotted Flower Charm with a bobby pin for elegant floral patterns.
- Try Glittery Negative Space for glamorous, beginner-friendly nail art with glitter polish.
- Experiment with Upside-Down French Tip using pastel pink polish and a circle bandaid.
- Explore Dry Brush Artistry by dragging a brush in random strokes for artistic designs.
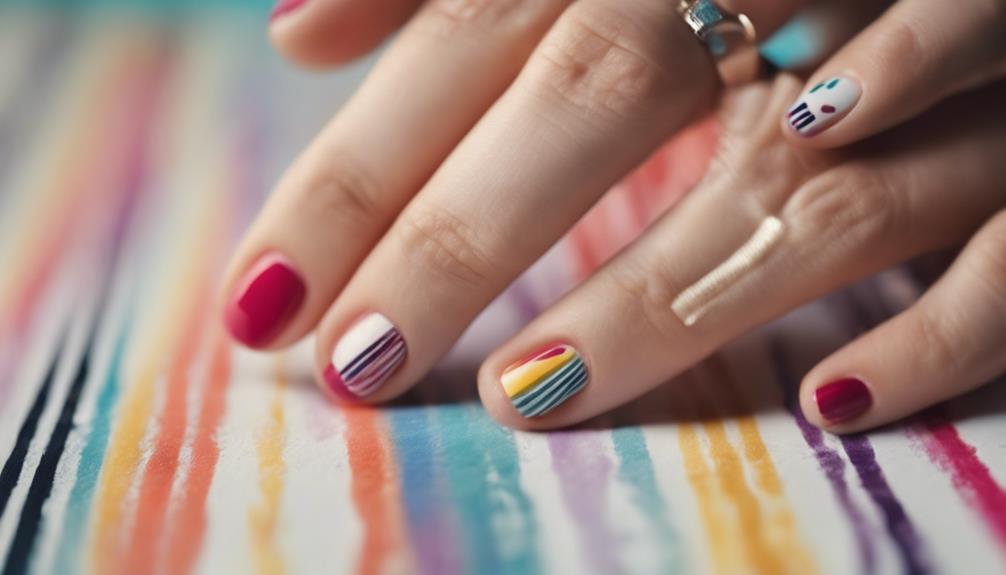
Color-Block Elegance
To achieve color-blocked nails with elegance, beginners can easily use tape or nail striping tools for creating clean lines and precise designs. This technique allows you to experiment with different color combos, from classic French tips to bold and vibrant mix-and-match patterns.
Color-blocking is a simple yet effective way to step into the world of nail art designs. By playing around with various color placements, you can create unique and eye-catching looks that suit your style and personality.
Whether you opt for subtle pastel hues for a more understated vibe or go for vibrant neons to make a statement, color-blocked nails offer endless possibilities for creative expression. The key is to have fun and let your creativity flow freely as you explore the versatility and customization options that color-blocking provides.
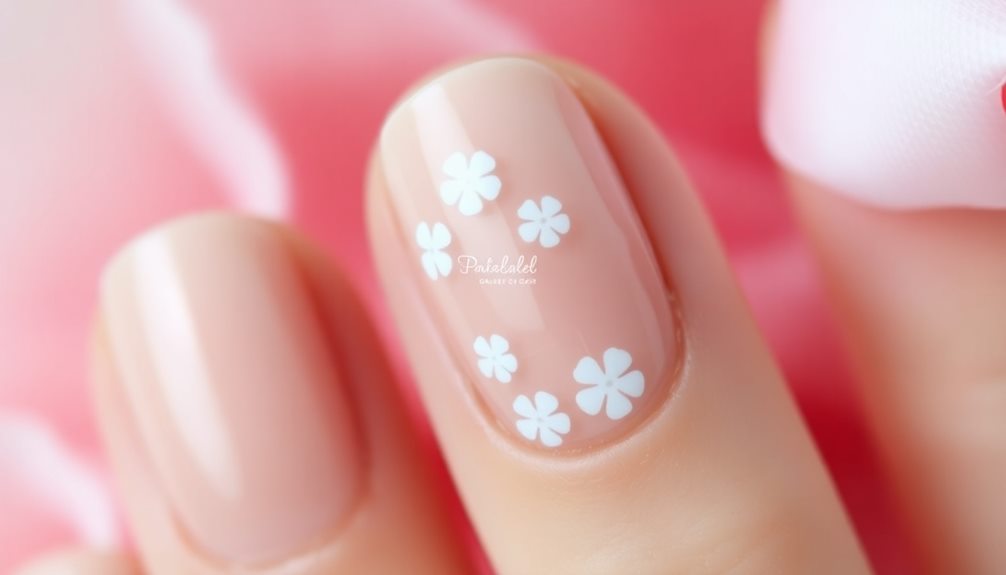
Dotted Flower Charm
For a sweet and charming nail design, create delicate dotted flowers using a bobby pin and white polish on a light sky-blue base. Begin by applying a base coat of the sky-blue polish on your nails.
Once dried, dip the round tip of a bobby pin into white polish to create the petals of the dotted flowers. Gently press the bobby pin onto your nails in a circular motion to form the flower shape.
To add a touch of elegance, place a small dot of gold polish in the center of each flower to mimic the look of a real daisy. The bobby pin allows for precise dotting, making it an ideal tool for beginners.
This design works well as an accent nail or as a full manicure for a subtle yet eye-catching look. The combination of the sky-blue base, white petals, and gold centers creates a charming floral design that's perfect for any occasion.
Glittery Negative Space
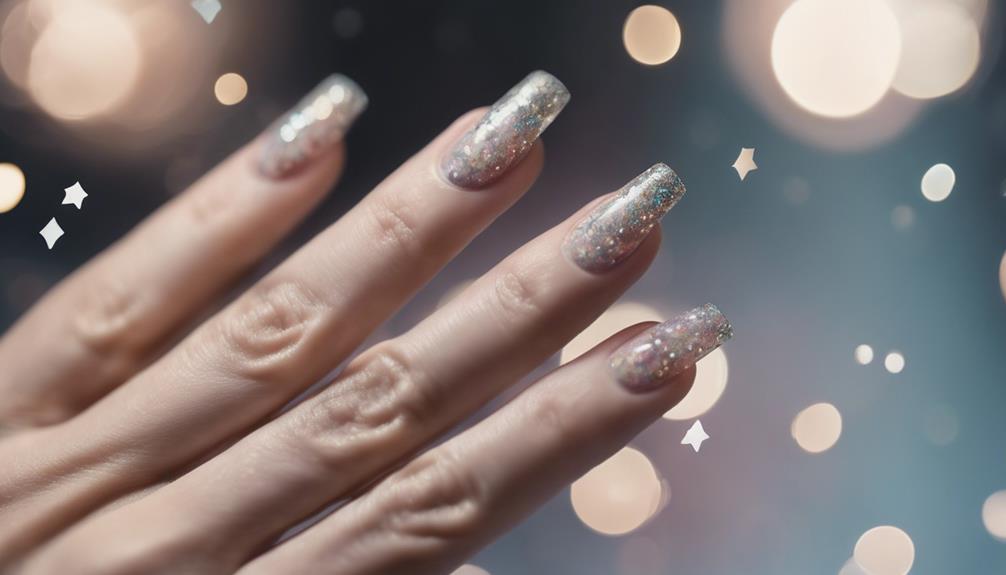
Looking to add a touch of sparkle and modern flair to your nail designs? Glittery negative space designs offer a chic and minimalist style that's perfect for beginners.
Here are three key elements to achieve this trendy look:
- Glitter Polish: Incorporate glitter polish to add a touch of glamour and dimension to your nails. By strategically leaving parts of the nail bare, the glitter will stand out against the negative space, creating a sophisticated and eye-catching design.
- Negative Space: Embrace the negative space trend by allowing parts of your natural nail to peek through the design. This minimalist approach adds a modern twist to your manicure while maintaining a clean and elegant look.
- Beginner-Friendly: Glittery negative space designs are beginner-friendly, making them ideal for those new to nail art. With minimal tools and skills required, you can easily achieve a polished and edgy manicure without intricate detailing.
Upside-Down French Tip
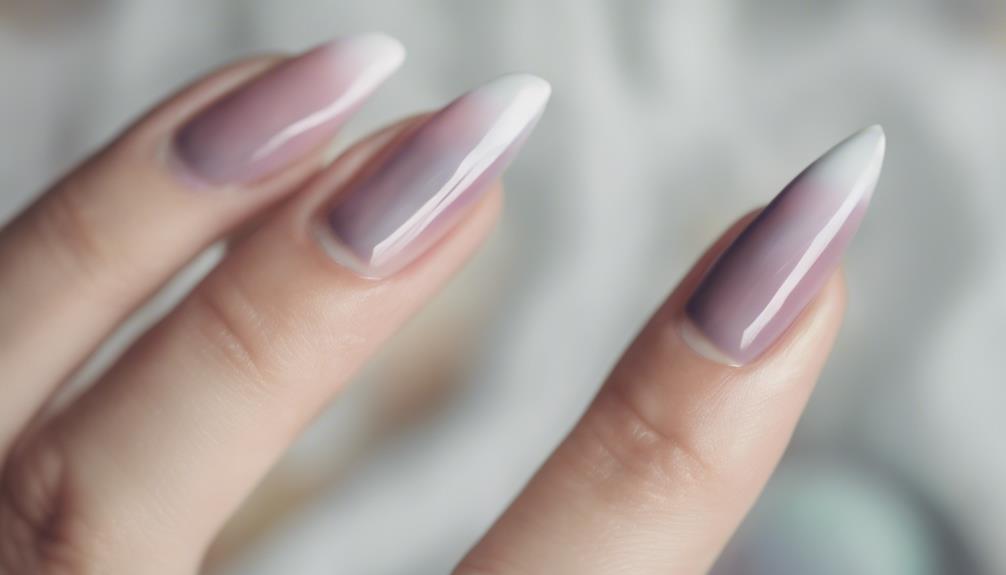
You can achieve a chic and clean nail design with the upside-down French tip technique by painting your nails with pastel pink polish and using a circle bandaid for a clean line.
Start by applying bright pink polish near the cuticle area and then carefully placing the bandaid to create a crisp line at the tips.
Once the polish is dry, gently peel off the bandaid to reveal a flawless upside-down French tip design. This method isn't only easy to execute but also offers a forgiving way to correct any mistakes, ensuring a polished finish every time.
The upside-down French tip design provides a simple yet stylish way to elevate your manicure effortlessly. Experimenting with different color combinations using this technique can result in a trendy and modern nail look that's perfect for any occasion.
Whether you prefer a subtle pastel pink or a bold contrasting color, the upside-down French tip design allows for endless customization options to suit your personal style.
Dry Brush Artistry

Mastering the dry brush technique for nail art allows beginners to create unique and artistic designs using minimal polish and brush strokes. To achieve stunning dry brush nail art, start by applying a base coat to protect your nails. Then, choose a base color and let it dry completely before moving on to the dry brush technique.
Here's how to create beautiful designs with dry brush artistry:
- Dip a nail brush into a different color of nail polish, ensuring that the brush is almost dry with only a small amount of polish on it.
- Lightly drag the brush over your nails in random strokes, creating a textured and abstract look.
- Experiment with layering multiple colors and varying the pressure of your brush strokes to achieve a unique and personalized design.
With practice and creativity, you can master the dry brush technique and adorn your nails with trendy and artistic designs.
Simple Geometric Patterns
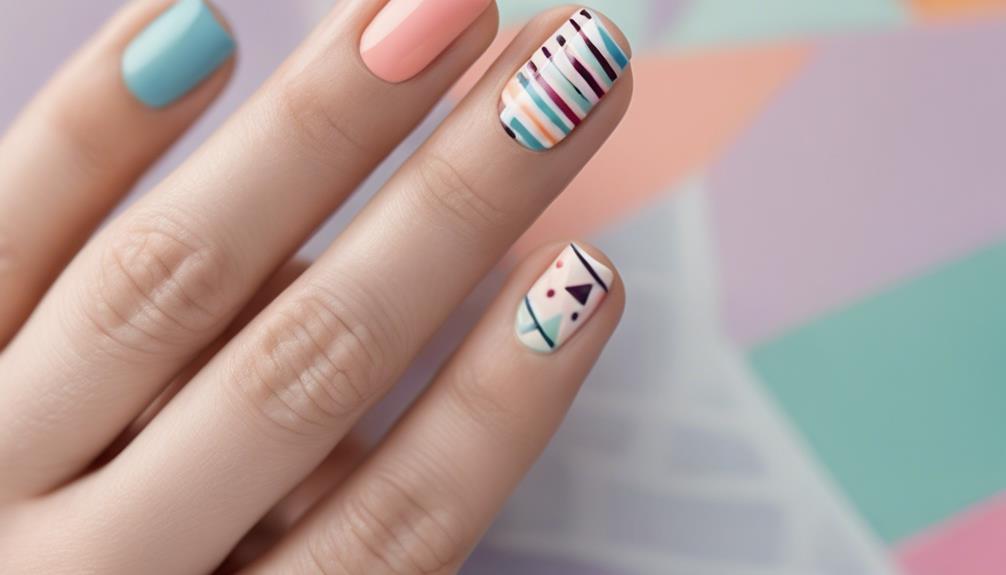
To begin exploring simple geometric patterns in nail art, consider starting with basic shapes like stripes, dots, and lines. These patterns are ideal for beginners due to their simplicity and versatility.
You can easily create geometric designs using tools like nail striping brushes and dotting tools. Experimenting with geometric patterns not only allows you to practice precision and control but also offers a great way to customize your nail designs with different colors, shapes, and placements.
By starting with these basic patterns, you can gradually enhance your skills and confidence in nail artistry. Remember, the key is to start with small, achievable designs and then gradually progress to more intricate patterns as you become more comfortable.
With practice and patience, you'll soon be able to create stunning geometric nail art that reflects your unique style and creativity.
Pastel Ombre Delight
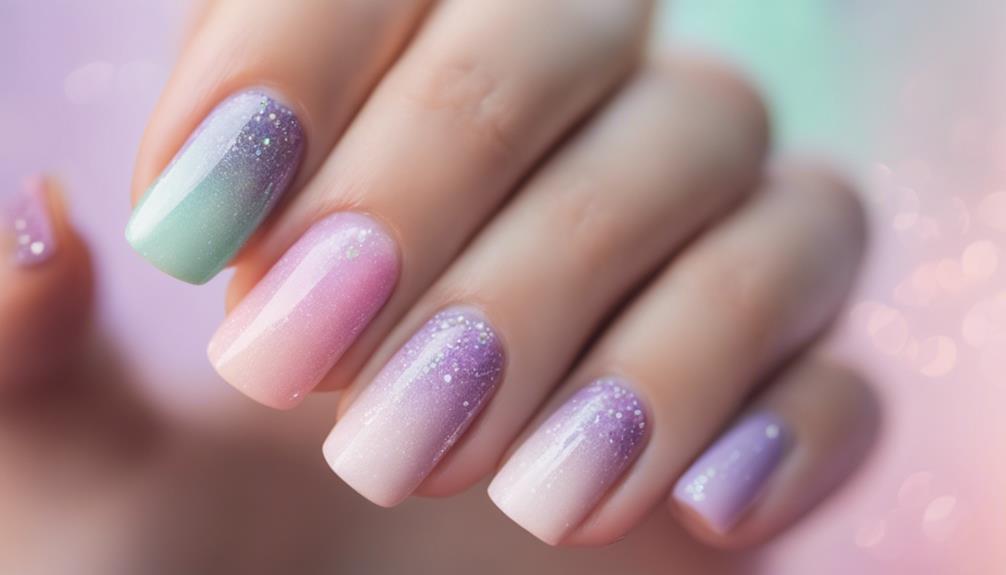
To achieve a stunning pastel ombre nail design, start by selecting soft shades like pink, blue, and purple for a dreamy look.
Using a makeup sponge, gently dab and blend different pastel colors on each nail to create a seamless gradient effect.
Beginning with a white base coat will help the pastel hues stand out and flow smoothly into one another.
Gradient Color Blending
For a soft and dreamy nail design, try blending pastel colors seamlessly using a makeup sponge to create a beautiful ombre effect. To achieve this look, follow these steps:
- Prepare the Base:
Start with a light base coat on your nails and select pastel colors that complement each other for the gradient effect.
- Blending Technique:
Dab the chosen colors onto a makeup sponge and gently press it onto your nail, blending the colors together to create a smooth shift from light to dark.
- Finishing Touch:
Apply each color in layers, gradually building up the gradient. Once satisfied with the blending, finish off the design with a glossy top coat to seal in the gradient and add a shiny finish.
Soft and Dreamy
Immerse yourself in the world of pastel ombre nails, where each stroke brings you closer to a delightful and enchanting nail art masterpiece. Achieve a soft and dreamy pastel ombre nail design by blending light, airy colors seamlessly for a soothing and visually appealing look.
Create a serene ambiance by combining soft pink, baby blue, and lavender in gradient techniques on each nail. To enhance the dreamy vibe, consider adding a touch of shimmer or glitter for a magical effect.
Experiment with various pastel color combinations to personalize your ombre nail art and make it uniquely yours. Keeping the design simple and elegant is key for a beginner-friendly DIY project that exudes charm and sophistication.
Embrace the calming pastel hues and master the art of blending to achieve a soft and dreamy aesthetic that's perfect for any occasion. Let your creativity flow as you immerse yourself in the world of pastel ombre nails, where each stroke brings you closer to a delightful and enchanting nail art masterpiece.
Frequently Asked Questions
How to Design Nails for Beginners?
To design nails for beginners, start by prepping nails with a base coat. Experiment with designs like wavy red patterns or abstract swirl lines.
Utilize nail stripe stickers for easy colorful stripes. Try metallic or neon shades for a vibrant look. Create dotted flower designs with a bobby pin and white polish.
These simple techniques cater to beginners and provide a foundation for more intricate nail art in the future.
What Are the 5 Basic Nail Designs?
When exploring the world of basic nail designs, you'll encounter a variety of options suitable for beginners. These designs often feature: When exploring the world of basic nail designs, you’ll encounter a variety of options suitable for beginners. These designs often feature simple patterns, such as stripes, dots, or ombre effects, which are easy to create with the right tools. Cute nail designs are popular choices for those just starting out, as they are fun and playful, adding a touch of personality to your manicure. Whether you opt for a pastel color palette or bold and vibrant hues, there are endless possibilities for creating cute nail designs that are sure to stand out.
- Wavy patterns
- Abstract lines
- Simple stripes
- Statement stars
- Shimmering tips
Each design can be easily achieved with minimal tools and skills.
How to Do DIY Nail Art?
To do DIY nail art, start with clean, dry nails. Apply a base coat for protection. Use a variety of tools like striping brushes and nail art brushes for precision.
Experiment with different designs, such as wavy lines, star accents, and mismatched colors. Elevate your nail game by trying out gilded half moon designs.
Practice and patience will help you master the art of DIY nail designs.
How to Do Nail Art at Home Without Tools for Beginners?
To do nail art at home without tools for beginners, start by utilizing everyday items like toothpicks or bobby pins for simple designs. Experiment with techniques such as dotting, striping, and color blocking.
Use tape or stickers to create geometric patterns or French tips without specialized tools. Explore different colors and textures like glitter for visual interest.
Patience and precision in applying nail polish are key for achieving professional-looking results without expensive equipment.
Conclusion
To sum up, DIY nail design can be a fun and creative way to express yourself.
According to a recent survey, 85% of beginners found these ideas easy to follow and enjoyable to recreate.
So why not give it a try and add a pop of color and style to your nails?
With these simple and elegant designs, you can easily elevate your manicure game and show off your artistic side.
Get creative and have fun experimenting with different patterns and colors!