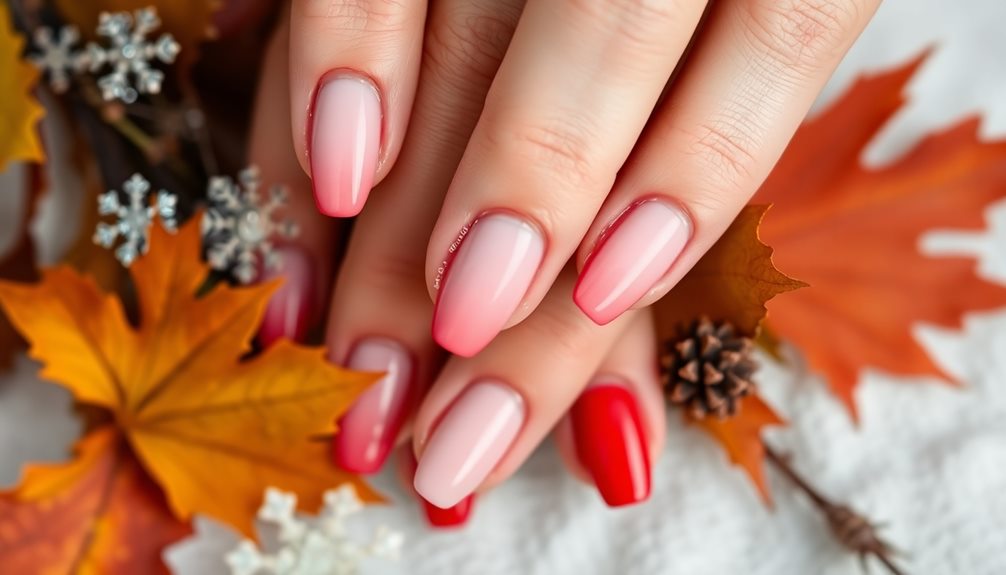
Red and white ombre nails are the perfect way to express your style for any occasion! This chic gradient starts with a deep red at the base, transitioning to a bright white at the tips. You can easily customize your look by adding glitter or nail art, like hearts for Valentine's Day or snowflakes for winter. To apply, use a quality base coat, then sponge on thin layers of red and white for a seamless blend. Finish with a glossy top coat for shine. Regular maintenance keeps your nails fresh, ensuring they look amazing for any event, and there's so much more to explore!
Key Takeaways
- Red and white ombre nails create a chic gradient perfect for any mood and occasion, from casual outings to elegant events.
- Seasonal adaptations allow for versatility, featuring deeper reds in winter and lighter shades with floral designs in spring.
- Adding nail art accents like hearts, stripes, or glitter can enhance the overall design and add a playful touch.
- Techniques such as sponging or airbrushing ensure a seamless blend, while quality base and top coats improve durability and shine.
- Regular maintenance, including touch-ups and nourishing oils, keeps the ombre nails looking fresh and vibrant.
Introduction

Ombre nails have taken the nail art world by storm, offering a stunning way to blend colors seamlessly. One popular choice is red and white ombre nails, which create a beautiful gradient that transitions from deep red at the base to pristine white at the tips.
This design looks striking and chic, making it perfect for any occasion, whether you're dressing up for an elegant event or keeping it casual. To achieve this gorgeous look, you can use sponging or airbrushing methods, both of which allow for a well-structured blend that enhances the overall design key skills.
You can also add glitter accents or nail art embellishments to elevate your red and white ombre nails, giving them a glamorous touch.
Seasonal Color Versatility
When it comes to nail art, embracing seasonal color versatility can really make your ombre nails stand out. Red and white ombre nails can be customized for every season, allowing you to express your style throughout the year.
For winter, you might opt for deeper reds and whites, perfect for holiday celebrations. Picture vibrant red tones contrasting beautifully against pure white tips, creating an eye-catching look. To enhance your creative expression, consider using designs that mirror seasonal themes, just like how Montessori toys promote creativity.
In spring, switch to lighter shades and incorporate floral designs to capture the season's freshness. As the weather warms up, playful summer designs can take center stage! You can play with bright red hues blended softly into white for a cheerful vibe.
As autumn approaches, turn to elegant autumn hues, giving your red ombre a cozy feel. Adding seasonal patterns, such as snowflakes in winter or leaves in fall, enhances the overall theme.
The versatility of red and white gradients means they pair well with any seasonal outfits, making them a favorite among nail art enthusiasts. So, get creative! Your ombre nails can easily transition from festive to fun, reflecting your mood and the changing seasons.
Popular Variations and Ideas
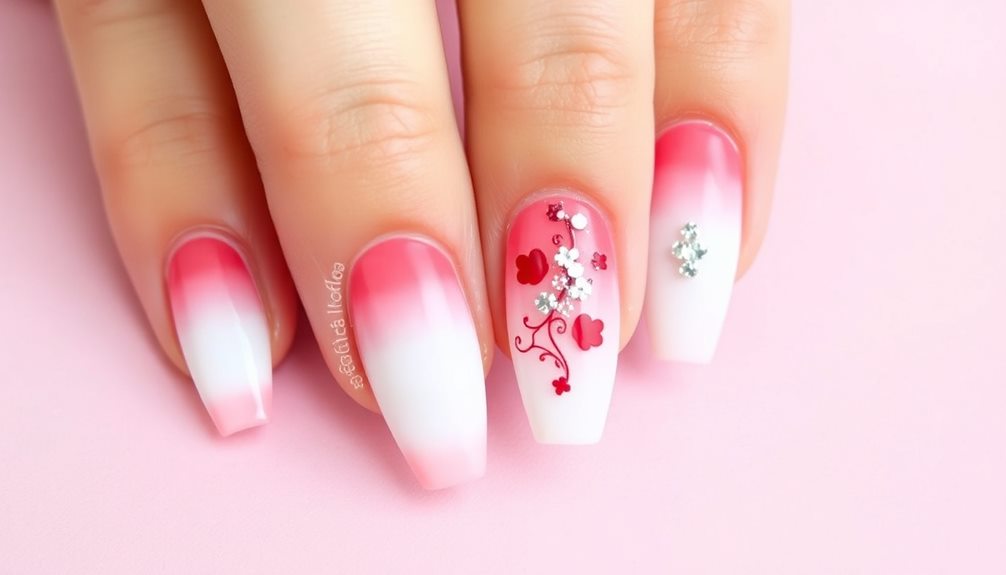
Get inspired by the many popular variations and ideas for red and white ombre nails that can elevate your nail game. The ombre technique offers a beautiful gradient effect that blends these two colors seamlessly.
You can choose from glossy, matte, or glitter finishes to customize your look for any occasion, making it a versatile choice for different nail shapes like popular nail shapes.
For a playful touch, consider adding nail art accents like hearts or stripes to enhance your design. This is especially fun for seasonal adaptations! For instance, red and white ombre nails with little hearts are perfect for Valentine's Day, while festive snowflakes can make your nails holiday-ready.
Don't forget about glitter accents! Adding a sprinkle of glitter can make your nails sparkle and shine, drawing attention and compliments. You can even mix and match different styles—try a glossy gradient with matte tips for a trendy twist.
Regular maintenance and touch-ups will keep your red and white ombre nails looking fresh and vibrant, especially at the tips.
With these variations and ideas, you're sure to find the perfect look that expresses your mood and style!
Tips and Tricks

Achieving a flawless red and white ombre effect can be easier than you think with the right techniques.
Start by prepping your nails with a quality base coat to protect against staining and create a smooth surface for your polish. Use thin layers of red polish at the base of your nails, then apply white polish above it.
To create the perfect gradient blend, grab a makeup sponge. Dab it gently on the two colors, starting with red and blending upward into white. This method helps you avoid clumping and ensures a seamless ombre effect.
Once your gradient is complete, don't forget to finish with a glossy topcoat! This not only adds shine but also protects your ombre nails, keeping them fresh and vibrant for longer.
To maintain nail health, make sure to regularly moisturize your cuticles and nails, especially after removing any polish. This keeps your nails looking their best and prevents chipping.
With these tips and tricks, you’ll be rocking chic red and white ombre nails in no time. Enjoy experimenting with different designs and let your style shine! If red and white ombre nails aren’t quite your style, don’t worry. You can always try something different, such as mocha brown ombre nails. The possibilities are endless when it comes to nail art, so have fun exploring different color combinations and techniques to find the perfect look for you. Let your creativity run wild and show off your unique personality through your manicure.
Care and Maintenance

Maintaining the beauty of your red and white ombre nails requires consistent care and attention. Start with a high-quality base coat to protect your natural nails from staining. This step not only enhances the longevity of your ombre design but also keeps your nails healthy.
After applying your ombre polish, don't forget a glossy top coat! It gives a shiny finish and is chip-resistant, helping to extend the life of your vibrant colors.
Regular touch-ups every two weeks are essential. This keeps your ombre gradient looking fresh and lively, as wear and tear can dull the colors over time. To maintain nail health, regularly moisturize your nails and cuticles with nourishing oils. This practice prevents chipping and keeps your nails looking fabulous.
When it's time to remove your ombre polish, choose acetone-free removers. They're gentler on your nails, minimizing damage during the removal process.
Following these simple nail care tips will help you enjoy your beautiful ombre nails for longer, ensuring they always look chic and stylish! Happy nail pampering!
Common Mistakes to Avoid

Creating stunning ombre nails can be a rewarding experience, but there are common mistakes that can undermine your efforts. First, always ensure your white base is completely dry before applying other colors. This step helps avoid smudging and ensures a smooth gradient effect.
Next, when it's time to blend two colors, remember that ombre nails are perfect when the colors transition seamlessly. Use a small amount of polish on your sponge for even color application. Too much polish can lead to blotchiness and unevenness.
Don't rush the blending process! Dab the sponge gently to achieve that beautiful gradient effect between the red shade and white. If you overwork the gradient with excessive dabbing, you'll end up with a muddied appearance instead of a clean ombre look.
Lastly, always opt for high-quality nail polishes. Cheaper options mightn't provide the desired opacity or blend well.
Frequently Asked Questions
Are Ombre Nails Still in Style in 2024?
Yes, ombre nails are definitely still in style in 2024! You'll find creative color combinations and unique textures that cater to your personal style, making them a chic choice for any occasion.
What Is the Difference Between Gradient and Ombre Nails?
Gradient nails blend multiple colors seamlessly, creating a smooth transition. In contrast, ombre nails feature two primary colors with distinct blocks. You'll notice the difference in application techniques and overall visual appeal in each style.
Are Ombre Nails Classy?
Absolutely, ombre nails are classy! Their seamless color transitions create a sophisticated look that suits both casual outings and formal events. You can easily customize them to reflect your personal style while maintaining elegance.
What Are the Best Colors for Ombre Nails?
When choosing colors for ombre nails, think about harmonious blends. Soft pinks, deep blues, or vibrant oranges work well. You can also experiment with pastels or bold contrasts to create stunning, eye-catching designs.
Conclusion
In conclusion, red and white ombre nails are a fun way to express yourself and match your mood! Whether you're feeling festive or just want some chic nails, these designs are perfect for any occasion. Remember to try different variations and take care of your nails for the best results. With a little practice, you'll avoid common mistakes and create stunning looks. So grab your polish and get creative—your next nail art adventure awaits!